4.2. Using the Installed Applications list (Left Panel)
4.2. Using the Installed Applications list (Left Panel)The left panel presents all installed programs that PickMeApp may discover on your computer.
Using the Filter
The filter is a convenient tool that enables you to quickly search for the application you want to capture. To activate the filter, simply type the name of the application, or part of its name, in the filter input line. Only alphanumeric and all punctuation characters can be typed.
To use the filter:
- Start PickMeApp
- Type some characters from the application name in the filter input line, or choose one of the predefined filtering options*.
- Check the desired applications, or choose the “Mark All” option.
- Click the “Capture” and transfer your application to the default profile.
- During the capture, you can skip/pause an application transfer, using buttons at the progress bar.
- Please wait until the progress bar turns gray, and the “Capturing process finished” message appears.
Note: During the capture, deployment or deletion of an application, the filter is disabled.
Predefined filter options
There are four pre-defined filter options:
- <captured> Shows only applications already captured in the selected profile.
- <not captured> Shows only applications not captured in the selected profile.
- <selected> Shows only previously marked applications.
- <clear> Cancels the previous filter, and causes the applications list to revert to the default state.
Some ways to use the filter options:
- <captured> To see applications captured in the current profile.
- <not captured> To select a new application to capture.
- <selected> To see a list of applications you chose to capture.
The Mark All button
This button selects all applications available for a capture under a chosen filter.
The Unmark All button
This button clears the selection of all applications under a chosen filter.
Capturing multiple applications
With PickMeApp, you can transfer several applications at once. For this purpose, it is necessary to find all the desired applications in the list, and check each of them in turn.
To capture multiple applications:
- Start PickMeApp.
- Using filters or manual selection, check each application to be captured.
- Click the Capture button, and transfer your applications to the default profile.
- During the capture, you can skip/pause an application transfer, using the buttons at the progress bar.
- The capture is complete when the progress bar turns gray, and the “Capturing process finished” message appears.
Using a destination profile
After an application is captured, all application data is stored in the PickMeApp personalized application package. The application package consists of a single file with a .tap extension that contains all the data necessary for application deployment. This file is saved in a “destination profile” selected by the user.
By default, all captured applications are saved in the profile “My captured applications,” located in the folder TAPPS within the PickMeApp folder.
To create a new destination profile, do the following:
- Start PickMeApp.
- Click on the “Create new profile” button.
- Enter a unique profile name
- Type in the name of a destination path or browse for a unique destination path.
- Click the “OK” button
A new profile will be created at the chosen destination.
Changing the destination profile
To activate a destination profile for capturing applications:
- Start PickMeApp.
- Choose one of the available profiles in the right panel, and click on the profile name.
- The chosen profile becomes the destination for applications captured.
Note: During the capture, deployment or deletion of an application, the filter is disabled.
Marking of installed applications
Installed applications on the list can be marked by a colored circle:
Yellow : the application is currently running
Green : the application is already captured in the current profile on the right panel
Blue : the application is already captured in one of non-active profiles on the right panel
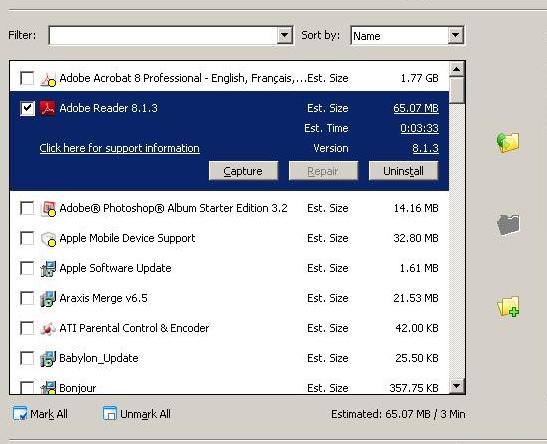
Expanded Application entry
To learn more about an application, click on its name in the application list.
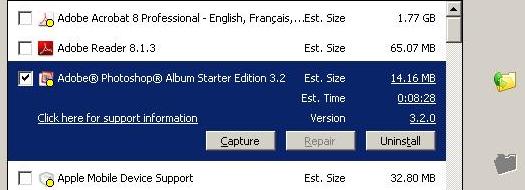
The Expanded Application entry includes:
- Est. Size : Estimated size of the application package when captured.
- Est. Time : Estimated time taken for the capture of the application.
- Version : Version of the application, as provided by the application vendor.
- Support Info : Provides a link to detailed information about the application.
- Capture button : Starts capturing the application immediately
- Repair button : Repairs the application. Active only if the repair feature is available.
- Uninstall button : Uninstalls the application from your system *
* Warning: Uninstalling an application via PickMeApp will not cause its capture.
Repairing an application
The expanded application entry contains the "Repair" button. When the button is pressed PickMeApp will run a repair tool for the application. The button activates only if the repair feature is available for the application.