@5 MANAGING INSTALLATION PACKAGES
@5 MANAGING INSTALLATION PACKAGESPickMeApp helps manage your installation packages. Alongside packages created by capturing installed applications, PickMeApp can discover, download, and install any existing Windows application in just a few clicks.
Among the advantages of using PickMeApp as an application manager are:
- It helps discover, download, and install silently any Windows application.
- It identifies how to install or to remove program silently, or without user intervention.
- It keeps track of new package releases automatically.
- It works completely offline with local repositories of custom software.
- It creates and manages your own personal collection of installation packages , in the cloud or locally, centralized or distributed.
- It has a built-in PickMeApp Collection of 120 popular silently installable programs.
PickMeApp supports, MSI, exe, tap, tad, and pad (XML) packages as well as package collections available in ZIP files.
- TAP Packages: They are Captured Application packages. All captured applications in PickMeApp are saved as TAP packages. TAP is proprietary to PickMeApp.
- MSI packages that are built using Windows Installer, a Windows component and application programming interface (API) used in installing, maintaining, and removing software.
- PickMeApp supports EXE file setups, which are self-extracting installation packages build by installers such as Inno Setup , NSIS, Wise, and others as well as by PickMeApp.
- PAD Packages: These are installation packages that come in the Portable Application Description (PAD) format. PAD format is a machine-readable document format designed by the Association of Shareware Professionals. It allows software authors to provide product descriptions and specifications to online sources in a standard way, using a simple XML schema that allows webmasters and program librarians to automate program listings. PAD files most commonly have a .XML or .PAD file name extension. The following global repository is used to publish PAD files http://repository.appvisor.com/
- TAD Packages: This PAD extension, which allows support for silent, unattended installations of Windows applications, is proprietary to PickMeApp.
5.1 Using the Installation Software Packages Panel (Right Panel)
5.1 Using the Installation Software Packages Panel (Right Panel)The Installation software packages panel lists your installation packages in so-called Profiles.
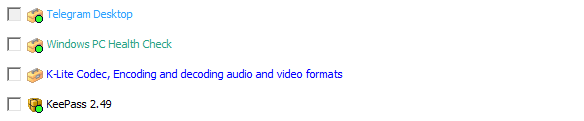
Package Font Color
PickMeApp uses different icons and font colors to distinguish different types of packages.
- Green font - MSI Package
- Turquoise - exe package
- Blue - pad and tad files
- Black – tap files
Filtering Installation Packages
You can instantly search for installation packages and captured applications by using the Filter located on the top of the Installation Packages panel. To use the Filter, simply type the name of the application, or part of its name on the box. The list of installation packages is then filtered to display only the installation packages that meet your search criteria for each PickMeApp Profile.
As an example, filtering the list by Microsoft displays all packages with the word Microsoft In the application or package name. You can see this in the screenshot below.
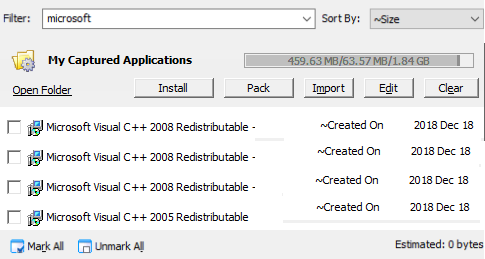
At this point, we can already click Mark All to select all the filtered application packages. However, if we only want to install a single application package, we can narrow down our search further. Let us illustrate this with an example.
Say we are looking for Microsoft Visual C++ 2010 redistributables only, we can filter the list of application packages by 2010. As seen in the screenshot below, this narrows down the list to two packages. We can then select whichever of these packages we want to install, pack, or import.

You can also click on the Filter box and select from the following pre-defined options:
- <installed> – Lists all the installation packages that have already been installed on the PC.
- <not installed> – Lists all the installation packages that are not yet installed on the PC.
- <selected> – Lists all installation packages that have been marked/selected.
- <clear> – Cancels the previous filter and lists all installation packages.
Going back to our sample filter where we look for Microsoft Visual C++ 2010 redistributables, we can reset the filter by selecting the <clear> predefined option from the Filter box.
The screenshot below shows the predefined filter options. 
Marking an Installation Package Prior to an Operation
After filtering the list of installation packages by name or according to the predefined options (see Filtering Installation Packages), manually mark the box to the left of a package to be installed, packed, or imported.
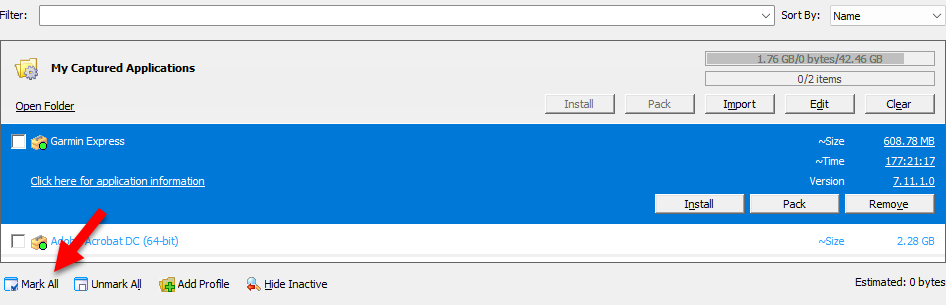
To select all the filtered installation packages, click the Mark All button at the bottom of the Installation Packages panel. You can then install, pack, and import all the marked application packages using the Install and Pack respectively, under the Expanded View of the PickMeApp profile.
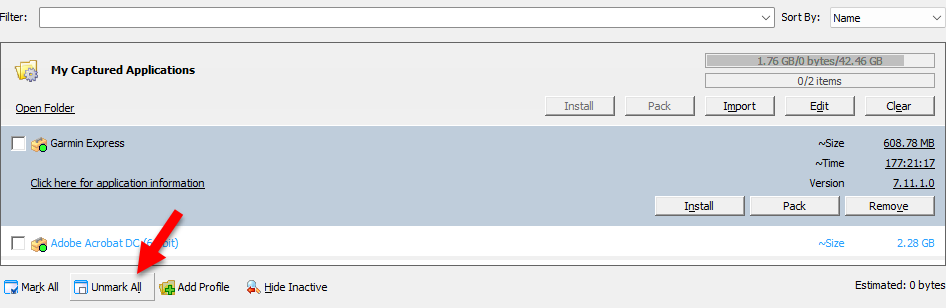
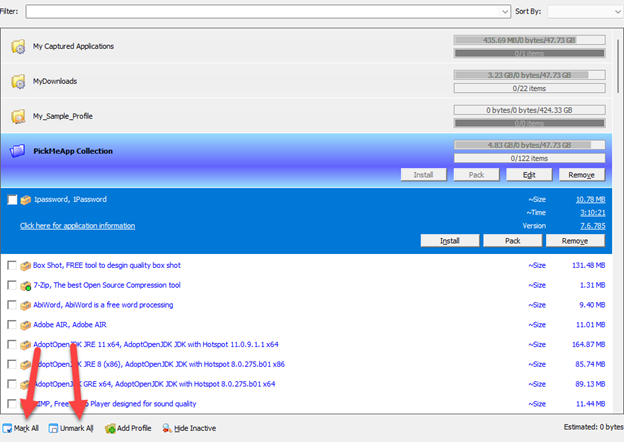
Unmarking Selected Installation Packages
After marking all installation packages (see Marking an Installation Package Prior to an Operation), you can click the Unmark All button to deselect the marked packages. You can also do this manually, by unmarking each box to the left of the marked installation packages.
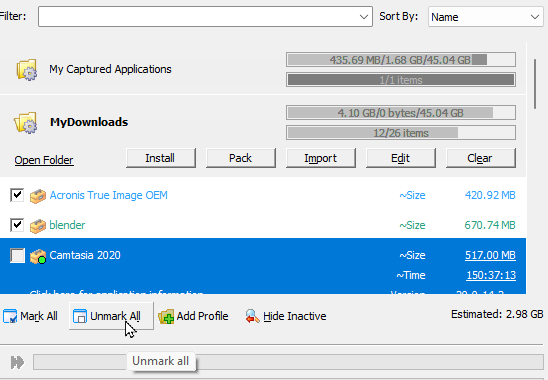
Sorting Installation Packages
To help you better organize your installation packages, you can sort the list by Name, Size, Age, Used On, Cache Size, and Version. 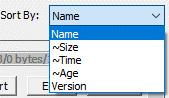
Selecting Installation Software Packages
You can select an installation package from the Installation Software Packages panel by checking the box before its name. You can select one or more packages using this method. In the same manner, uncheck the box to deselect the package.
To select all the installation packages found by a filter or listed under a profile (see Filtering Installation Packages), click the Mark All button at the bottom of the Installation Software Packages panel. In case you change your mind after selecting all packages, click the Unmark All button to deselect them again.
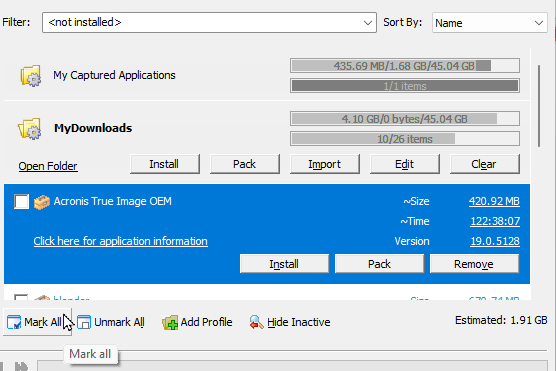
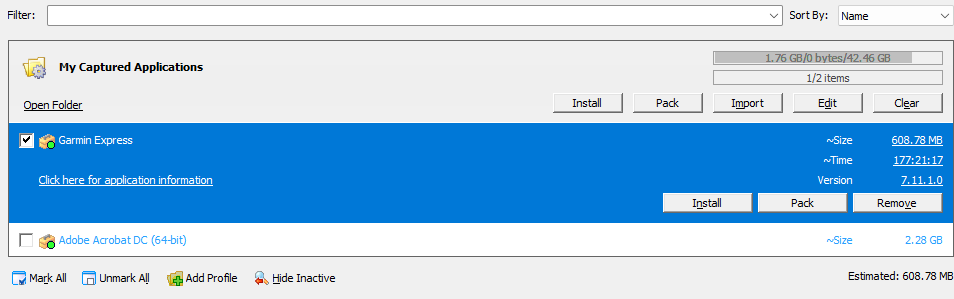
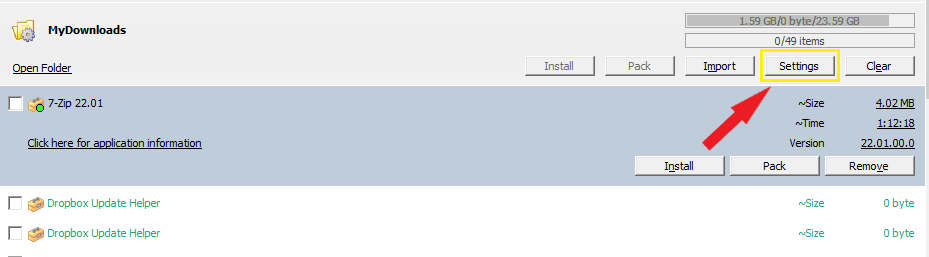
Expanded Package Entry View
To display the expanded installation package entry view, or the Expanded view, click a package under the Installation Software Packages panel.
Depending on the sort filter used (see Sorting Installation Packages), the Expanded view may show the following information:
- Estimated Size (~Size) – The actual size of the application when installed on the destination computer. This is normally the same as the size displayed in Windows when adding or removing programs in Control Panel.
- Estimated Time (~Time) –The estimated time for installing the package.
- Version – The version number of the installation package.
It also shows the following buttons:
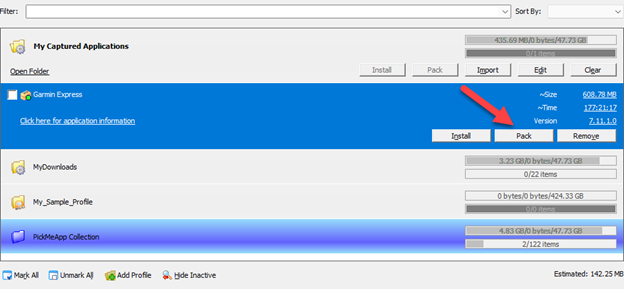
- Pack – Creates a standalone installation file for a captured application.
- Install – Installs the application. It is enabled only when the application is not installed on the PC or installation settings allow installing the same or an early version of the application on the PC.
- Remove – Deletes the captured application from the active profile
To view more details about an installation package, you can also click the Click here for support information link directly below each expanded application entry.
Deselecting Installation Packages
To deselect all packages found using the filter or under an active profile, click the Unmark All button located at the bottom of the Installation Packages panel.
5.2 PickMeApp Installation Packages Profiles
5.2 PickMeApp Installation Packages ProfilesTo better organize installation packages, PickMeApp has introduced Installation Package Profiles.
These profiles are designated locations where application installers (packages) are stored and are categorized based on their storage type: local, remote (cloud), or peer-to-peer. Depending on the storage location, PickMeApp profiles are divided into three main types:
- Local Profiles: These manage installation packages on local drives and are colored grey when active and red when inactive, typically in the portable version of PickMeApp.
- Web Profiles: Managed on a remote server, these profiles are colored blue when online and grey when offline. They are currently set to read-only, prohibiting the import or capture of installed applications within the profile.
- Peer-to-peer Profiles: Designed to enable users to seamlessly synchronize installation packages across multiple PCs, these profiles are colored blue when connected and grey when offline.
Build-In Installation Packages Profiles
PickMeApp includes several predefined profiles. By default, there are four (4) built-in profiles:
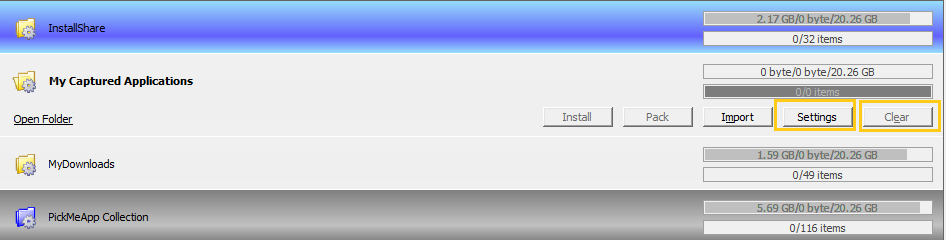
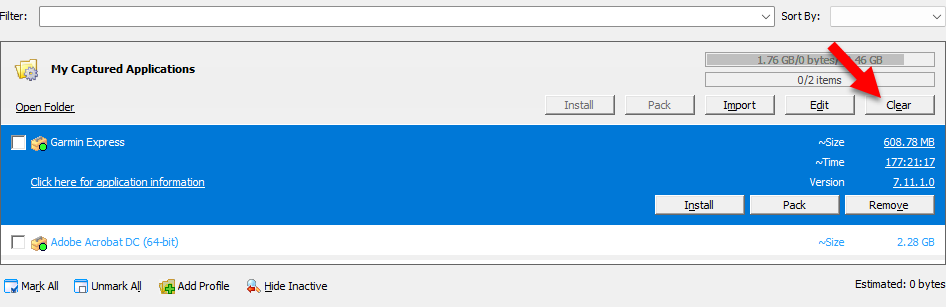
- My Captured Applications: This is the default local profile for captured applications and is always enabled. It saves captured applications to the TAPPS folder within the PickMeApp application directory. "My Captured Applications" is the active profile each time PickMeApp is started. Although you can rename this profile via the profile's "Settings" button, it will always be linked to the TAPPS folder. If the TAPPS folder is deleted, it will automatically be recreated. The contents of this profile can be cleared by pressing the "Clear" button, which deletes the installation packages located in the TAPPS folder.
- My Downloads: This local profile points to the Windows Downloads folder. You can rename it using the Profile Settings button, but it will continue to direct to the Windows
- Downloads folder. Clearing the contents of this profile, achieved by pressing the "Clear" button, results in the deletion of the installation packages found in the Downloads folder.
- PickMeApp Collection: This built-in Web Profile contains installation packages of popular applications.
- InstallShare: This is a built-in peer-to-peer profile that enables users to seamlessly synchronize their installation packages across multiple PCs.
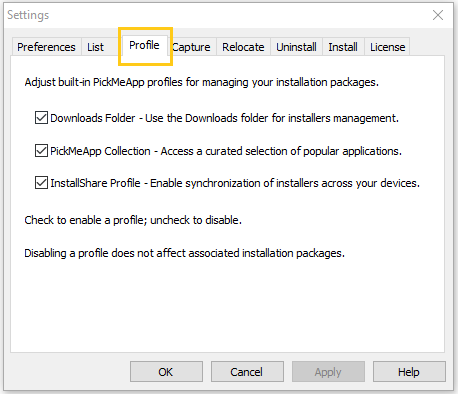
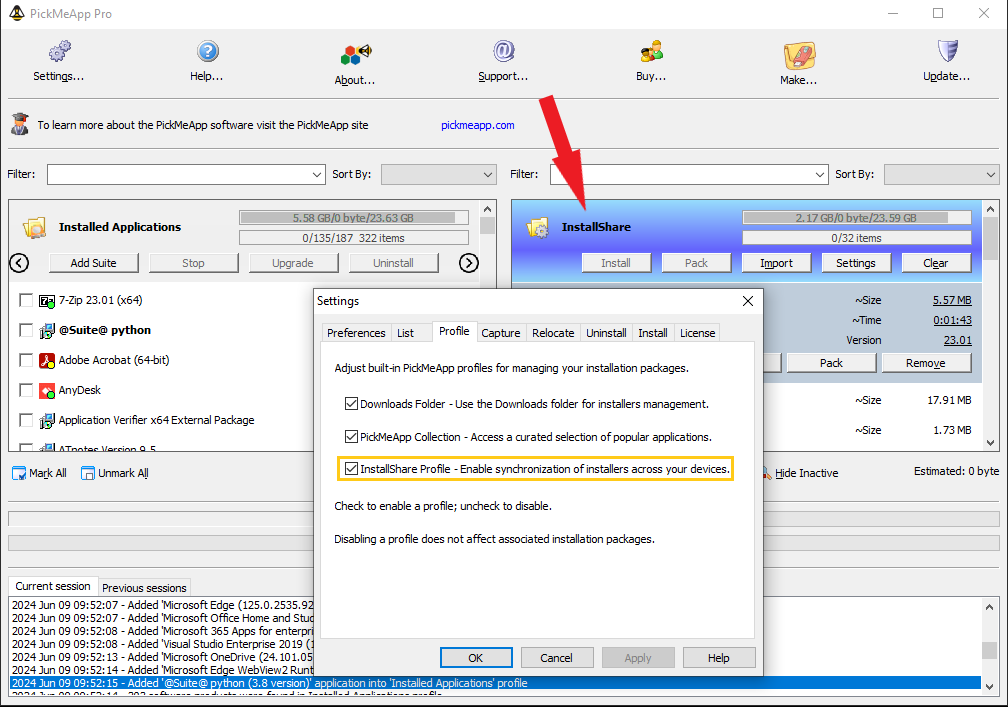
To manage your built-in profiles, navigate to the Settings dialog in PickMeApp. Once there, click on the ‘Profiles’ tab to view all available built-in profiles.
In this dialog, you can enable or disable built-in profiles with a few exceptions. Use the toggle switch next to the profile name to enable or disable it.
Creating a User-Defined Profile
To better organize your captured applications and other installation packages , you can create your own user-defined profiles. For example, you can create a Backup profile for packages you want to back up with their own customized settings.
To create a new local profile:
- Click the Add Profile button at the bottom of the Installation Packages panel.
- On the Add Profile window, enter the Profile Name and select the location where the applications under the profile will be saved. The location can be a folder under the PickMeApp installation directory, anywhere on your computer, on
- a removable drive, on the network or on the cloud.

- Click OK to add the new profile to the Captured Application panel.
Note: Upon adding the new profile, if there are already installation packages in the profile location, these will be added to the profile automatically.
Creating a Web Profile
Web Profiles point to a server somewhere on the Internet.
To create a remote web profile, you should indicate the location of the remote profile. For example, to create a web folder for installation packages from NirSoftTools, enter NirSoftTools as the Profile Name, then under Location, enter https://www.nirsoft.net/pad/pad-links.txt.
In this example, the text file named pad-links.txt contains the list of PAD files for installation packages in the profile. 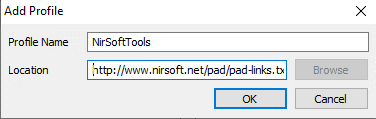
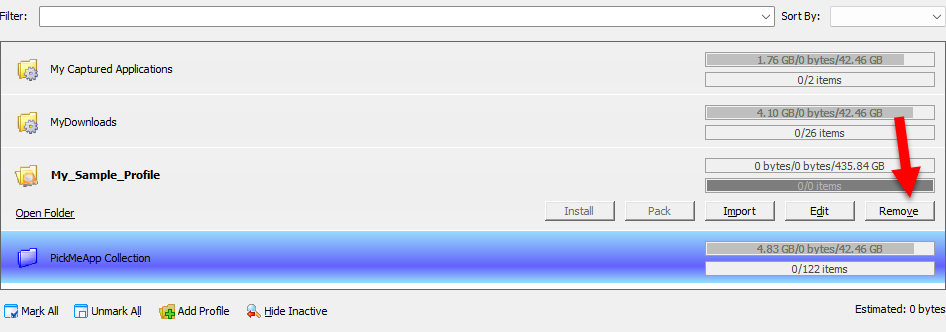
Editing a Profile Name
The names of the default My Captured Applications profile as well as user-defined profiles may be edited by clicking the Settings button under the profile’s Expanded view.
Removing a User-Defined Profile
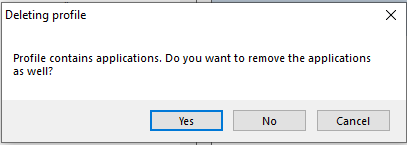
To remove a profile and all installation packages belonging to it, click the Remove button on the profile’s Expanded view.
If there are installation packages in the Profile, the following message will be displayed. To go ahead and remove the packages with the Profile, click Yes. Otherwise, click No, in which case the packages will be left behind in the local folder of the deleted profile.
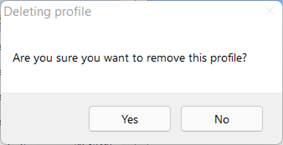
If there are no installation packages within the profile, you will be asked to confirm the Remove operation. Click Yes to go ahead and delete the Profile.
Note: Built-in profiles cannot be removed. However, you can disable them via the Profile Tab in the Settings Dialog
Clearing the Built-In Local Profiles
To remove installation packages or captured applications located in the built-in profiles like My Captured Applications and MyDownloads profiles, click the Clear button on the Profile Bar’s Expanded Entry View. When prompted, click Yes to continue, otherwise click No.
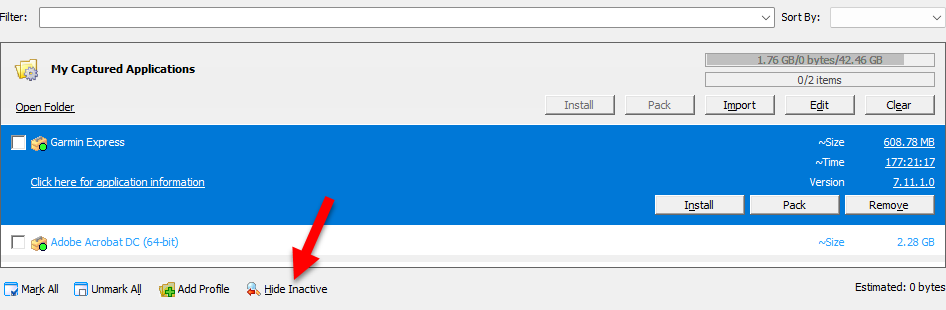
Hiding Inactive Profiles
If PickMeApp does not find the destination folder of a profile, it marks the profile with a red folder icon and shows it as inactive.
This happens when the path of the profile is located on a disconnected mobile drive, or on an inaccessible network storage.
To hide inactive profiles, click the Hide Inactive button at the bottom of the Installation Software Packages panel.
Selecting a Profile for an Application Prior to Capture
To capture an application into a profile, select the profile from the Installation Software Packages panel prior to running the Capture process. The profile’s destination folder is where PickMeApp will save the created .tap files or exe files (depending on the Capture settings) . In the screenshot below, the application that is undergoing capture is being saved to the My Captured Applications profile.
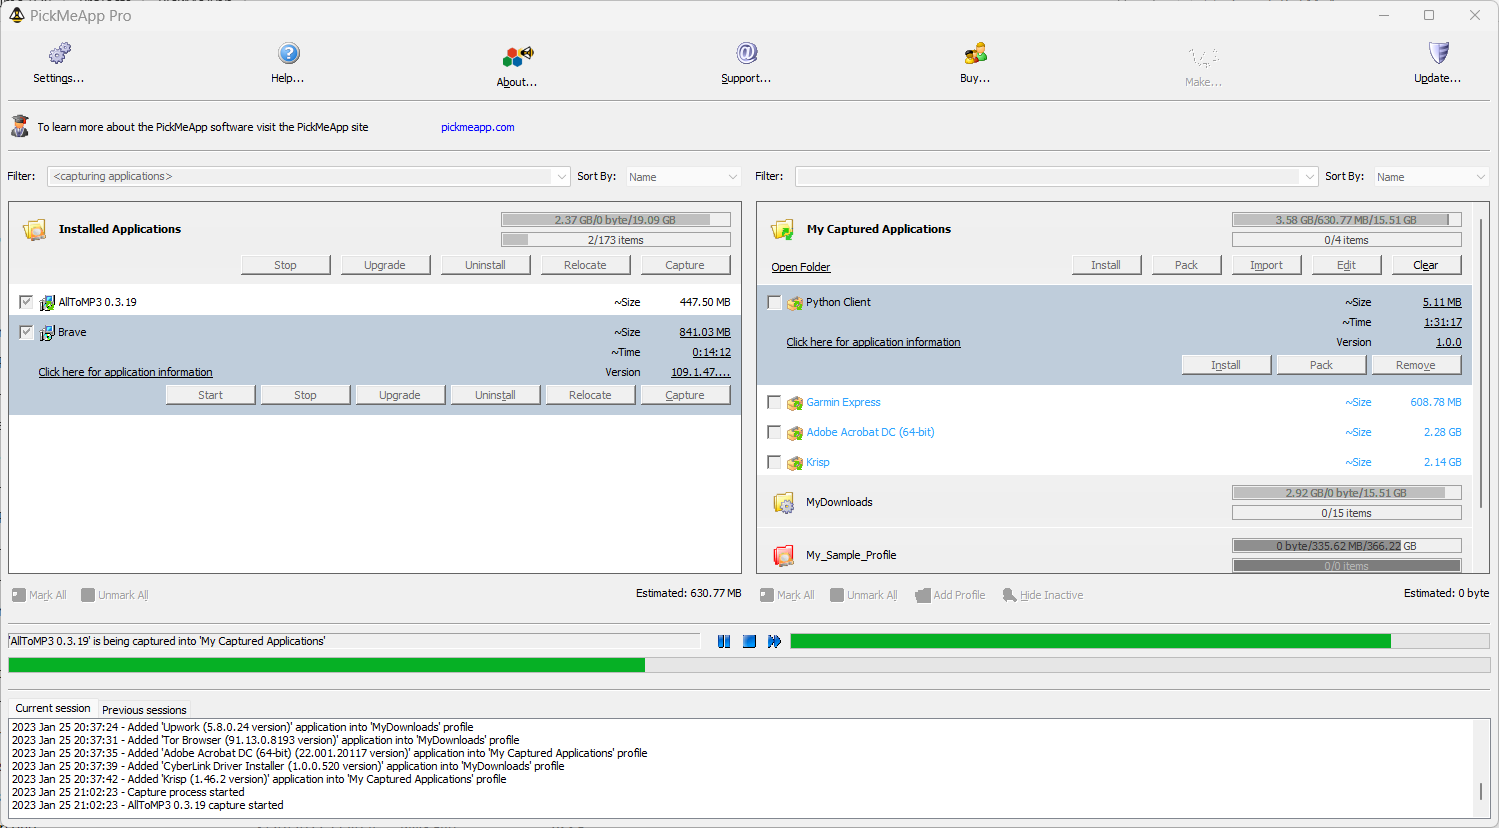
Note: You cannot capture an application to the same profile twice. If you want to capture an application again, either remove the captured application from the profile or choose another profile for the application.
Note: You cannot use Web Profiles to capture applications.
Importing Installation Packages into a PickMeApp Profile
To import an installation package into a PickMeApp Profile:
- Select the PickMeApp profile to which the installation package will be imported.
- Click Import.

- Select the installation package from your computer or the URL referencing the remote installation package. Make sure to select the appropriate installation format from the list so that you can see the installation packages located on your computer.
- Click Open to continue the import process.
- The Progress Bar shows the status of the application during importation into PickMeApp. The Log Window also displays the status of the current session.
- Once PickMeApp finishes with the Import process, the Progress Bar is refreshed or cleared and the Current session tab under the Log Window displays an Import process is finished entry. The installation package also appears in the list of applications under the designated PickMeApp folder.
5.3 Managing Installation Packages
5.3 Managing Installation PackagesThe following operations can be performed on installation packages:
- Installing an application. For more information on installing applications, see Installing Applications.
- Packaging one or more installation software into a single installation file. For more information, see Packing Installation Software.
- Remove an installation software package (from a Profile). For more information, see Removing Installation Packages.
- Importing an installation software package (to a Profile). For more information, see Importing Installation Packages into a PickMeApp Profile.
Both Install and Pack can be performed on multiple installation packages at once, while Remove from Profile can only be performed on one package at a time.
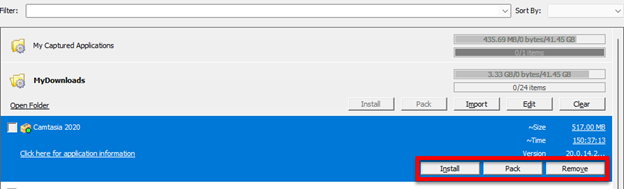
Managing an Installation Software Package
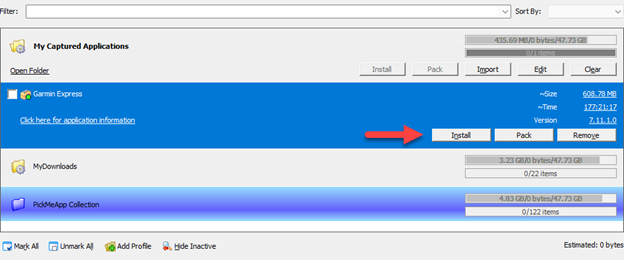
To manage a single installation package:
- Highlight the installation package you want to manage.
- Click the appropriate buttons, e.g., Installed, Pack, and Remove, on the Application Bar.
Managing Multiple Installation Packages at the Same Time
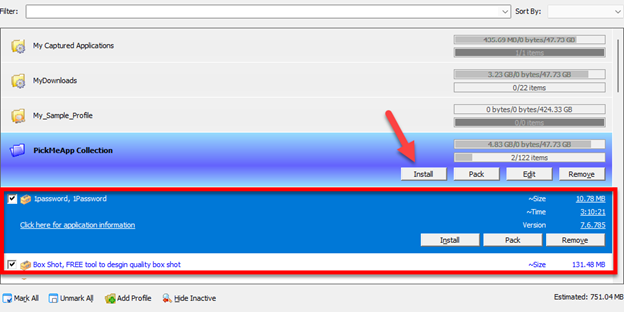
To manage several installation packages at once:
- Check the boxes to the left of the applications.
- Click the appropriate buttons, e.g., Install, Pack, and Import, on the Application Bar.

5.4 Installing Applications
5.4 Installing ApplicationsPickMeApp can keep track of all installation packages on your computer as well as remote application collections. As such, it can also be used as an application installer without going through the trouble of looking for the installation package on your computer or the web.
Install Settings
For more efficient management of your installations by PickMeApp, you need to configure your Install settings first.
- To configure your install settings:
- Click Settings on the Main Toolbar (see The PickMeApp User Interface).
- On the Settings window, click the Install tab.
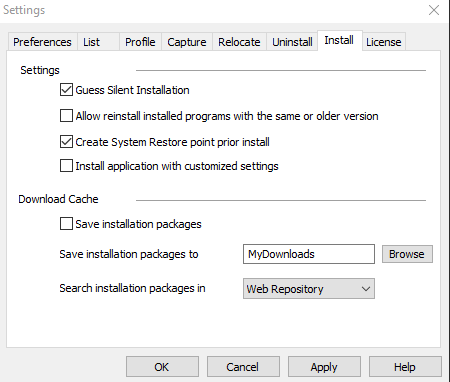
- By default, the following Install settings are enabled:
- Guess Silent Uninstallation
- Create System Restore point prior to install
- Make Downloads folder as PickMeApp Profile For more information, see Using Profiles.
- By default, the following capture settings are disabled:
- Allow reinstall installed programs with the same or older version
- Install application with customized settings
- Save installation packages
- To disable or enable a setting, click the checkbox to its left.
- By default, PickMeApp allows searching for installation packages in Web Repository. You can set this to Local Repository so PickMeApp will first look in the MyDownloads cache.
- Click Apply to save the configuration settings.
Pre-deployment Checklist
It is recommended to upgrade Windows Installer to version 4.5 and up when working with PickMeApp. Many programs require a runtime environment to be installed on the destination system. As of now, PickMeApp does not check if the required environment is installed. Therefore, it is recommended to download and install the following:
- Microsoft .NET Framework (3.5 (and up))
- Microsoft Visual C++ Redistributable Runtimes (see also VisualCppRedist AIO project)
- Microsoft Visual Basic 6.0 Common Controls
- Java Runtime Environment
You can use PickMeApp Applicaiton Collection to install these environments.
Note: Some installation packages may have other requirements aside from the above.
Installing an application
Before you can install an application, you should select the Profile where its installation package is located. If you do not know where the installation package is located, you can filter the list of installation software packages for the application. For more information, see Filtering Installed Applications.
To install a single installation package:
- Highlight the application you want to install on the Installation Software Packages panel.
- Click the Install button on the Installation Package Bar.
- Click Yes on the confirmation message to continue with the Install process.
- The Progress Bar shows how far you are into the Install process. The Session Log Window also displays the status of the current session.
- Once the Install process is completed, the Progress Bar is refreshed/cleared and the Current session tab under the Log Window displays an Installation process finished entry.
Installing Multiple Applications at the Same Time
It is possible to install several application packages at once only if these applications do not require user interaction during the installation process.
By default, PickMeApp tries to guess the non-interactive, unattended, and silent uninstallation sequence (see Install Settings). This allows installation of multiple applications.
While installing multiple applications, installation packages that do not allow unattended installations are identified and their install dialogs opened. Their installation is also skipped. Installation of these packages is left to the user to complete interactively.
To install multiple applications at the same time:
- On the Installation Software Packages panel, check the boxes to the left of the applications to be installed. Alternatively, you can filter the list and narrow it down to the applications you want to install (see Filtering Installation Packages).
- Click the Application Bar, then click Install, which is enabled only when you have marked/selected one or more applications listed under the active profile.
- Click Yes on the confirmation messages to continue with the installation processes.
- The Progress Bar shows how far you are into an application’s Install process. The Session Log Window also displays the status of the current session.
- Once all selected packages are installed, the Progress Bar is refreshed/cleared and the Current session tab under the Log Window displays several Install processes is finished entries corresponding to the selected number of installation packages.
Automatic Installation of Packages Within Profiles
PickMeApp Pro offers an "Automatically Install Packages" setting within each installation package profile, which can be toggled on or off according to your specific needs.
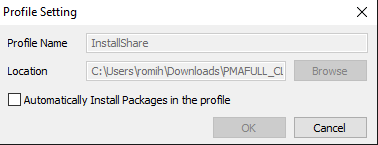
When this setting is enabled, the profile icon will display a special overlay, visually indicating its active status.

Upon activating this setting, PickMeApp continuously monitors the profile for new packages. When a new package is detected, the software:
- Checks if the application is already installed.
- Compares the installed version to determine if an update is needed.
- Verifies the "Allow reinstall installed programs with the same or older version" setting in the Install Tab of the Settings dialog.
The software will automatically install the package if it's new or updated and will reinstall it only if explicitly permitted by the install settings.
Activating the "Automatically Install Packages" setting in any profile triggers a review of all packages within that profile to ensure they are up-to-date. Additionally, restarting PickMeApp initiates a recheck of all packages in profiles where this setting is enabled.
Installations are scheduled during periods when PickMeApp is idle, putting the software in a busy state during the process. This setup allows you to pause, stop, or skip installations as needed, ensuring that ongoing installations do not interfere with your regular use of PickMeApp or your computer.
Note: If the automatic installation process is stopped, it will resume in about one minute, starting from where it was last paused. To completely halt the automatic installation process, make sure to toggle off the "Automatically Install Packages" setting for all profiles.
5.5 Removing Installation Packages
5.5 Removing Installation PackagesInstallation packages can be removed from local profiles but not from web profiles, with the behavior differing based on the profile. Thus, packages in the PickMeApp Collection profile cannot be deleted.
On the other hand, packages in local profiles such as My Downloads profile can be completely removed from your computer.
5.6 Packaging Installation Software
5.6 Packaging Installation SoftwarePickMeApp allows packing installation packages or a captured application into a standalone installation file that can be used on another PC without PickMeApp.
You can also pack several installation packages or captured applications into a single installation file. When you run this file on another computer, it will install all the applications included in the package.
You can use the Packaging feature to repackage expired self-extracted executable setups created by PickMeApp during capturing. The setup created by PickMeApp is limited by the lifespan of the original PickMeApp license. This repacking feature is also available in PickMeApp Light.
Note: TAP files do not required repackaging. They are permanently valid.
Packaging an Installation Package
To create a standalone repackaged installation file for an installation package or a captured application, click the Pack button from the Application bar.
Once done, you will see the installer file created on your destination folder. The installer is an .exe file that works just like your typical application installers in Windows. Double-click on the file to install the application on the target computer.
When packing a captured application, the Session Log window logs it as Packing %s application as self-extracting installation.
Packaging Multiple Applications into a Single Installation File
You can create a single installer file for multiple applications. To do this, select or mark the applications and click the Pack button from the Profile Bar.
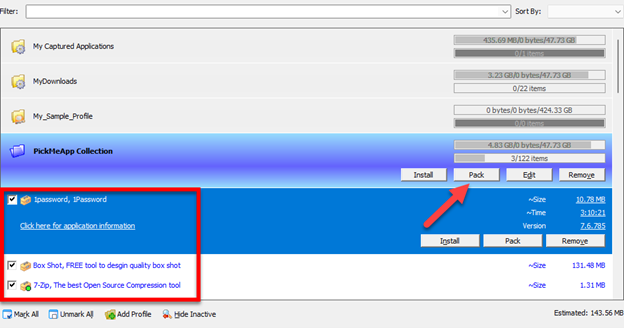
You can also click the Mark All button at the bottom to select all applications. If you change your mind, click the Unmark All button to deselect all marked applications prior to capture.
Once done, you will see an installation file with the same name as the active profile, created under the profile’s destination folder. Click on the file to install the bundled applications on the target computer.
Note: PickMeApp does not need to be present on the destination PC when installing a packaged application.
5.7 PickMeApp Collection
5.7 PickMeApp CollectionTo ease the process of using PickMeApp as your go-to Application Manager, the PickMeApp distribution includes the PickMeApp Collection Web Profile of 120 popular one-click installable programs.
- All included programs are the latest releases linked directly to their original publisher sites.
- PickMeApp can install these applications all at once.
- All installation work is done in the background.
- Applications are downloaded directly from each publisher's official site.
- The applications are installed in their default locations.
- They will not bother you with any choices or options.
- They will be installed without extra junk such as toolbars, among others.
- They will skip any reboot requests from installers, although you might need to restart your PC manually at the end of the installation process.
Each day we review, evaluate, and add programs to our PickMeApp Collection. The built-in PickMeApp Collection Web Profile enjoys automatic updates coming from our growing PickMeApp Collection.
5.8 InstallShare: The Special Built-In Peer-to-Peer Profile
5.8 InstallShare: The Special Built-In Peer-to-Peer ProfilePeer-to-Peer Profile
The Peer-to-Peer Profile is a powerful feature in PickMeApp Pro that enables seamless synchronization of installation packages across multiple PCs. This profile leverages the open-source Syncthing framework, a robust technology that ensures secure and efficient data synchronization without relying on centralized servers, thereby enhancing your control and privacy. For more details on Syncthing and its capabilities, click here.
To activate the Peer-to-Peer Profile, ensure your email and password for PickMeApp.com are correctly configured in the License Tab of the Settings Dialog, and verify that the peer-to-peer option is enabled for the profile.
Once enabled, the Peer-to-Peer Profile synchronizes and shares its content across all profiles with the same name within the PickMeApp Cluster. This cluster is defined as a group of at least two instances of PickMeApp running on different PCs, each with the same PickMeApp ID and a valid connection, where credentials are correctly authenticated with the PickMeApp.com backend.
Like other profiles, the Peer-to-Peer Profile supports various operations on the installation packages within it, including capturing applications, importing packages, and performing packing, repacking, and cleaning tasks.
However, the distinguishing feature of the Peer-to-Peer Profile is its advanced synchronization capabilities. When actions such as capturing, importing, or repacking result in a new or updated installation package within a peer-to-peer profile in the PickMeApp Cluster, that package automatically propagates to all peer-to-peer profiles with the same name across the cluster. Similarly, deleting a package from a peer-to-peer profile on one PC will cause it to be removed from all peer-to-peer profiles with the same name throughout the cluster.
By utilizing the Peer-to-Peer Profile, users can ensure that their software installation packages are available across multiple devices, enhancing productivity and reducing the complexities typically associated with managing multiple installations.
InstallShare as Peer-to-Peer Profile
Currently, PickMeApp Pro features a built-in peer-to-peer profile named InstallShare, which is enabled by default. You can manage the InstallShare profile through the Profile tab in the Settings Dialog.
Note: Ensure that the correct email and password are configured in the License Tab of the Settings Dialog before enabling InstallShare.
Once InstallShare is correctly enabled and credentials are verified, the contents of the InstallShare profiles are synchronized across all active instances of PickMeApp that share the same PickMeApp ID.
InstallShare Profile Usage
InstallShare profile allows you to effortlessly propagate applications captured on a source PC to a destination PC.
How to Propagate Captured Applications Between Source and Destination PCs Using InstallShare
- Install PickMeApp Pro on both the source and destination PCs.
- Set the same PickMeApp.com email and password on both PCs via the License Dialogs.
- Enable the InstallShare profile on both instances of PickMeApp.
- Select the InstallShare profile as the active profile on the source PC
- Capture the application within the InstallShare profile on the source PC.
- Confirm captured application appears in the InstallShare Profile on the destination PC.
Note: There is no need to manually set the PickMeApp ID in the License tab of the Settings dialog. Once the email and password are correctly entered, PickMeApp will automatically retrieve the correct PickMeApp ID from the backend.
InstallShare Profile with "Automatically Install Packages" Setting Enabled
When the "Automatically Install Packages" setting is enabled for the InstallShare profile, it not only synchronizes packages between PCs but also triggers the installation of captured applications on the destination PC. This ensures that any applications propagated through InstallShare are ready for use on the destination system without further user intervention, streamlining the process and enhancing productivity across devices.
Viewing Connected Instances in Your PickMeApp Cluster
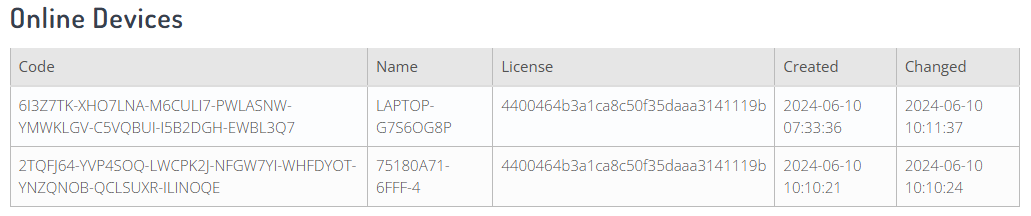
To view all currently connected PickMeApp instances within your PickMeApp Cluster, simply log in to your account on the PickMeApp.com website. Upon logging in, you will have access to the "Online Devices" section, which displays a table of all active instances. This table includes detailed information for each device, such as:
- Code: A unique identifier for each instance.
- Name: The name of the computer on which the PickMeApp instance is running.
- License: The PickMeApp ID associated with each instance.
- Created: The date when each instance was initially registered.
- Changed: The most recent time the instance info was refreshed.
This functionality allows you to easily monitor and manage all instances of PickMeApp running within your cluster, ensuring efficient synchronization and coordination across multiple PCs.