The Installed Applications panel lists your installed applications.
Managing Installed Applications
PickMeApp can perform the following management operations on installed applications:
- Retrieve detailed information about applications installed on the computer.
- Search and Filter installed applications by name, size, and installation date, and other filter options.
- Run an installed application.
- Terminate a running application or stop some application’s executable.
- Upgrade, uninstall, and repair installed applications.
- Relocate installed applications to another drive.
- Capture an installed application as backup or in preparation for transfer to another PC.
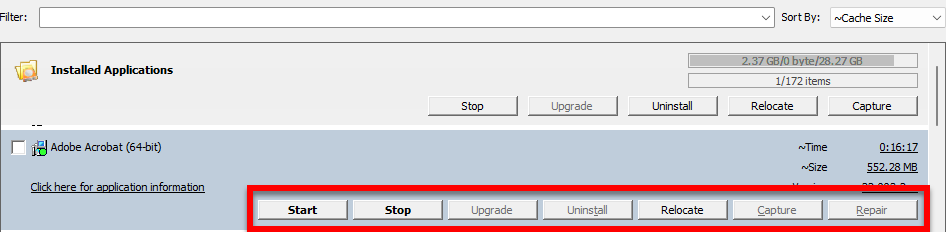
Managing a Single Installed Application
To manage a single installed application:
- Highlight the application you want to manage.
- Click the appropriate buttons, e.g., Start, Stop, Upgrade, Uninstall, Relocate, Capture, and Repair on the Installed Application Bar.
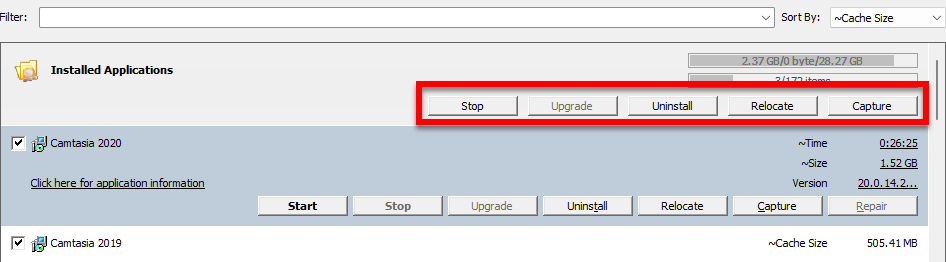
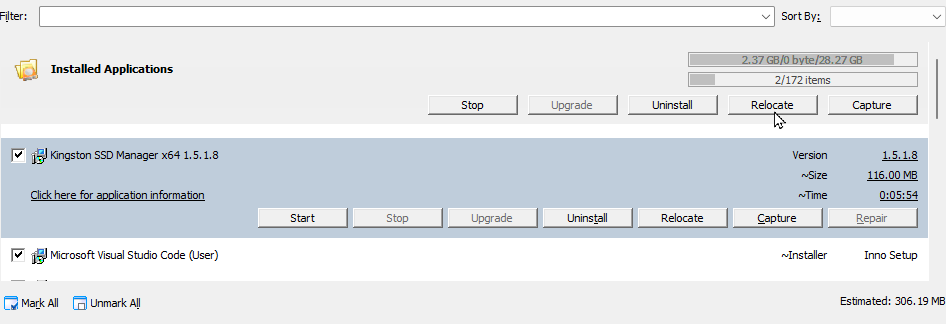
Managing Several Applications at Once
To manage several installed applications at once:
- Check the boxes to the left of the applications.
- Click the appropriate buttons, e.g., Stop, Upgrade, Uninstall, Relocate, and Capture, on the Installed Application Profile Bar.
To perform supported management operations on installed applications, you should first select applications by:
- Highlighting either a single application or selecting multiple applications from the list.
- Marking/unmarking all applications appearing in Search View.
Note: If a management operation is not supported for a selected installed application, it will be disabled.
Installed applications on the list are denoted with the following icons:
- Yellow circle: the application is currently running.
- Green circle: the application is already captured in the current profile on the right panel.
- Blue circle: the application is already captured in one of non-active profiles on the right panel.
- Red exclamation mark “!” – an upgrade is available for that application.
The applications in the list can also have different font colors.
- Blue – installed application was relocated to another disk.
- Bold – installed application is a software suite comprising several applications.
- Black – all other installed applications
Software Suites
According to "What is a Software Suite?" from computerhope.com, a software suite is a collection of two or more software programs bundled and sold together. These programs can either share features or have distinct functions but revolve around a similar theme. A notable example is Microsoft Office, which combines Word, Excel, PowerPoint, and Outlook.
After installing software, it's sometimes tricky to tell standalone applications from those in a software suite. Take Python, for example. It installs seven different programs, all with "python" in their names, making it evident they're from the Python suite. But what about apps labeled "Microsoft," "Editor," or "Viewer"?
PickMeApp currently recognizes applications from Microsoft suites, like Microsoft Office. We're working on expanding this detection to other suites. Once a suite is recognized, PickMeApp manages it in its entirety, allowing for various actions like capturing, relocation, packaging, and uninstallation.

You can spot suite applications by the "@Suite@" tag in the Installed Application panel. To find suites, use the "<suites>" filter. The application info can show suite members and their statuses. If a member is missing, it likely got uninstalled before.
Actions on a suite apply to its individual members in sequence. For instance, uninstalling a suite result in each member being uninstalled one after the other.
If the last member of a suite is removed, PickMeApp automatically deletes that suite. Importantly, the suite's setup stays consistent, even if PickMeApp is restarted.
Managing apps within suites has its perks. Capturing a suite with PickMeApp is often more space and time-efficient than doing so with separate apps. However, custom software suites can't exceed 8G.
Note: This feature doesn't work with cloud versions of Microsoft Office, like Office 365.
Besides improving suite detection, PickMeApp lets you create custom software suites from installed apps. Users can group apps, giving these groups unique identifiers. Custom suites get the same treatment as regular ones in PickMeApp. If all members are removed, the suite is deleted. Still, the configuration remains intact after restarts. When a custom suite is moved to another computer, PickMeApp ensures all members are reinstalled and the configuration is maintained.
Imagine you frequently use three specific tools for graphic design - GIMP, Inkscape, and Blender. Instead of managing them individually, you can create a suite named 'Graphic Design Tools' for streamlined management."
Custom Suite Management
Add Custom Software Suite
Use the “Add Suite” button located on the Installed Applications Bar. By pressing this, you can initiate the process of adding a custom software suite.

Upon clicking "Add Suite” button ", you'll encounter the “Add Suite” dialog, guiding you through suite creation.

Instructions:
- Follow: "Select applications to include in a suite."
- Search Members: Use the "Search” by application name feature to quickly find apps you wish to include in your suite. The search field also has 2 predefined filters <selected> and <not selected>.
- Application List Section: This displays available installed applications with checkboxes to make your selections easier. You'll see columns labelled Name, Publisher, Version, and Size. A convenient select-all checkbox is available near “Name” near label to help in bulk choice for the filtered installed applications.
- Suite Information Section: Here you can supply optional details for your suite:
- Suite Name: Use the placeholder to enter a distinct suite name.
- Suite Version: Define the version of your suite.
- Suite Publisher: Mention the publisher of the suite.
- Action Buttons: Save your configurations using the 'Save' button or opt to exit without saving using 'Cancel'.
Note: During suite creation, the platform ensures uniqueness. If you enter a suite name and version identical to an existing one, you'll be notified. Adjust the name or version as needed.
Edit Custom Software Suite
Edit Suite Button can be found in the Application Bar of a suite application, this button allows you to change an existing suite.

Edit Suite Dialog is Initiated by the "Edit Suite" button. this dialog mirrors the Add Suite dialog. Using this Edit Suite Dialog, you may adjust suite’s members or change its name or version. (Just Remember to keep it unique)
Note if you deselect all members of the suite and save this configuration, the suite will be removed automatically.
Also using Edit Suite Dialog, you can remove the suite by pressing the “Delete Suite” button: Found at the left bottom corner, pressing this button prompts you to confirm the suite's deletion. Once confirmed, PickMeApp will erase the suite and its associated data.
For Example
Assuming you've made a suite for 'Audio Editing' which consists of Audacity and FL Studio. However, you later decide that these applications don't need to be in a suite. Simply use the 'Delete Suite' button to remove the suite while retaining the individual applications."
Internal Note: The suite's data is saved to a dedicated file within the PickMeApp system directory on your system disk.
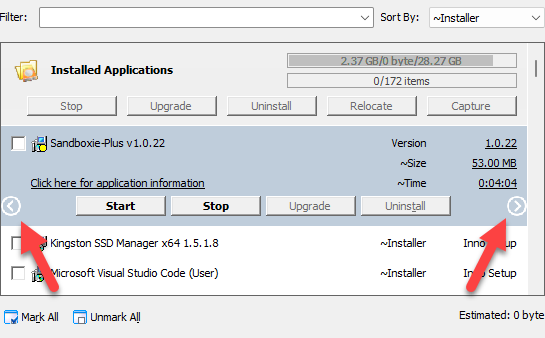
Expanded Entry Views of Installed Applications Panel
To display the Installed Application Expanded Entry View, click the profile name under the Installed Applications panel.
By default, the buttons on the Application Profile’s Expanded Entry View are disabled. They are only enabled when you highlight an application or select two or more installed applications.
Note: Each application also has its own Expanded Entry View, which is different from the Expanded Entry Views of the Application Panel. For more information, see Expanded Application Entry View.
Filtering Installed Applications
You can instantly search for applications by using the Filter located on the top of the Installed Applications panel. To filter the list of installed applications, enter the complete name, or part of the name, on the box. The Search View will display the installed programs that meet your search criteria.
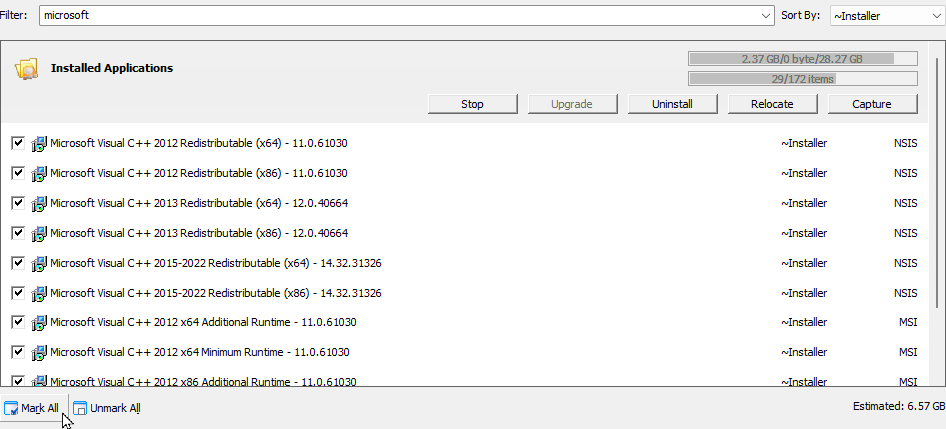
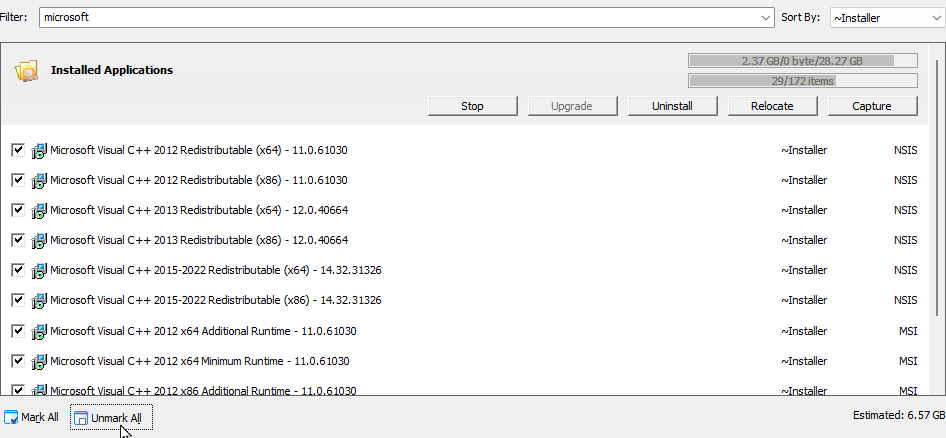
As an example, filtering the list by Microsoft displays all installed applications with the word Microsoft in the application name. You can see this in the screenshot below.
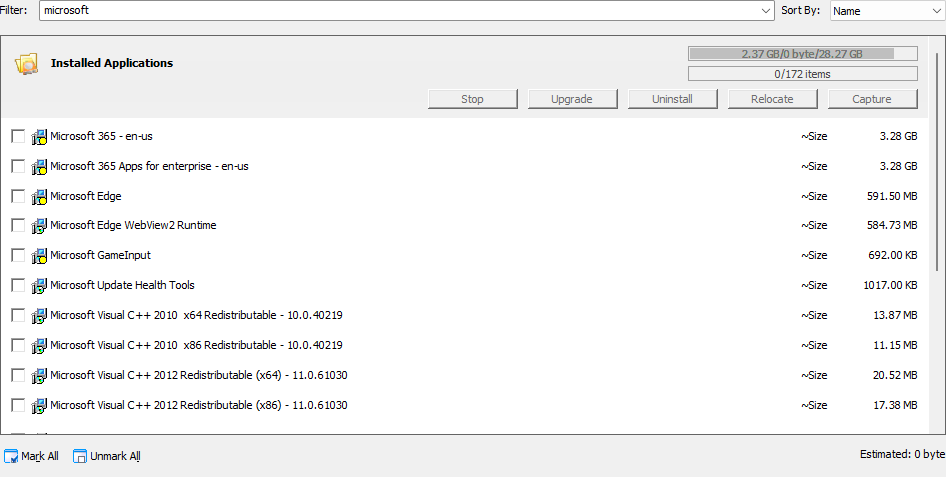
At this point, we can already click Mark All to select all applications in the Search view. However, if we only want to capture a single application, we can narrow down our search further by filtering for a specific application name, e.g., Microsoft Visual C++2005 Redistributable.
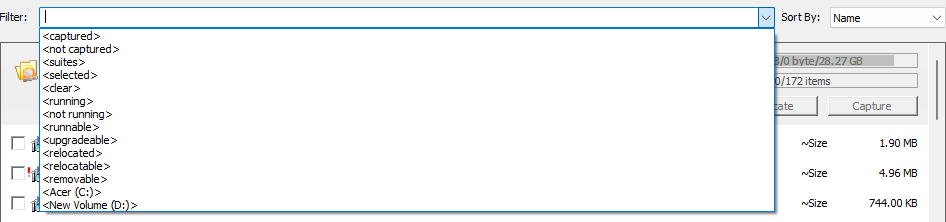
You can also click the Filter box and select from the following predefined options:
- <captured> – Lists installed applications that have been captured previously.
- <not captured> – Lists installed applications that have not been captured yet.
- <suites> – Lists the software suites recognized by PickMeApp, e.g., MS Office.
- <selected> – Lists the applications you have marked prior to filtering the list.
- <running> - List running applications.
- <not running> - Lists stopped applications.
- <runnable> - Lists applications that can be run by PickMeApp.
- <upgradeable> - Lists applications that have newer versions.
- <relocated> - Lists applications that have been relocated from a disk to another disk.
- <relocatable> - Lists applications that can be relocated to another disk.
- <removable> - Lists all installed applications that can be removed/uninstalled.
- <clear> – Cancels the previous filter and returns to the default display that lists all installed applications.
- Applications installed on your system drives on your computer, for example, <C:> or <D:>
Note: Selecting a different filter or searching for a different program does not deselect already selected applications. To clean previous selections, select the <clear>
The screenshot below shows the predefined filter options.
Note: Filters are disabled when PickMeApp is performing an operation on installed applications.
Sorting Installed Applications
To help you organize your applications for easier viewing, you can sort the list by Name, Size, Time, Age, Used On, Cache Size, Version, and Installer (the list is sorted by Name by default).
This is particularly handy when you have many installed programs on your PC. As an example, when using Installer to sort, you will know what Installer what used in deploying the installed application.

Managing the Installed Application Panel View
While Windows "Add/Remove Programs" provides a basic view, PickMeApp delves deeper, often uncovering 2-3 times more installed applications on a PC. This granular insight empowers users to make informed application management decisions.
However, the sheer volume of displayed applications might feel cluttered for some users. In response, we've integrated customizable display options to align with the familiar Windows "Add/Remove Software" appearance.
Access these controls via the "List" tab in the "Settings" dialog. The two main configurable settings are:
Access these controls via the "List" tab in the "Settings" dialog. The two main configurable settings are:
- Hide all suite members: Conceals individual software suite components.
- Hide system applications: Omits applications categorized as:
- Redistributables
- Frameworks
- Operating System applications
- Auxiliary applications added by primary installations.

These settings are active by default. If specific applications seem absent, you may want to deactivate one or both options.
To further streamline management, we've added application counters. These metrics provide a snapshot of the selected, visible, hidden, and overall installed applications.

Counters are displayed in the format:
#selected / #shown / #hidden and the total number of installed applications.
Expanded Application Entry View
To display the expanded application entry view, or the Expanded view, click an application under the Installed Applications panel.
Installed applications in the Expanded Entry view show basic information, including:
- Estimated Time (~Time) –The estimated time it would take to perform an operation on the application
- Version – The version number of the application
- Estimated Size (~Size) – The estimated size of the application as installed on the source computer. This is normally the same as the size displayed in Windows when adding or removing programs in Control Panel.
- ~Age – installation date
- ~Used On – The last time the application was used
- Version – The version number of the application
- Required Disk Space – The estimated size of the installed application.
- Cache Size – This shows the estimated Setup size of the hidden cache left after installing the application. This is unique to PickMeApp, allowing the program to reveal the actual size of installed applications,
- ~Installer – This shows the type of installer used in creating the installation package.
In the Expanded Application Entry view, the Application Bar shows the following buttons:
- Start – Starts the application.
- Stop – Stops the application.
- Upgrade – Upgrades the application to the latest available version.
- Uninstall – Uninstalls the application from your computer.
- Relocate/Restore – Relocates an application to a different disk or undo relocation.
- Capture – Creates an installation archive that includes the essential elements for setting up and running the application on another computer.
- Repair – Repairs the application. This operation is only applicable to software with a repair feature.
The Extended Application view is responsive, meaning that if you minimize it, it will have navigation buttons on the left and right that will allow you to browse through the rest of the Application Bar’s buttons.
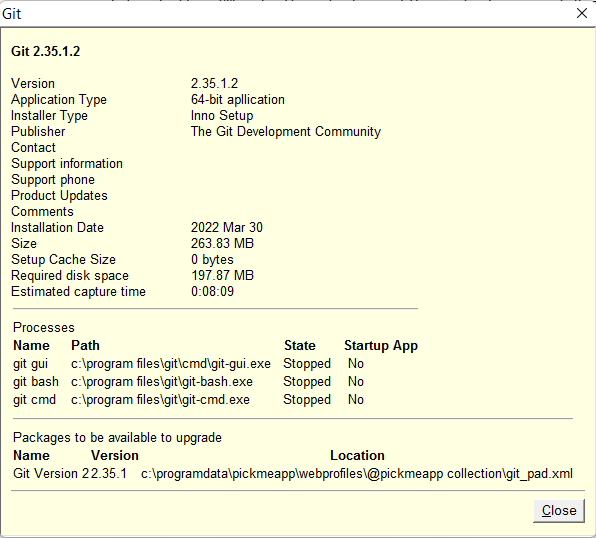
To view more details about an application, click the Application Information text link directly below the application name.
Below is a sample application information screen.
Marking an Installed Application Prior to an Operation
After filtering the list of installed applications in either of the two applications profiles by name or according to the predefined options (see Filtering Installed Applications), check the box to the left of the application.
To select all the applications that have been filtered, click the Mark All button at the bottom of the Installed Applications panel. You can then perform the applicable operation on the marked applications under the Expanded View of the Installed Application panel.
Note: While you can select installed applications without a filter, it is quicker to filter and select the applications before conducting an operation. If you selected multiple applications from the list, you could bring them up by using the <selected> filter. For more information, see Filtering Installed Applications.
Unmarking a Selected Application
After marking several applications (see Marking an Installed Application Prior to an Operation), you can click the Unmark All button to deselect the marked applications. You can also do this manually, by unmarking each box to the left of the marked application.
Highlighting an Installed Application
Click the application from the list under the Installed Applications panel. Once highlighted, the item is displayed in its Expanded Application Entry view.
