Manuale utente
Manuale utente root Dom, 2010-07-18 13:08@1 INTRODUCTION
@1 INTRODUCTIONPickMeApp Pro is a unique administrative tool for managing the lifecycles of Windows software installed on your computer. With it, you can discover, download, install, run, upgrade, terminate, remove, relocate, capture, and transfer Windows PC applications, in just a few clicks!
Major features include:
- Discovers and reports on all installed applications, including those which are hidden by the Windows operating system.
- Reveals and summarizes detailed information about installed software, exposing unique data that are not available using other tools.
- Captures and transfers installed programs from a Windows-based computer to another. The installation packages created by PickMeApp Pro can be used to backup or restore applications previously installed on Windows computers, after you have reinstalled or recovered Windows. The installation packages can also be installed on other Windows computers, thereby saving PC administration time.
- Relocate installed applications from one storage device to another on the same computer to free space on the system disk
- Helps clean up a computer from unnecessary software by silently uninstalling selected applications and helping repair malfunctioning software programs. PickMeApp can run or terminate selected applications and all their hidden process and services.
- Helps install new software programs and upgrade existing installed software. PickMeApp comes with a built-in repository of free essential applications which can be automatically installed on your computers. All included programs are the latest releases linked directly to their original publisher websites.
- Works with custom software repositories managed locally or remotely. The PickMeApp package management functionality eases setup and creation of Windows-based working environments.
As a software lifecycle management tool, PickMeApp Pro:
- Creates System Restore Points prior to operations that may affect system stability, such as installing new software, upgrading, and uninstalling existing software programs.
- Provides a rich set of command-line commands that can be used without running PickMeApp Pro interactively.
- Can be run as a portable application using any removable storage. As a portable application, PickMeApp leaves no trace of its usage on Windows. It reads and writes its configuration settings to a file saved under the PickMeApp installation folder.
- Can be fine-tuned using advanced settings.
PickMeApp Pro supports Windows XP SP3 and above, including Windows 11. It can equally manage software product lifecycles of 32-bit and 64-bit Windows programs. On Windows XP and Vista PickMeApp requires Windows Installer 4.5 to be installed. For information on where you can download Windows Installer 4.5, see https://docs.microsoft.com/en-us/windows/win32/msi/windows-installer-redistributables.
Currently, there are three other PickMeApp products, namely PickMeApp Light, PickMeApp Installer, and PickMeApp Relocator. Each of these products have their own separate manuals. A more detailed comparison of the differences between PickMeApp Pro, PickMeApp Light, PickMeApp Installer and PickMeApp Relocator can be found on the PickMeApp website at https://pickmeapp.com/downloads.
@2 SETTING UP PICKMEAPP PRO
@2 SETTING UP PICKMEAPP PRO mca.yogeshshar… Dom, 2022-05-22 12:532.1 Installing PickMeApp Pro
2.1 Installing PickMeApp ProBefore you can use PickMeApp Pro, you should download and install it first on your Windows PC.
You can download PickMeApp Pro from https://www.pickmeapp.com/downloads/PickMeAppPro.
Note: PickMeApp Pro can also be run as a portable application. For more information, see Make a Portable PickMeApp Pro.
To install PickMeApp Pro:
- Navigate to the location where you downloaded the PickMeApp Pro installer.
- Click and run the installer.
- On the Welcome screen, click Next.
- Accept the terms of the License Agreement.
- Click Next and choose the system folder where PickMeApp Pro will be installed.
- Click Install.
- Click Yes on the User Account Control prompt to confirm that you are allowing the installer to update your device. PickMeApp Pro is then installed to the destination folder.
- After successful installation, click Finish.
You may launch the program right after installation, although you may need to buy a license first before you can use it. You can also choose to let Windows run PickMeApp Pro automatically during startup. You can switch off this option via PickMeApp Pro settings later.
Note: You cannot install two different PickMeApp products on your PC at the same time. If another PickMeApp product is already installed, uninstall that product first before installing PickMeApp Pro.
PickMeApp is installed to the following directories on your PC.
- Executable: PickMeAppPro.exe is installed to the location specified during installation,
e.g., Program Files (x86)/PickMeAppPro. - Data: All data files and system directories are located at %programdata%/PickMeApp,
e.g., ProgramData/PickMeApp.
Note: Set your computer to show hidden folders if you cannot see your %programdata% folder.
If you have limited space on your system disk, you can optimize PickMeApp Pro setup. For more information, see Optimizing PickMeApp.
To utilize PickMeApp Pro’s capabilities fully, you should let it run permanently in the background.
Note: When reinstalling PickMeApp Pro, ensure that you close it first to avoid any potential issues later.
2.2 Uninstalling PickMeApp Pro
2.2 Uninstalling PickMeApp ProTo remove PickMeApp Pro from your computer, run Add or Remove Programs, then uninstall PickMeApp Pro. Make sure to close PickMeApp Pro first before removing it from your computer.
Using Add or Remove Programs
The PickMeApp uninstallation process will uninstall all executables and clean up the installation folder. However, it does not remove the data folders located in %programdata%, where custom PickMeApp settings, captured data and other artifacts are kept.
Using the PickMeApp Installation Program
To completely remove PickMeApp and all its files, run the PickMeApp installation program and choose Remove. You will be prompted to remove all PickMeApp files prior to removing PickMeApp Pro.
2.3 Buying a PickMeApp Pro license
2.3 Buying a PickMeApp Pro licensePickMeApp Pro requires a valid and non-expired license to function.
After PickMeApp Pro installation, a browser window automatically opens to a page where you can buy a PickMeApp Pro license.
Alternatively, click the Buy Now button on the PickMeApp Pro interface to purchase an annual license. You can also go directly to the PickMeApp Pro Shop by clicking here.
After purchasing a relevant PickMeApp Pro license, you will receive an email confirming your order from PickMeApp Support. This email contains your relevant PickMeApp ID/license and the email address to which the license was issued. The screenshot below shows a sample PickMeApp ID/license. 
Your PickMeApp license entitles you to free updates and is good for one (1) year from time of purchase. After your existing license expires, you will need to buy a new license to continue using the program and/or receive program updates.
You are allowed to install and use PickMeApp on an unlimited number of devices.
You need a valid PickMeApp ID to request support, receive updates, and enjoy the many other features available to licensed users.
Note: A PickMeApp Pro license can be used to run PickMeApp Light as well.
@3 USING PICKMEAPP PRO
@3 USING PICKMEAPP PRO mca.yogeshshar… Dom, 2022-05-22 13:343.1 Starting PickMeApp Pro
3.1 Starting PickMeApp ProYou can run PickMeApp Pro like any regular Windows program. However, only one instance of PickMeApp Pro can run on your computer at the same time. To check if it is already running, look for the PickMeApp Pro icon on your system tray.
If PickMeApp is already running for another user who is logged on to the computer, the other user would need to close its instance of PickMeApp . You can then log on to your own account again and run PickMeApp.
Note: You will need administrative rights on the computer for PickMeApp to work properly. PickMeApp Pro will prompt for privileges in case you do not have administrative rights.
3.2 Setting Your PickMeApp License
3.2 Setting Your PickMeApp LicensePickMeApp requires a valid license to operate. For convenience, you can retrieve your license automatically using your PickMeApp.com credentials, which are also essential for accessing other features that require interaction with the PickMeApp.com site, such as Peer-To-Peer Profiles. The manual method to set PickMeApp ID is also available if needed.
Note: The License window opens automatically when you run PickMeApp Pro without a license, email, or valid password. It will continue to appear each time you run the application anew if any of these parameters are missing or incorrect.
Automatic License Activation (Preferred Method):
Automatically retrieve your PickMeApp ID by entering your email and password associated with your PickMeApp.com account. This simplifies the activation process:
- Open the License Tab in the Settings Dialog.
- Enter your Email used to purchase the license and Password for your PickMeApp.com account.
- Press 'Apply' or 'OK' to initiate the automatic retrieval of your PickMeApp ID. Your PickMeApp ID will then be automatically filled in once your credentials are verified.
Password Recovery: If you forget your password, click the Recover link to open the web-based password recovery dialog.

Manual License Activation:
If you prefer or need to manually enter your license information, follow these steps when you first launch PickMeApp Pro:
- Open the License Tab in the Settings Dialog
- Enter your PickMeApp ID and the email address you used to purchase the license.
- Press 'Apply' or 'OK' to activate PickMeApp Pro.
Note: Ensure you have entered the correct details to avoid issues with our server validating your license.
By following these instructions, you can activate your PickMeApp Pro license quickly and easily using the method that best suits your needs, ensuring full access to all its features.
If you do not enter your license information or password at this time, you will get the following error message.
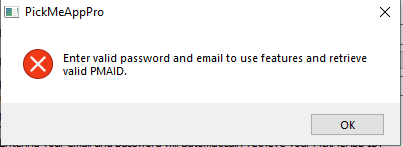
This dialog will be shown each time you fail to enter your PickMeApp ID, email, or optionally, password.
Note: You need to enter your pickmeapp.com account password to use features such as automatic PickMeApp ID retrieval and InstallShare Profile. To learn more about the InstallShare Profile, refer to the following paragraph 5.8 InstallShare: The Special Built-In Peer-to-Peer Profile.
If you have entered a valid PickMeApp ID and email, you may ignore this dialog.
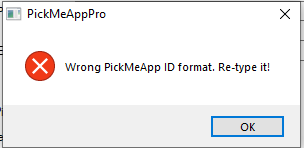
However, if you did not enter a valid PickMeApp ID and email, you will see the following message:
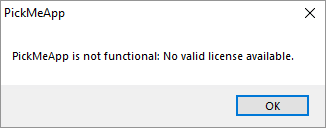
If your license is expired, the error message will be different.
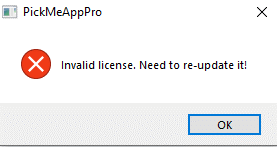
In case of incorrect license details, the error message below is displayed.
For more information on buying a PickMeApp license, see Buying a PickMeApp Pro license.
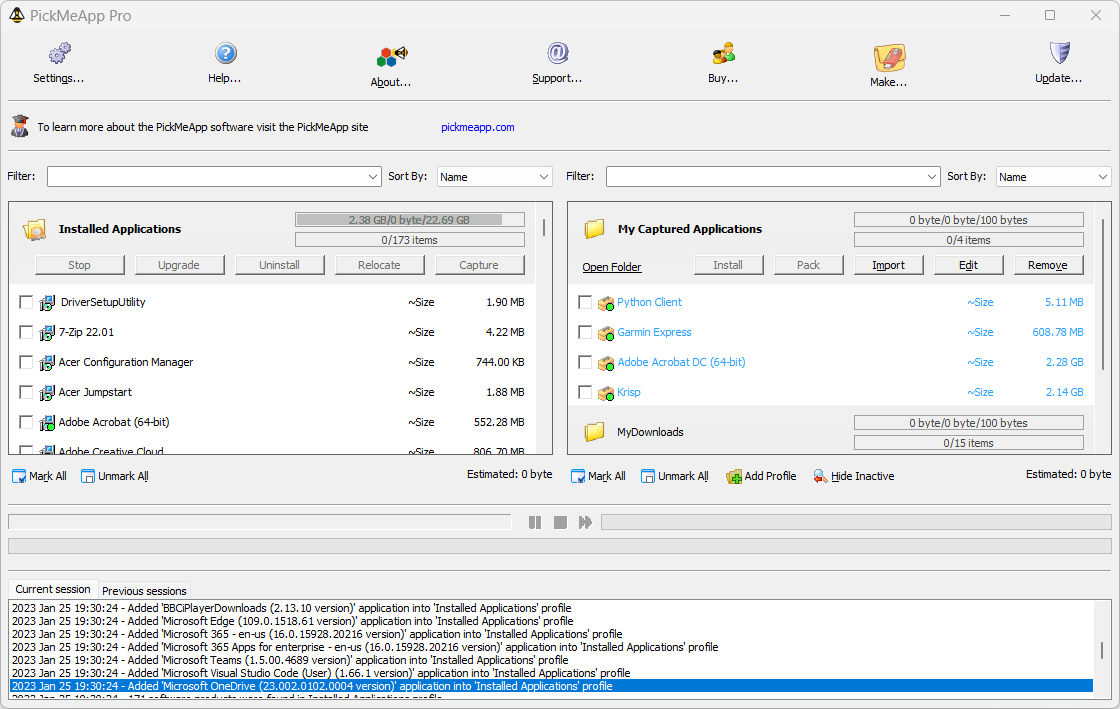
3.3 The PickMeApp Pro User Interface
3.3 The PickMeApp Pro User InterfacePickMeApp Pro makes tasks managing your software products as simple as possible with its straightforward program interface.
PickMeApp user interface is divided into the following main elements:
- Main Toolbar
- Hint Window
- Installed Software Programs Panel
- Installation Software Packages Panel, which can be divided into PickMeApp profiles. There are three built-in PickMeApp Profiles, namely, Captured Applications, My Downloads, and PickMeApp Collections. For more information, see PickMeApp Installation Packages Profiles.
- Progress Bar Window, with pause, stop, and skip buttons. The upper progress bar shows the status of an action performed on individual applications. The lower progress bar, which is longer, shows status of batch processing actions.
- Sessions Log Window

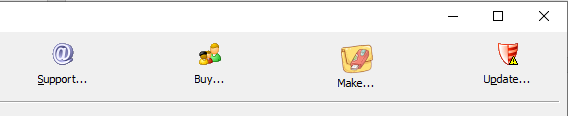
Main Toolbar
This is the Main Toolbar.

It contains the following options:
- Settings - Opens a dialog where you can configure PickMeApp application settings
- Help – Opens your browser to the online version of this User Manual
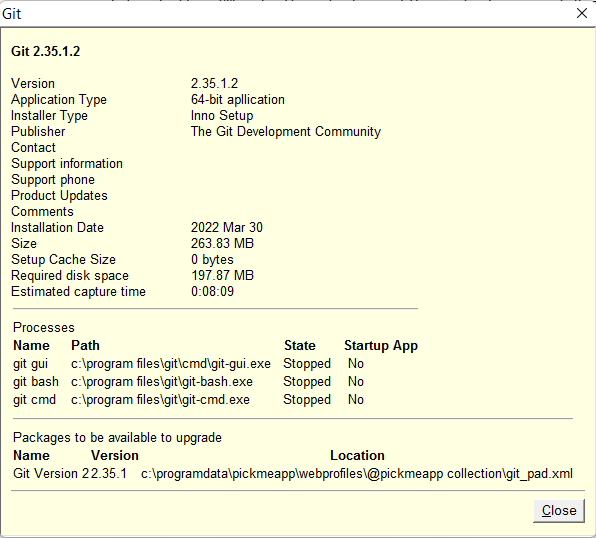
- About – Opens a window showing the PickMeApp version installed on your computer.
- Support – Opens the online PickMeApp Support page on a new browser window. Online Support is available for all licensed PickMeApp users.
- Buy – Opens the PickMeApp Store on your browser so that you can buy a license.
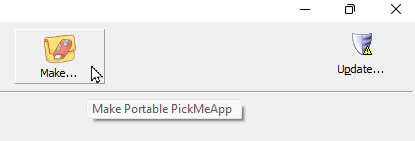
- Make – Opens the Make Portable PickMeApp window, where you can make a portable PickMeApp Pro application that you can then copy to a USB flash drive or some other storage device for standalone use while you are away from your PC.
- Update – Checks for available PickMeApp updates. This button will turn red whenever a PickMeApp Pro update is available. You can automatically enable check for updates via the Settings >Preferences tab.
Hint window
The Hint window shows you tips and links that will help you learn more about PickMeApp. You can choose to hide this window via Settings>Preferences.

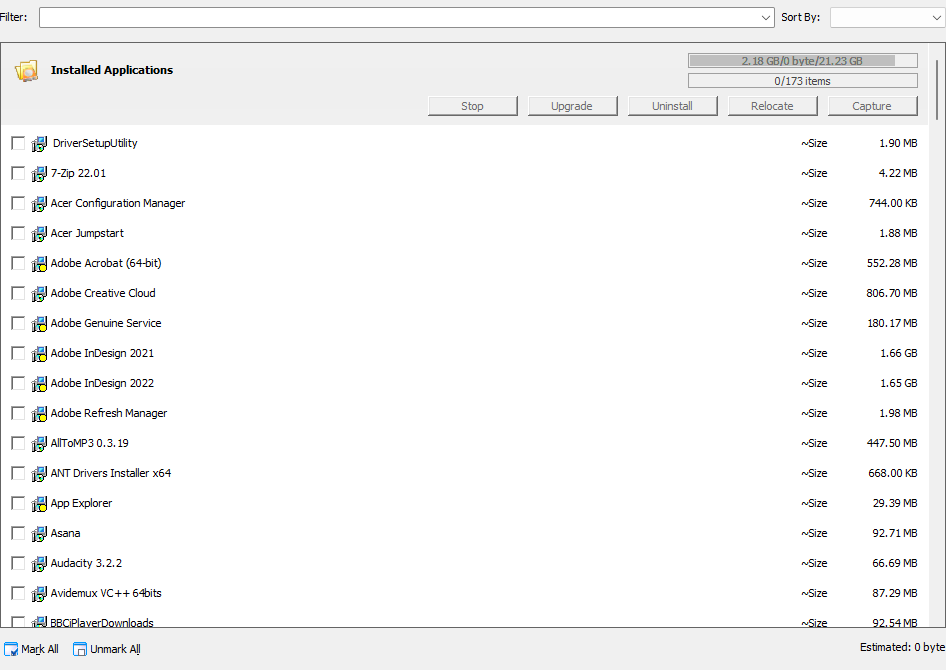
Installed Applications Panel
The Installed Applications panel lists your installed applications.
Note: Some applications may appear twice. This is dependent on how applications are configured by their developers.
Qualified Applications
PickMeApp can perform all types of management operations, including:
- Running stopped applications
- Terminating running applications
- Relocating an application to another disk
- Capturing an application into a package that can be used in installing the application on the same or another computer.
- Upgrading an application into the latest version
- Uninstalling an application silently
- Repairing an application
By filtering and selecting multiple applications, PickMeApp can also upgrade, relocate, uninstall, capture, or stop multiple applications.
Note: Multiple applications cannot be started or repaired at the same time.
For more information on the operations that can be performed within the Installed Applications Panel, see Using the Installed Applications Panel.
Installation Software Packages Panel
The Installation Software Packages panel shows all the software installation packages that can be installed by PickMeApp, including captured applications.
PickMeApp Pro supports the TAP, PAD, and MSI/EXE installation package formats.
Within the Software Packages panel, PickMeApp can smoothly perform all type of software package management operations, including adding and removing applications collections (Profiles), and installing, upgrading, repackaging, removing, or importing new packages. For more information, see Managing Installation Packages.
Like the Installed Applications Panel, installation software packages are initially organized into built-in PickMeApp Profiles. There are several built-in profiles, namely:
- My Captured Applications
- My Downloads
- PickMeApp Collection
Note: The built-in My Downloads profile can be disabled via Settings.
My Captured Applications
This is a predefined profile for storing captured applications. Select this profile if you want the applications captured using PickMeApp’s Capture Application feature to be put under this profile. The profile is selected by default at first PickMeApp run. When you run it for the first time, the My Captured Applications profile will be empty. It will be filled up once you start capturing applications to that profile using PickMeApp.
My Downloads
All supported application packages in your computer’s Downloads folder are listed under this profile. If you disable the Make Downloads folder as PickMeApp Profile setting, this will not appear as a profile. For more information, see Install Settings.
PickMeApp Collection
This is the built-in web profile. The profile holds a collection of 120 popular one-click installable programs that can be installed from within PickMeApp. For more information, see WEB Profiles as Applications Collections.
Progress Bar
The Progress Bar window shows the status of the running PickMeApp process: Stop, Capture, Install, Uninstall, Repair, Pack, and Creating Portable PickMeApp.
You may stop, resume, or skip some operations, while other operations, once started, cannot be interrupted, and they are performed until the end.
To stop, pause, resume, or skip the process, click the corresponding buttons on the Progress Bar.

The upper progress bar shows the status of an action performed on individual applications. The lower progress bar, which is longer, shows status of batch processing actions.
Session Log Window
The Session Log window shows a record of the events and outcome of all processes, as well as other relevant messages, from the time you installed PickMeApp. For example, Capture, Install, Uninstall, Repair, Pack, Removal, and the Installation/Uninstallation of an application outside of PickMeApp are all shown under the Session Log window.

It is divided into two (2) tabs, namely:
- Current Session
- Previous Sessions
All actions each time you run PickMeApp are logged under the Current Session tab. If you are running PickMeApp for the first time, only the Current Session tab will display any information. After exiting the program, this information is moved into the Previous Sessions tab and the Current Sessions tab is refreshed/cleared. Next time you run the program, the information logged during previous sessions become available under the Previous Sessions tab and information related to your new session is logged under the Current Sessions tab.
You may hide the session log via Settings>Preferences
Note: The Session logs are written to the history.xml file located in the PickMeApp directory under %programdata%. The PickMeApp Support Team may request for a copy of this file during support calls.
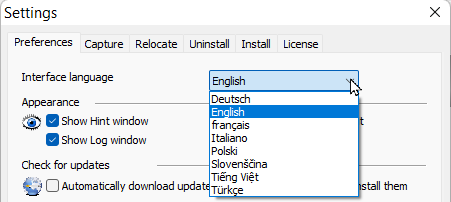
3.4 Choosing a Language for PickMeApp Pro
3.4 Choosing a Language for PickMeApp ProSet the language to be used in PickMeApp Pro under Settings > Preferences. Aside from English, other supported languages are French, German, Italian, Polish, Slovenian, Turkish, and Vietnamese.
3.5 Customizing the PickMeApp UI
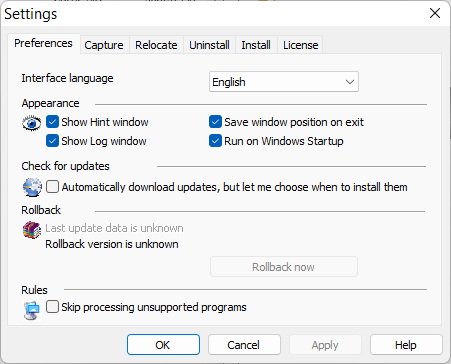
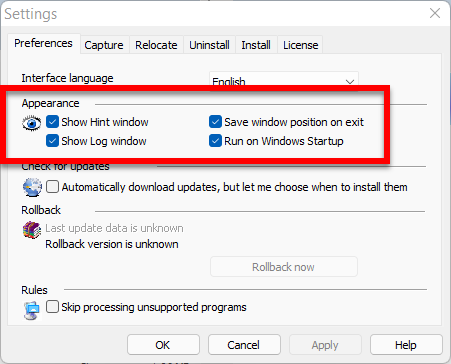
3.5 Customizing the PickMeApp UIThe appearance of the PickMeApp UI is configured from the Settings window, which is displayed when you click Settings on the Main Toolbar.
From the Settings window, you can enable showing of the Hint window and Session Log window on the PickMeApp UI. You can also save the position of the PickMeApp UI on exit and run PickMeApp automatically when Windows starts up.
3.6 Updating PickMeApp Pro
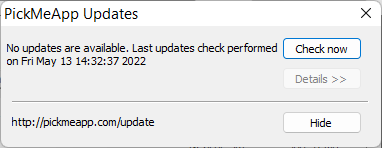
3.6 Updating PickMeApp ProPeriodically, PickMeApp Pro checks for the latest updates to the program. Whenever a new update is available, the Update button on the menu turns red.
Note: You can choose to automatically download updates via Settings > Preferences tab.
To check if there is an available update to PickMeApp Pro:
- Click the Update button.
- On the PickMeApp Updates window, click Check Now.
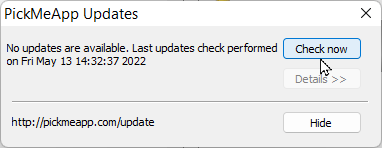
- Wait while PickMeApp Pro connects to and checks the update servers.
- If an update is not available, close the PickMeApp Updates window. Skip the rest of the procedure below.
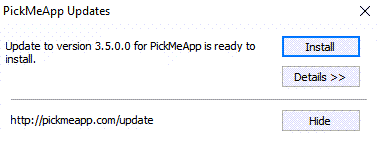
- If there is an available update, information about it is displayed on the PickMeApp Updates window.
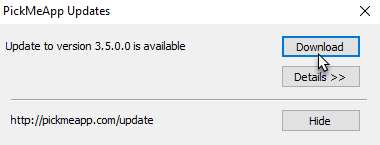
- To check for the content of the update, click Details.
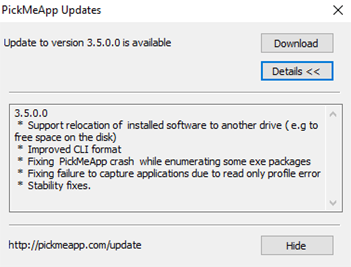
- To start downloading the update, click Download.
- After downloading, click the Install button to update PickMeApp to the latest version.
- After PickMeApp Pro is updated, click the Restart button.
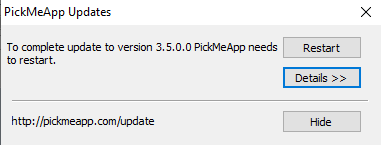
Upon exiting, if PickMeApp Pro is not restarted automatically, you may have to restart it manually.
3.7 Rolling PickMeApp Version Back
3.7 Rolling PickMeApp Version BackIf you have updated PickMeApp Pro and you want to go back to using the previous version for some reason, go to Settings > Preferences > Rollback, then click Rollback now.

3.8 Exiting PickMeApp
3.8 Exiting PickMeAppWhen you exit PickMeApp, all PickMeApp settings are stored in the settings.xml file located in PickMeApp folder. The settings are ready for use the next time you start PickMeApp.
Note: From the Appearance section in Settings > Preferences, you can save the position of the PickMeApp Pro window on exit so that next time you run the program, it will appear in the same position.

3.9 Making a Portable PickMeApp Pro
3.9 Making a Portable PickMeApp ProYou can create a portable PickMeApp Pro application that you can then use on another computer. You can select the profiles you want to include in this portable version from the PickMeApp Pro currently installed on your computer.
Unlike the PickMeApp installed on your computer, a portable PickMeApp can be copied to a removable drive and run on another computer. It will also save all its data to the same main folder.
To make a portable PickMeApp Pro application:
- Click the Make… button on the Main Toolbar.
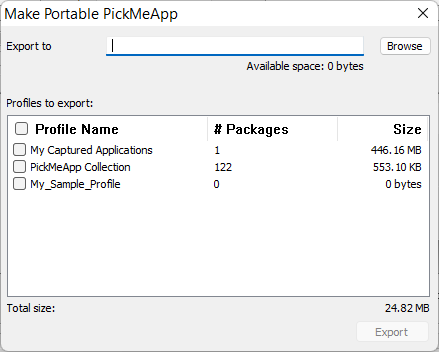
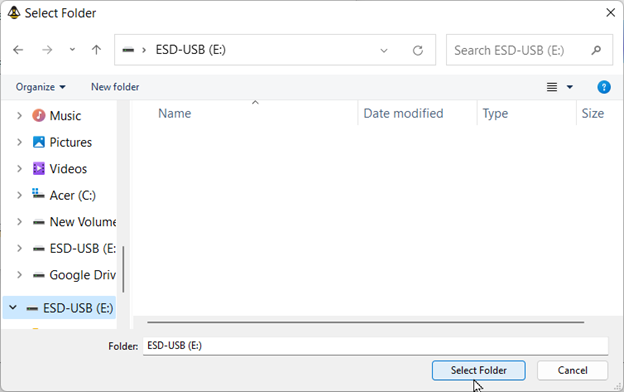
- On the Make Portable PickMeApp window, click Browse.
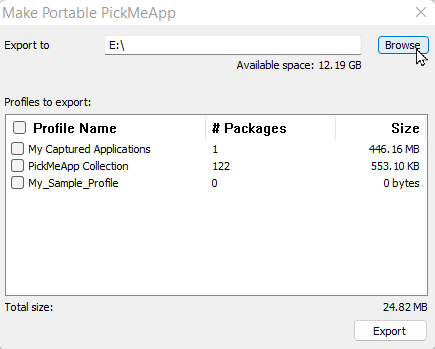
- Select the folder or drive on your computer where the portable PickMeApp Pro application will be created. In the example below, the portable application will be created on a USB flash drive.
- Click the profiles on the list that you want to include in the portable application. To select all profiles, click the checkbox to the left of the Profile Name column.
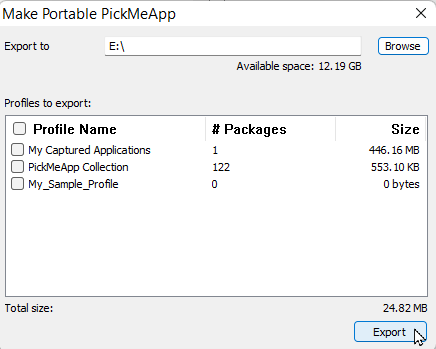
- Click Export. Together with the PickMeApp Pro license, this exports all selected PickMeApp profiles, system files and folders, and settings to the folder or drive selected in Step 3.
Note: The length of time it will take to make the portable PickMeApp Pro application will depend on the number of selected profiles and your computer’s disk speed. The PickMeApp progress bar will show the status while the portable PickMeApp Pro is being created. We recommend waiting until all profiles have been exported before running the portable PickMeApp Pro.
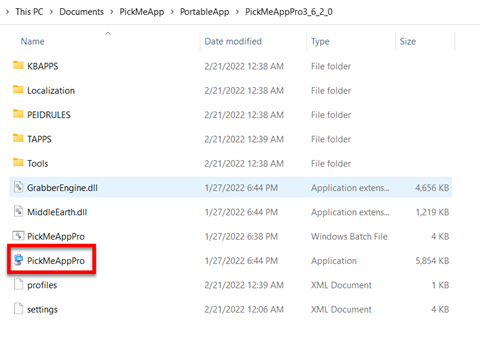
Starting Portable PickMeApp Pro
To launch the portable PickMeApp Pro, open the PickMeApp folder on the drive where you installed the portable application and click the PickMeAppPro.exe file. For the portable PickMeApp Pro to work properly, you will need administrative rights on the computer.
Note: Unlike the installed PickMeApp on your computer, PickMeApp Portable is installed on a single folder. Therefore, you can copy it to a removable drive and run it on another computer.
@4 MANAGING INSTALLED PROGRAMS
@4 MANAGING INSTALLED PROGRAMSWhen PickMeApp starts, it automatically retrieves information about the installed programs on your computer. This process may take several minutes, as it depends on the number of applications already installed on your system. The discovered applications are then listed under the Installed Applications panel.
The various software management features in PickMeApp are discussed below.
4.1 Using the Installed Applications Panel (Left Panel)
4.1 Using the Installed Applications Panel (Left Panel)The Installed Applications panel lists your installed applications.
Managing Installed Applications
PickMeApp can perform the following management operations on installed applications:
- Retrieve detailed information about applications installed on the computer.
- Search and Filter installed applications by name, size, and installation date, and other filter options.
- Run an installed application.
- Terminate a running application or stop some application’s executable.
- Upgrade, uninstall, and repair installed applications.
- Relocate installed applications to another drive.
- Capture an installed application as backup or in preparation for transfer to another PC.
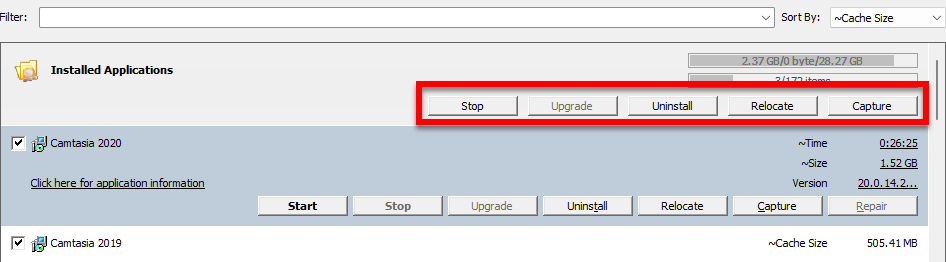
Managing a Single Installed Application
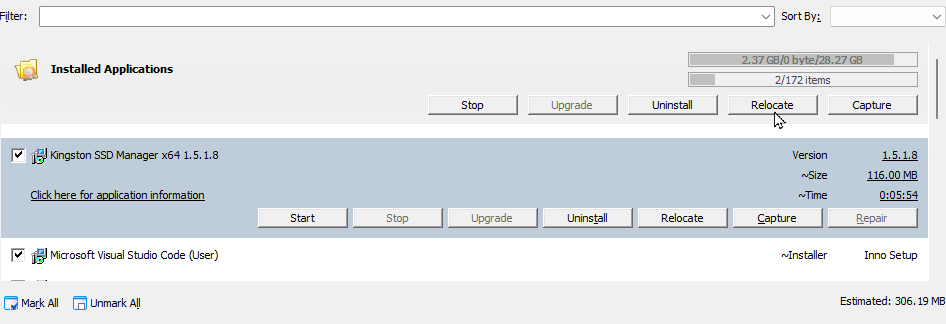
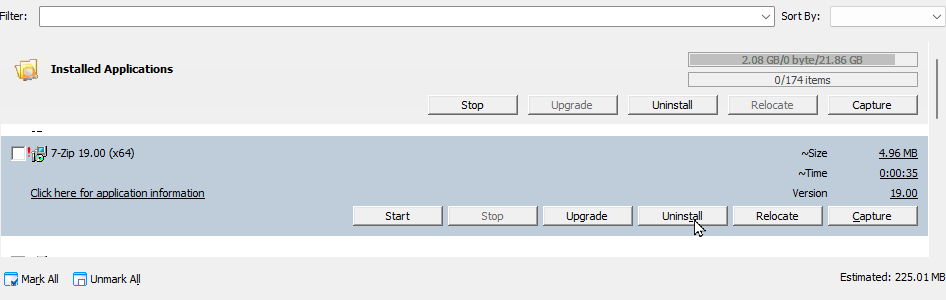
To manage a single installed application:
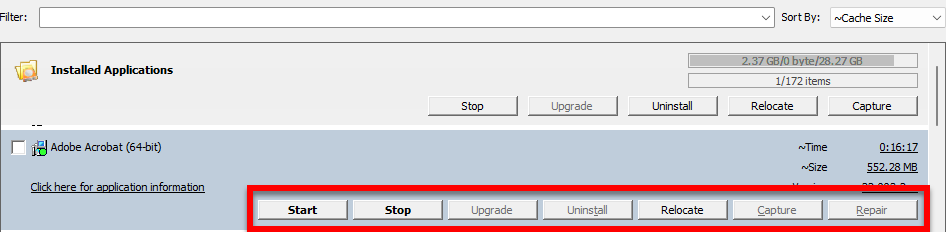
- Highlight the application you want to manage.
- Click the appropriate buttons, e.g., Start, Stop, Upgrade, Uninstall, Relocate, Capture, and Repair on the Installed Application Bar.
Managing Several Applications at Once
To manage several installed applications at once:
- Check the boxes to the left of the applications.
- Click the appropriate buttons, e.g., Stop, Upgrade, Uninstall, Relocate, and Capture, on the Installed Application Profile Bar.
To perform supported management operations on installed applications, you should first select applications by:
- Highlighting either a single application or selecting multiple applications from the list.
- Marking/unmarking all applications appearing in Search View.
Note: If a management operation is not supported for a selected installed application, it will be disabled.
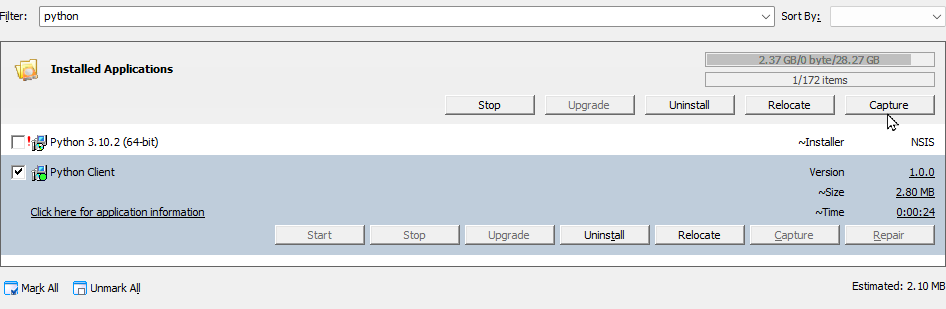
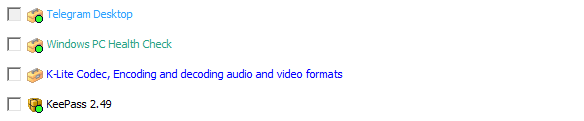
Installed applications on the list are denoted with the following icons:
- Yellow circle: the application is currently running.
- Green circle: the application is already captured in the current profile on the right panel.
- Blue circle: the application is already captured in one of non-active profiles on the right panel.
- Red exclamation mark “!” – an upgrade is available for that application.
The applications in the list can also have different font colors.
- Blue – installed application was relocated to another disk.
- Bold – installed application is a software suite comprising several applications.
- Black – all other installed applications
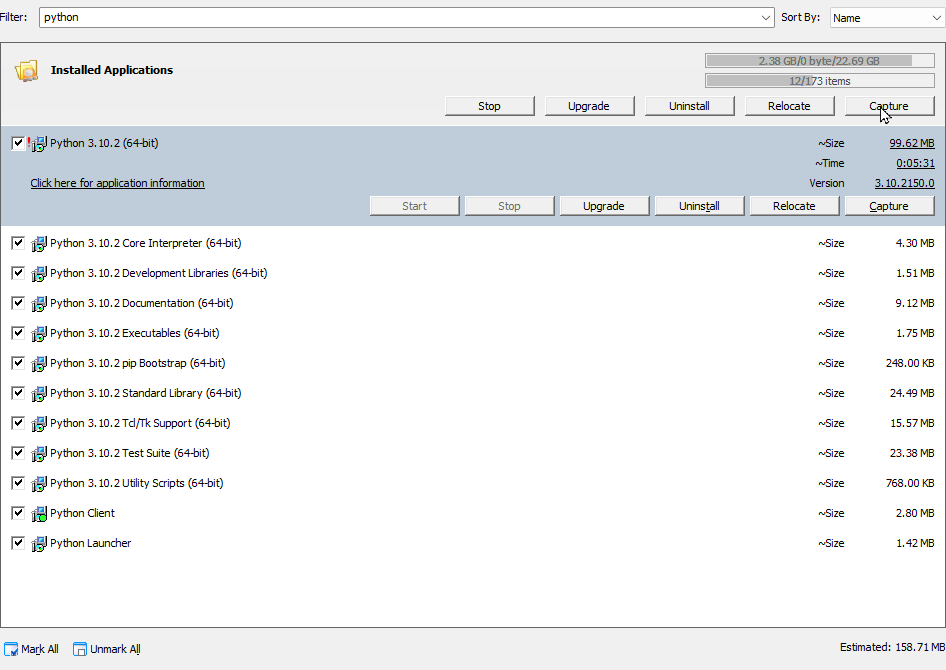
Software Suites
According to "What is a Software Suite?" from computerhope.com, a software suite is a collection of two or more software programs bundled and sold together. These programs can either share features or have distinct functions but revolve around a similar theme. A notable example is Microsoft Office, which combines Word, Excel, PowerPoint, and Outlook.
After installing software, it's sometimes tricky to tell standalone applications from those in a software suite. Take Python, for example. It installs seven different programs, all with "python" in their names, making it evident they're from the Python suite. But what about apps labeled "Microsoft," "Editor," or "Viewer"?
PickMeApp currently recognizes applications from Microsoft suites, like Microsoft Office. We're working on expanding this detection to other suites. Once a suite is recognized, PickMeApp manages it in its entirety, allowing for various actions like capturing, relocation, packaging, and uninstallation.

You can spot suite applications by the "@Suite@" tag in the Installed Application panel. To find suites, use the "<suites>" filter. The application info can show suite members and their statuses. If a member is missing, it likely got uninstalled before.
Actions on a suite apply to its individual members in sequence. For instance, uninstalling a suite result in each member being uninstalled one after the other.
If the last member of a suite is removed, PickMeApp automatically deletes that suite. Importantly, the suite's setup stays consistent, even if PickMeApp is restarted.
Managing apps within suites has its perks. Capturing a suite with PickMeApp is often more space and time-efficient than doing so with separate apps. However, custom software suites can't exceed 8G.
Note: This feature doesn't work with cloud versions of Microsoft Office, like Office 365.
Besides improving suite detection, PickMeApp lets you create custom software suites from installed apps. Users can group apps, giving these groups unique identifiers. Custom suites get the same treatment as regular ones in PickMeApp. If all members are removed, the suite is deleted. Still, the configuration remains intact after restarts. When a custom suite is moved to another computer, PickMeApp ensures all members are reinstalled and the configuration is maintained.
Imagine you frequently use three specific tools for graphic design - GIMP, Inkscape, and Blender. Instead of managing them individually, you can create a suite named 'Graphic Design Tools' for streamlined management."
Custom Suite Management
Add Custom Software Suite
Use the “Add Suite” button located on the Installed Applications Bar. By pressing this, you can initiate the process of adding a custom software suite.

Upon clicking "Add Suite” button ", you'll encounter the “Add Suite” dialog, guiding you through suite creation.

Instructions:
- Follow: "Select applications to include in a suite."
- Search Members: Use the "Search” by application name feature to quickly find apps you wish to include in your suite. The search field also has 2 predefined filters <selected> and <not selected>.
- Application List Section: This displays available installed applications with checkboxes to make your selections easier. You'll see columns labelled Name, Publisher, Version, and Size. A convenient select-all checkbox is available near “Name” near label to help in bulk choice for the filtered installed applications.
- Suite Information Section: Here you can supply optional details for your suite:
- Suite Name: Use the placeholder to enter a distinct suite name.
- Suite Version: Define the version of your suite.
- Suite Publisher: Mention the publisher of the suite.
- Action Buttons: Save your configurations using the 'Save' button or opt to exit without saving using 'Cancel'.
Note: During suite creation, the platform ensures uniqueness. If you enter a suite name and version identical to an existing one, you'll be notified. Adjust the name or version as needed.
Edit Custom Software Suite
Edit Suite Button can be found in the Application Bar of a suite application, this button allows you to change an existing suite.

Edit Suite Dialog is Initiated by the "Edit Suite" button. this dialog mirrors the Add Suite dialog. Using this Edit Suite Dialog, you may adjust suite’s members or change its name or version. (Just Remember to keep it unique)
Note if you deselect all members of the suite and save this configuration, the suite will be removed automatically.
Also using Edit Suite Dialog, you can remove the suite by pressing the “Delete Suite” button: Found at the left bottom corner, pressing this button prompts you to confirm the suite's deletion. Once confirmed, PickMeApp will erase the suite and its associated data.
For Example
Assuming you've made a suite for 'Audio Editing' which consists of Audacity and FL Studio. However, you later decide that these applications don't need to be in a suite. Simply use the 'Delete Suite' button to remove the suite while retaining the individual applications."
Internal Note: The suite's data is saved to a dedicated file within the PickMeApp system directory on your system disk.
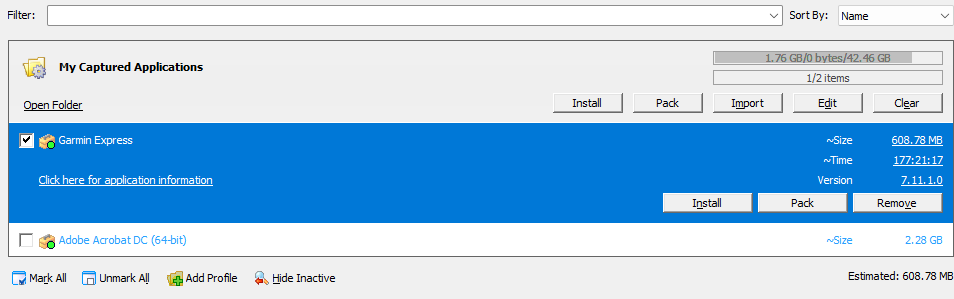
Expanded Entry Views of Installed Applications Panel
To display the Installed Application Expanded Entry View, click the profile name under the Installed Applications panel.
By default, the buttons on the Application Profile’s Expanded Entry View are disabled. They are only enabled when you highlight an application or select two or more installed applications.
Note: Each application also has its own Expanded Entry View, which is different from the Expanded Entry Views of the Application Panel. For more information, see Expanded Application Entry View.
Filtering Installed Applications
You can instantly search for applications by using the Filter located on the top of the Installed Applications panel. To filter the list of installed applications, enter the complete name, or part of the name, on the box. The Search View will display the installed programs that meet your search criteria.
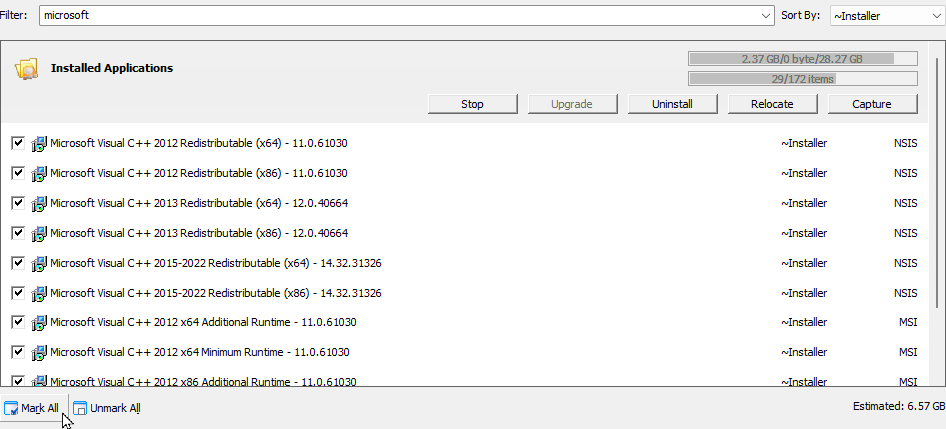
As an example, filtering the list by Microsoft displays all installed applications with the word Microsoft in the application name. You can see this in the screenshot below.
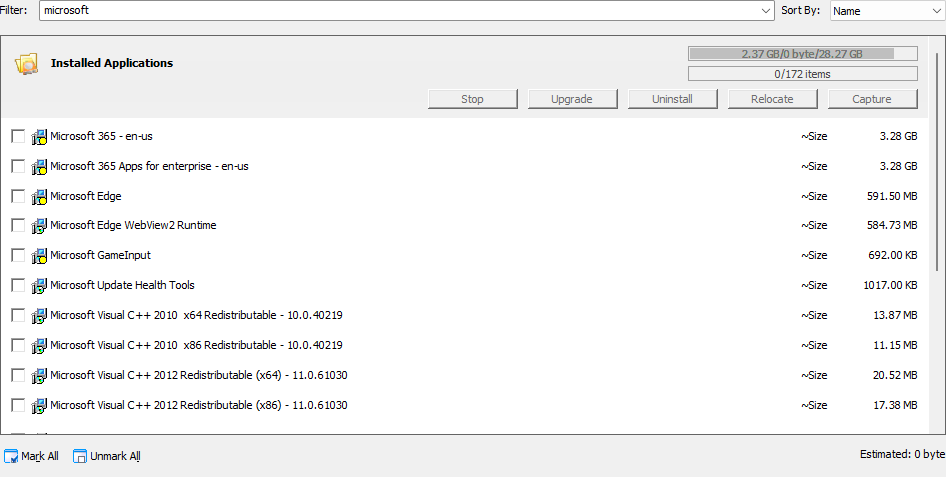
At this point, we can already click Mark All to select all applications in the Search view. However, if we only want to capture a single application, we can narrow down our search further by filtering for a specific application name, e.g., Microsoft Visual C++2005 Redistributable.
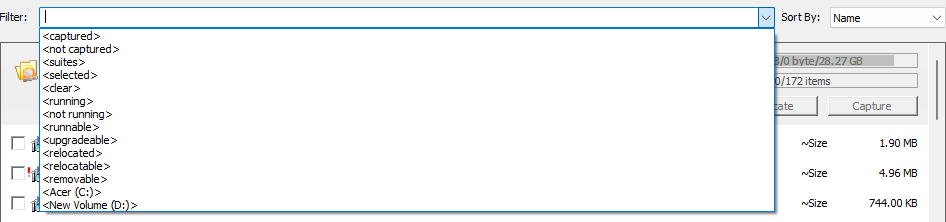
You can also click the Filter box and select from the following predefined options:
- <captured> – Lists installed applications that have been captured previously.
- <not captured> – Lists installed applications that have not been captured yet.
- <suites> – Lists the software suites recognized by PickMeApp, e.g., MS Office.
- <selected> – Lists the applications you have marked prior to filtering the list.
- <running> - List running applications.
- <not running> - Lists stopped applications.
- <runnable> - Lists applications that can be run by PickMeApp.
- <upgradeable> - Lists applications that have newer versions.
- <relocated> - Lists applications that have been relocated from a disk to another disk.
- <relocatable> - Lists applications that can be relocated to another disk.
- <removable> - Lists all installed applications that can be removed/uninstalled.
- <clear> – Cancels the previous filter and returns to the default display that lists all installed applications.
- Applications installed on your system drives on your computer, for example, <C:> or <D:>
Note: Selecting a different filter or searching for a different program does not deselect already selected applications. To clean previous selections, select the <clear>
The screenshot below shows the predefined filter options.
Note: Filters are disabled when PickMeApp is performing an operation on installed applications.
Sorting Installed Applications
To help you organize your applications for easier viewing, you can sort the list by Name, Size, Time, Age, Used On, Cache Size, Version, and Installer (the list is sorted by Name by default).
This is particularly handy when you have many installed programs on your PC. As an example, when using Installer to sort, you will know what Installer what used in deploying the installed application.

Managing the Installed Application Panel View
While Windows "Add/Remove Programs" provides a basic view, PickMeApp delves deeper, often uncovering 2-3 times more installed applications on a PC. This granular insight empowers users to make informed application management decisions.
However, the sheer volume of displayed applications might feel cluttered for some users. In response, we've integrated customizable display options to align with the familiar Windows "Add/Remove Software" appearance.
Access these controls via the "List" tab in the "Settings" dialog. The two main configurable settings are:
Access these controls via the "List" tab in the "Settings" dialog. The two main configurable settings are:
- Hide all suite members: Conceals individual software suite components.
- Hide system applications: Omits applications categorized as:
- Redistributables
- Frameworks
- Operating System applications
- Auxiliary applications added by primary installations.

These settings are active by default. If specific applications seem absent, you may want to deactivate one or both options.
To further streamline management, we've added application counters. These metrics provide a snapshot of the selected, visible, hidden, and overall installed applications.

Counters are displayed in the format:
#selected / #shown / #hidden and the total number of installed applications.
Expanded Application Entry View
To display the expanded application entry view, or the Expanded view, click an application under the Installed Applications panel.
Installed applications in the Expanded Entry view show basic information, including:
- Estimated Time (~Time) –The estimated time it would take to perform an operation on the application
- Version – The version number of the application
- Estimated Size (~Size) – The estimated size of the application as installed on the source computer. This is normally the same as the size displayed in Windows when adding or removing programs in Control Panel.
- ~Age – installation date
- ~Used On – The last time the application was used
- Version – The version number of the application
- Required Disk Space – The estimated size of the installed application.
- Cache Size – This shows the estimated Setup size of the hidden cache left after installing the application. This is unique to PickMeApp, allowing the program to reveal the actual size of installed applications,
- ~Installer – This shows the type of installer used in creating the installation package.
In the Expanded Application Entry view, the Application Bar shows the following buttons:
- Start – Starts the application.
- Stop – Stops the application.
- Upgrade – Upgrades the application to the latest available version.
- Uninstall – Uninstalls the application from your computer.
- Relocate/Restore – Relocates an application to a different disk or undo relocation.
- Capture – Creates an installation archive that includes the essential elements for setting up and running the application on another computer.
- Repair – Repairs the application. This operation is only applicable to software with a repair feature.
The Extended Application view is responsive, meaning that if you minimize it, it will have navigation buttons on the left and right that will allow you to browse through the rest of the Application Bar’s buttons.
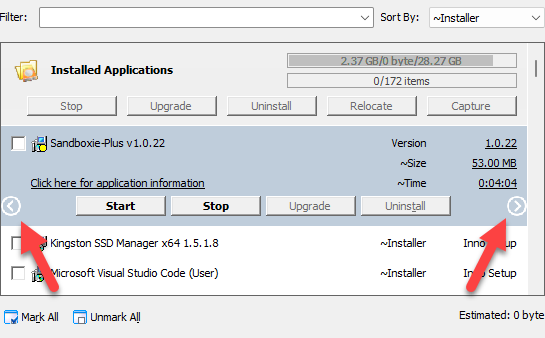
To view more details about an application, click the Application Information text link directly below the application name.

Below is a sample application information screen.
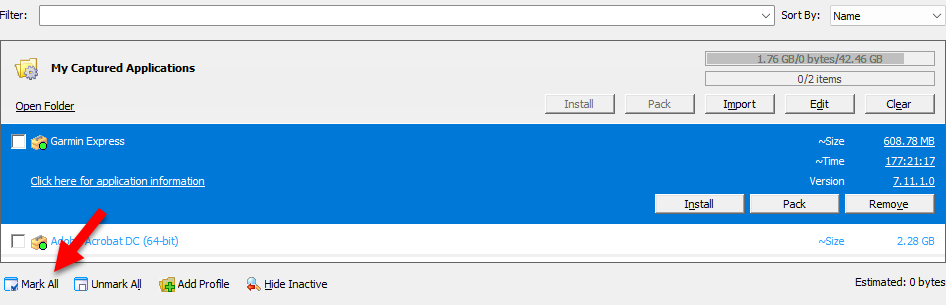
Marking an Installed Application Prior to an Operation
After filtering the list of installed applications in either of the two applications profiles by name or according to the predefined options (see Filtering Installed Applications), check the box to the left of the application.
To select all the applications that have been filtered, click the Mark All button at the bottom of the Installed Applications panel. You can then perform the applicable operation on the marked applications under the Expanded View of the Installed Application panel.
Note: While you can select installed applications without a filter, it is quicker to filter and select the applications before conducting an operation. If you selected multiple applications from the list, you could bring them up by using the <selected> filter. For more information, see Filtering Installed Applications.
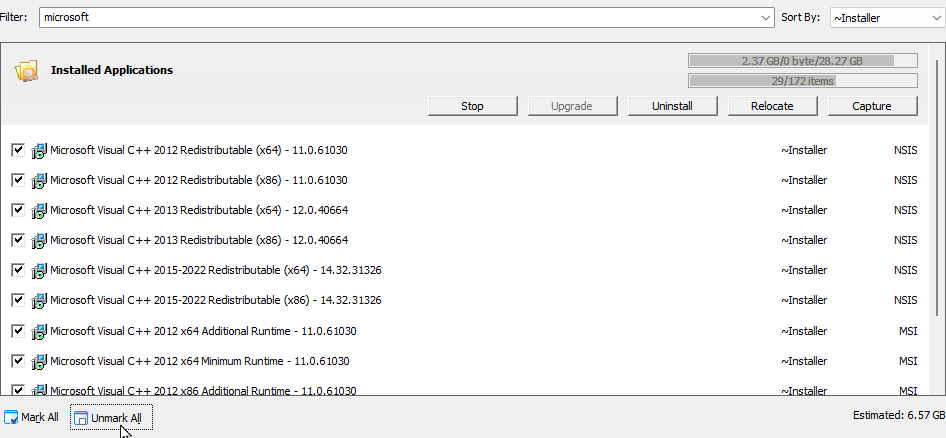
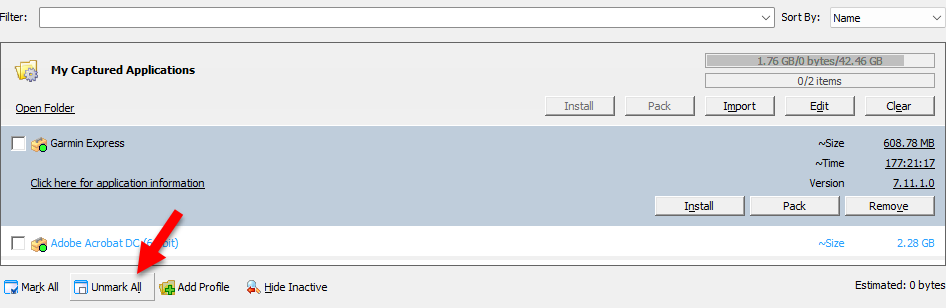
Unmarking a Selected Application
After marking several applications (see Marking an Installed Application Prior to an Operation), you can click the Unmark All button to deselect the marked applications. You can also do this manually, by unmarking each box to the left of the marked application.
Highlighting an Installed Application
Click the application from the list under the Installed Applications panel. Once highlighted, the item is displayed in its Expanded Application Entry view.

4.2 Capturing an Application
4.2 Capturing an ApplicationWhen capturing an application, essential elements such as application files and registry settings are saved into an installation package, which can then be used to install the application on another computer. It can also be used as a backup copy of the installed application so that you can use it if you ever need to reinstall the application on your own computer.
Setting Up Capture Settings
Before using PickMeApp’s Capture Application feature, you may want to check your capture settings first.
To define capture settings in PickMeApp:
- Click Settings on the Main Toolbar.
- By default, the following capture settings are enabled:
- Allow capturing setup cache
- Allow capturing of running application
- By default, the following capture settings are disabled:
- Capture application with customized settings – experimental feature
- Save captured application as self-extracting setup executable file.
- To disable or enable a setting, click the checkbox to its left.
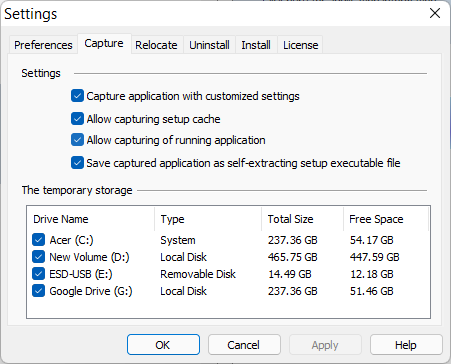
Note: It is recommended to choose non-removable NTFS disks as temporary storage when capturing applications.
Prior to capturing applications, you should set the temporary storage locations that will be used for captured applications. PickMeApp detects all storage disks on your PC and enables them as temporary storage locations by default. PickMeApp chooses the maximal storage space from among the enabled disks. To prevent PickMeApp from choosing a storage location, remove the checkmark on its box.
Capture Application with Customized Settings
When enabled, this captures the application together with any customized settings.
Allow Capturing Setup Cache
To allow smooth installation of additional components and features, and to facilitate repair, many software programs cache installation files on your PC during installation. PickMeApp can capture and transfer installation caches while capturing the applications. This feature improves application redeployment significantly.
The size of the captured application’s setup file can be 3-5 times larger when capture of setup cache is enabled. With larger file sizes, the time to capture an application also becomes significantly longer. You may need to disable this feature if you need a smaller installation package or want the application capture to be faster.
Allow Capturing of Running Application
By default, PickMeApp allows capture of running applications. However, sometimes, this may lead to issues with missing components in the application. When that happens, you may want to disable this setting.
Save Captured Application as Self-Extracting Setup Executable File
When enabled, this saves a captured application into a stand-alone, self-extracting setup file. When saved as a self-extracting file, it can be used like any other installation package – you just need to click it, then the program will be installed, regardless of whether you have PickMeApp or not.
When disabled, Capture saves the captured application into a single .tap file. In this case, you would need to have PickMeApp to install the program into a PC.
Capturing a Single Application
To capture a single installed application:
- Search for the application to be captured from the Installed Applications panel.
- When you find the application, click it to open its Expanded view.
- Optionally, select PickMeApp Profile on the right panel as the target for your captured application.
- Click the Capture button on the Installed Application Bar.
- Once the capture process is started, PickMeApp will start creating the application package which contains all the data necessary for the deployment of the application. This package is saved inside the active profile of your choice. This can be the built-in My Captured Applications profile that points by default to the TAPPS sub-folder within the PickMeApp data directory (%programdata%/PickMeApp). For more information, see Using Profiles.
Note: PickMeApp Light has only one hidden built-in profile which points to the TAPPS sub-folder.
- During the capture process, the Progress Bar shows how far you are into the process. The Log Window also displays the status of the current session.
- Once the capture process is done, the Progress Bar is refreshed/cleared and the Current session tab under the Log Window displays a Capturing process is finished entry. In addition, the captured application in now listed under the selected profile in the Installation Software Packages Panel.
PickMeApp creates the installation program under the Profile’s destination directory. To go quickly to the destination directory, click the Open Folder link under each Profile Bar in the Installation Software Packages Panel.

Capturing Multiple Applications at the Same Time
PickMeApp can also capture several applications at the same time (this is not available on PickMeApp Light).
- Under the Installed Applications panel, check the boxes to the left of the applications to be captured. Alternatively, you can filter the list and narrow it down to the applications you want to capture (see Filtering Installed Applications).
- Optionally, select PickMeApp Profile on the right panel as the target for your captured application packages.
- Click Capture, which is enabled only when you mark/select one or more applications in the Installed Applications panel.
- Once the capture process is started, PickMeApp will start creating packages per application. These packages contain all related application data, including the data necessary for application deployment. The package files, which can either be .tap or .exe depending on your Capture settings, are saved inside the selected PickMeApp Profile, which, by default, is the built-in My Captured Applications profile that points to the TAPPS sub-folder within the PickMeApp data directory (%programdata%/PickMeApp). For more information, see PickMeApp Installation Packages Profiles.
- During the capture process, the Progress Bar shows how far you are into the process. The Log Window also displays the status of the current session. The upper progress bar shows the status of an action performed on individual applications. The lower progress bar, which is longer, shows status of batch processing actions.
- Once the capture process is done, the Progress Bar is refreshed/cleared and the Current session tab under the Log Window displays a Capturing process is finished entry. In addition, the captured applications are now listed under the Installation Software Packages Panel.
Note: PickMeApp creates the installation package under the Profile’s destination directory. To go quickly to the destination directory, click the Open Folder link under each Profile Bar in the Installation Software Packages Panel.
4.3 Relocating an Installed Application
4.3 Relocating an Installed ApplicationPickMeApp can relocate an installed application or several installed applications at once from one storage device to another on the same computer.
Note: To know which of the applications installed on your computer can be moved or relocated to another location, use the <relocatable> filter.
During relocation, PickMeApp calculates required disk space, identifies application folders that are safe to relocate, moves applications folders to the new destination, cleans up leftover data and confirms application integrity after relocation. PickMeApp may undo any unsuccessful relocation and keep the computer save state throughout the relocation process. In some cases, restarting the computer and running PickMeApp again is required to complete a relocation.
Relocated software works seamlessly with management operations such as running, terminating, capturing, uninstalling, and upgrading installed software. After uninstalling an application, PickMeApp will cleanup any leftover application data and preserve relocated applications. Users can always reverse the relocation by recovering the software and putting it back in its original location.
PickMeApp supports relocating applications on all Windows operating systems with NTFS storage systems, starting from Windows XP SP3 and up. By using PickMeApp to move applications on another disk, users will effectively free up to 99% of system disk space that was previously occupied by installed applications. In future releases, PickMeApp will provide a solution for freeing even more space, which will further prolong the life span of Windows computers with insufficiently sized SSD disks.
PickMeApp starts the relocation of an installed application by ending all running application processes. Make sure you have saved all application documents prior to starting the relocation process.
The relocation may last from a few seconds to several minutes, depending on the size of the application and speed of the source and destination drivers. In some cases, you may experience a brief period of desktop flickering. This happens when PickMeApp is trying to release some locked files prior to the relocation.
WARRNING! During relocation, take care that you do not accidentally switch off the computer e.g., pressing the power button, otherwise the application may end up in a non-operational state.
Software suites, e.g., Microsoft Office, are managed as a single application. All applications in a software suite are relocated at once.
In some cases, you may be prompted to restart your computer and run PickMeApp again to finalize the relocation of applications. You may restart the computer once per several relocations.
Note: PickMeApp will attempt to stop the application before relocating it. However, if you encounter any issues during the process, you may want to stop the application first before attempting to relocate it again.
Setting a Destination Drive
You need to set a destination drive for applications to be relocated prior to using PickMeApp’s Application Relocation feature.
To set a destination drive for applications to be relocated:
- Click Settings on the Main Toolbar (see The PickMeApp Pro User Interface)
- On the Settings window, click the Relocate tab.
- Select the destination drive.
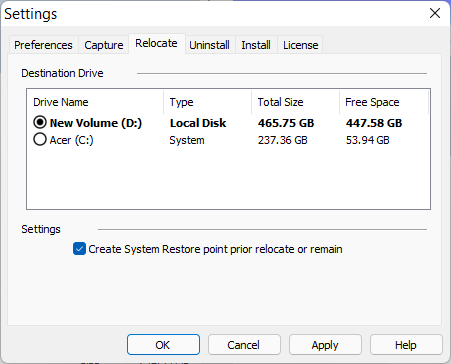
- Click Apply. A message saying that the drive has been chosen as the relocation destination appears on the Session Log.
Note: Only non-removable NTFS disks will be listed as destination storage suitable for relocation.
- To let PickMeApp create a system restore point prior to relocating an application, check the Create a System Restore Point box.
Note: For the Create System Restore point setting in PickMeApp to work, system protection must be turned on for the source disk, or the drive from where the application is being relocated.
Relocating a Single Application
After setting the destination drive, you can start relocating applications.
PickMeApp starts the relocation of an installed application by ending all running application processes. Make sure you have saved all application-related documents prior to the relocation.
The relocation may last from a few seconds to several minutes, depending on the size of the application and speed of the source and destination drivers. In some cases, you may experience a brief period of desktop flickering. This happens when PickMeApp is trying to release some locked files prior to the relocation.
Warning!
During relocation, take care not to accidentally switch off the computer. Otherwise, the application may end up in a non-operational state. To ensure that you can reinstall the application in case of issues, you may want to back up the application first by packaging it with PickMeApp.
Software suites, e.g., Microsoft Office, are managed as a single application. All applications in a software suite are relocated at once.
In some cases, you may be prompted to restart your computer and to run PickMeApp again to finalize the relocation of applications. You may restart the computer once per several relocations.
Note: You cannot relocate an application that is already installed on the destination drive.
To relocate a single application:
- Search for the application to relocate from Installed Applications panel.
- When you find the application, click it to open its Expanded view.
- Click Relocate to start relocating the selected applications to the designated destination drive (see Setting a Destination Drive). The Progress Bar shows how far you are into the Relocate process. The Log Window also displays the status of the current session.
- Once the relocation process is done, the Progress Bar is refreshed/cleared and the Current session tab under the Log Window displays a Relocating Product process finished entry. When you run the application the next time, it should start from its new location on the designated destination drive.
Relocating Multiple Applications at the Same Time
PickMeApp can relocate several applications at the same time.
To relocate several applications at once:
- Search for the applications to relocate from Installed Applications panel.
- When you find the applications, check the boxes to the left of the applications to be relocated. Alternatively, you can filter the list and narrow it down to the applications you want to relocate (see Filtering Installed Applications).
- On the Installed Application panel, click Relocate to start relocating the selected applications to the designated destination drive (see Setting a Destination Drive). The Relocate button is enabled when you mark/select one or more applications in the source panel.
- During the Relocate process, the Progress Bar shows how far you are into the process. The Log Window also displays the status of the current session.
- Once the Relocate process is done, the Progress Bar is refreshed/cleared and the Current session tab under the Log Window displays a Relocating Product Process finished entry. When you run any of the relocated applications the next time, they should start from their new locations on the designated destination drive.
Note: Restart the computer and run PickMeApp again if at least one application relocation requires a computer restart.
Relocated Applications Filter
You may find relocated applications by applying the <relocated> filter in the Filter Bar.
Relocated Applications Info
To see detailed information about a relocated application, select the Click here for application information link on the Application Bar. The detailed application info available via this link includes:
- The size of the relocated folders (the freed-up space from the original disk)
- The original and destination drives.
- The relocated folders and their status
Restoring a Relocated Application
To restore a relocated application means to return the relocated application’s folders back to their original location. This transfers the application back to its original location.
After an application is successfully relocated, the font color of each relocated application is changed to blue and the Relocate button on the Application Bar is changed to the Restore button.
Note: The Restore button remains disabled for relocated applications waiting for a computer and PickMeApp restart.
The Restore action is like relocating an application. The Restore process may last from a few seconds to several minutes, depending on the size of the application and speed of the source and destination drivers. In some cases, you may experience a brief period of desktop flickering. This happens when PickMeApp is trying to release some locked files prior to restoring the application.
Note: The application being restored fails with an error message if there is not enough space left on the original drive.
Restoring applications may require restarting the computer to clean up restored data coming from the relocation. When this happens, PickMeApp prints the information on the Session Log. Since there is no Restart computer message that appears on your screen, make sure to check the Session Log every time you try restoring an application.
Note: You can only restore applications one at a time. Batch mode is not available for restoring applications.
4.4 Upgrading an Application
4.4 Upgrading an ApplicationPickMeApp keeps your installed applications up to date. As a software updater tool, PickMeApp has the following features:
- Scans and lists your outdated software.
- Downloads and installs upgrades with just one click.
- Downloads upgrades directly from the program’s original source.
- Creates a system restore point that you can use to roll back to the computer’s previous working settings whenever required (PickMeApp Pro only).
- Supports thousands of software programs via built-in and/or custom app stores.
- Works smoothly with all Windows versions, including Windows 10/8/8.1/7/XP/Vista.
You can upgrade outdated applications one at a time, or several outdated applications at the same time.
Note: We recommend turning on System Protection in Windows to ensure that you can roll back any upgrades performed with PickMeApp.
Upgrades will be tracked for any installed software programs matching any installation package in the Software Installation Packages profiles. For example, any application from the PickMeApp Collection that has been installed on the computer will be monitored for upgrades.
To make sure that installed software will be monitored for upgrades, you can import its installation package in PAD format to one of the PickMeApp profile using the Import button on the Installed Software Applications panel. The official PAD repository (http://repository.appvisor.com/) contains more than 15,000 software titles.
PickMeApp will always upgrade an application to the latest available version.
To check the location of an application’s installation package, click the Application info link at the bottom of the Application bar.
It is ok to import the corresponding PAD package after an application has been installed.
Note: If you have a licensed application, ensure that your existing license applies to the version to which you want to upgrade. Otherwise, you might not be able to run the application after it has been upgraded. If you have System Protection turned on in Windows, you can roll back to the previous working version of the upgraded application.
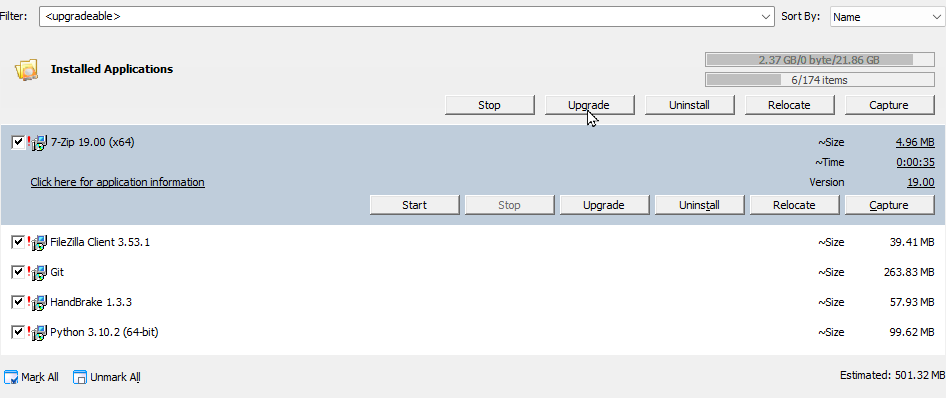
Identifying Upgradeable Applications
Installed programs that are outdated can be identified through an exclamation mark displayed to their left. Alternatively, you can find outdated programs by using the Upgradeable filter (see Filtering Applications).
Upgrading a Single Application
PickMeApp can upgrade a single application, or multiple applications, at a time.
To upgrade an application:
- Once you have identified an upgradeable application (see Identifying Upgradeable Applications), click it to open its Expanded view.
- Click Upgrade to start upgrading the selected application. The Progress Bar shows how far you are into the Upgrade process. The Session Log Window also displays the status of the current session.
- Once the Upgrade process is done, the Progress Bar is refreshed/cleared and the Current session tab under the Log Window displays an Upgrade process finished entry.
Upgrading Multiple Applications at the Same Time
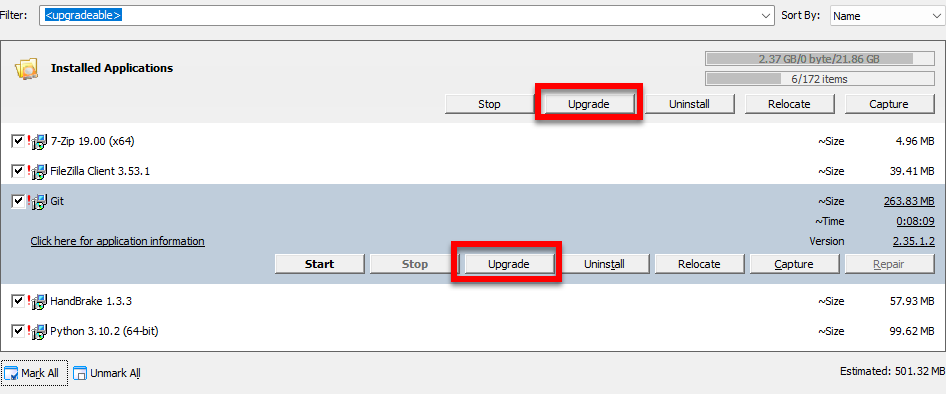
PickMeApp can upgrade several applications at the same time.
To upgrade several applications at once:
- Once you have identified the upgradeable applications (see Identifying Upgradeable Applications), mark/select them using the Mark All Button.
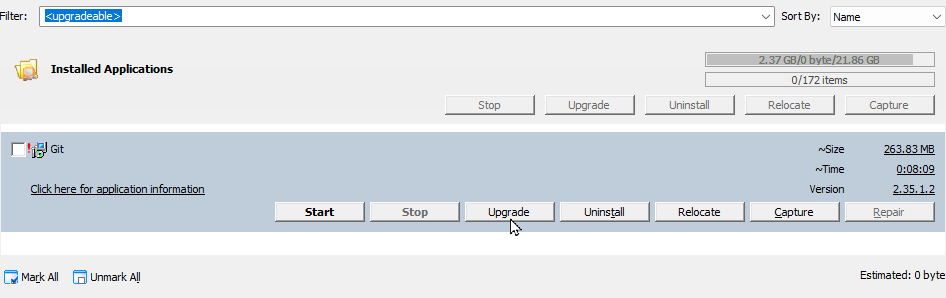
- On the Installed Application Panel bar, click Upgrade to start upgrading the selected applications. The Progress Bar shows how far you are into the Upgrade process. The Session Log Window also displays the status of the current session.
- Once an application is upgraded to its latest version, a message to this effect is displayed on the Session Log.
- Once the Upgrade process for all applications is done, the Progress Bar is refreshed/cleared and the Current session tab under the Log Window displays an Upgrade process finished entry.
4.5 Uninstalling Applications
4.5 Uninstalling ApplicationsPickMeApp can uninstall applications from your computer. You can uninstall one or more applications at once, thus saving you time.
Uninstall Settings
To configure the Uninstall settings for your applications:
- Click Settings on the Main Toolbar (see The PickMeApp User Interface).
- On the Settings window, click the Uninstall tab.
- By default, the Guess Silent Uninstallation option is selected. This means that PickMeApp will try to guess the non-interactive, unattended, and silent uninstallation sequence for software installed on your PC.
- To let PickMeApp uninstall running applications, check the Allow uninstalling of running applications box.
- To let PickMeApp create a System Restore point when uninstalling applications, check the Create System Restore point prior to uninstall box.
- Click Apply to save the configuration settings.
Note: The Create System Restore point setting will only work if you have System Protection turned on in Windows.
Uninstalling an Application
To uninstall an application
- Highlight the application to be uninstalled from the list. Alternatively, you can filter the list and narrow it down to the application you want to uninstall (see Filtering Installed Applications).
- From the application’s Expanded view, click the Uninstall button.

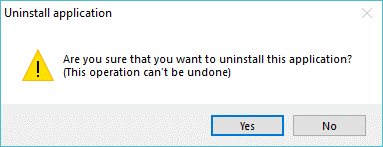
- Click Yes on the confirmation message to continue with the Uninstall process.
- The Progress Bar shows how far you are into the Uninstall process. The Session Log Window also displays the status of the current session.
- Once the Uninstall process is completed, the Progress Bar is refreshed/cleared and the Current session tab under the Log Window displays an Uninstall process finished entry.
Uninstalling Multiple Applications at the Same Time
It is possible to uninstall several applications at once only if these applications do not require user interaction during the uninstall process. Most Applications in PickMeApp support it natively. By default, PickMeApp tries to guess the non-interactive, unattended, and silent uninstallation sequence (see Uninstall Settings). This allows uninstallation of multiple applications.
While installing multiple applications, installed applications that do not allow unattended installations are identified, their uninstall dialogs opened. And their uninstall skipped. Uninstallation of these applications is left to the user to complete interactively.
To uninstall multiple applications:
- Select the application to be uninstalled from the list. Alternatively, you can filter the list and narrow it down to the application you want to uninstall (see Filtering Installed Applications).
- From the application’s Expanded view, click the Uninstall button.
- Click Yes on the confirmation message to continue with the Uninstall process.
- The Progress Bar shows how far you are into the Uninstall process. The Session Log Window also displays the status of the current session.
- Once the Uninstall process is completed, the Progress Bar is refreshed/cleared and the Current session tab under the Log Window displays an Uninstall process finished entry.
Note: We recommend uninstalling relocated applications using PickMeApp only.
4.6 Running and Terminating Applications
4.6 Running and Terminating ApplicationsAside from managing your software programs, you can also use PickMeApp to launch/start/run and stop/terminate applications.
PickMeApp’s detailed knowledge of application components allows it to locate and start any executable included in a software installed on your PC. PickMeApp can also identify and terminate any running process of the selected application on demand. PickMeApp even manages hidden application services running in the background that are consuming computer resources.
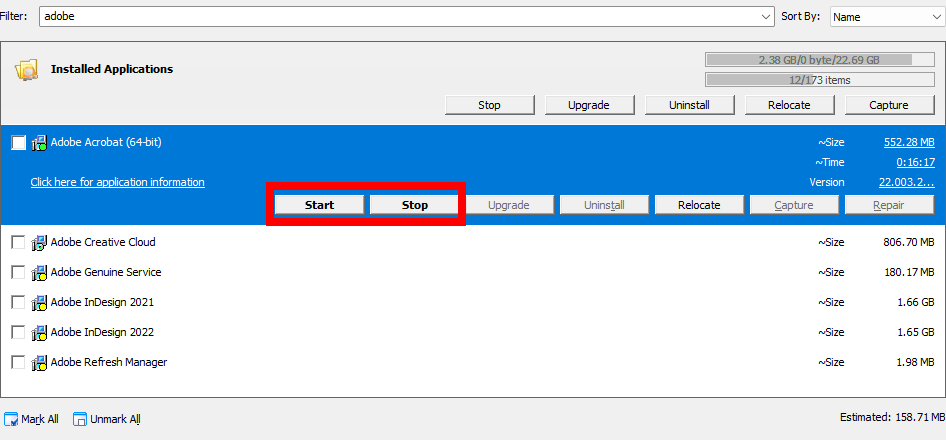
To run/terminate an application, click the corresponding Start/Stop button on the Application bar.


To terminate several applications at once, select the applications you want to terminate, then click the Stop button on the Installed Application panel.
If an application has a single executable, PickMeApp shows the Start/Stop buttons with normal text.
If an application has several executables or services, the buttons are shown in bold text. The Start/Stop buttons may be enabled at the same time for applications with several executables since its executables may either be running or stopped at the same time.
If several executables belong to the same application, PickMeApp allows users to choose which executable to start or to stop.

To simplify management, PickMeApp groups executables by type. The essential application executables can easily be reached with one click while rarely used executables are grouped together by default.
Alongside with starting executables, PickMeApp starts any essential application services needed to run those executables. On the other hand, it is possible to completely terminate an application’s processes and services to save on computer resources.
PickMeApp provides detailed application info about application executables, services, and running statuses, along with information about whether they are set up to run after computer startup.
To filter running/stopped applications for batch management, use the <running> and <non-running> filters. You can then select the applications you want to start or terminate from the list.
PickMeApp CLI interface is extended to support starting and stopping of applications from the command line.
Running an Application
To run an application using PickMeApp:
- Search for the application to run from Installed Applications panel. Alternatively, search for the application using the Not running filter.
- When you find the application, click it to open its Expanded view.
- Click Start to run the application. The Progress Bar shows the status of the application as it starts up. The Log Window also displays the status of the current session.
- Once the application is run, the Progress Bar is refreshed/cleared and the Current session tab under the Log Window displays a Start process finished entry.
Terminating an Application
To terminate an application using PickMeApp:
- Search for the application to terminate from Installed Applications panel. Alternatively, search for the applications using the Running filter.
- When you find the application, click it to open its Expanded view.
- Click Stop to terminate the application. The Progress Bar shows the status of the application as it starts up. The Log Window also displays the status of the current session.
- Once the application is terminated, the Progress Bar is refreshed/cleared and the Current session tab under the Log Window displays a Start process is finished entry.
Terminating Multiple Applications at the Same Time
To terminate several applications at once:
- Search for the applications to terminate from Installed Applications panel. Alternatively, search for the applications using the Running filter.
- When you find the applications, mark/select them using the Mark All button on the bottom left.
- On the Profile bar, click Stop to terminate the applications one by one. The Progress Bar shows the status of the applications as they are terminated. The Log Window also displays the status of the current session.
- Once the applications are terminated, the Progress Bar is refreshed/cleared and the Current session tab under the Log Window displays several Terminated processes finished entries corresponding to the number of terminated applications.
4.7 Repairing an Installed Application
4.7 Repairing an Installed ApplicationIf you are encountering issues in an installed application, you can try repairing it.
To repair an installed application:
- Select an application from the Installed Applications profile. Alternatively, you can filter the list and narrow it down to the application you want to repair (see Filtering Installed Applications).
- From the application’s Expanded view, click the Repair button.

Note: This function is only available for applications with repair features.
@5 MANAGING INSTALLATION PACKAGES
@5 MANAGING INSTALLATION PACKAGESPickMeApp helps manage your installation packages. Alongside packages created by capturing installed applications, PickMeApp can discover, download, and install any existing Windows application in just a few clicks.
Among the advantages of using PickMeApp as an application manager are:
- It helps discover, download, and install silently any Windows application.
- It identifies how to install or to remove program silently, or without user intervention.
- It keeps track of new package releases automatically.
- It works completely offline with local repositories of custom software.
- It creates and manages your own personal collection of installation packages , in the cloud or locally, centralized or distributed.
- It has a built-in PickMeApp Collection of 120 popular silently installable programs.
PickMeApp supports, MSI, exe, tap, tad, and pad (XML) packages as well as package collections available in ZIP files.
- TAP Packages: They are Captured Application packages. All captured applications in PickMeApp are saved as TAP packages. TAP is proprietary to PickMeApp.
- MSI packages that are built using Windows Installer, a Windows component and application programming interface (API) used in installing, maintaining, and removing software.
- PickMeApp supports EXE file setups, which are self-extracting installation packages build by installers such as Inno Setup , NSIS, Wise, and others as well as by PickMeApp.
- PAD Packages: These are installation packages that come in the Portable Application Description (PAD) format. PAD format is a machine-readable document format designed by the Association of Shareware Professionals. It allows software authors to provide product descriptions and specifications to online sources in a standard way, using a simple XML schema that allows webmasters and program librarians to automate program listings. PAD files most commonly have a .XML or .PAD file name extension. The following global repository is used to publish PAD files http://repository.appvisor.com/
- TAD Packages: This PAD extension, which allows support for silent, unattended installations of Windows applications, is proprietary to PickMeApp.
5.1 Using the Installation Software Packages Panel (Right Panel)
5.1 Using the Installation Software Packages Panel (Right Panel)The Installation software packages panel lists your installation packages in so-called Profiles.
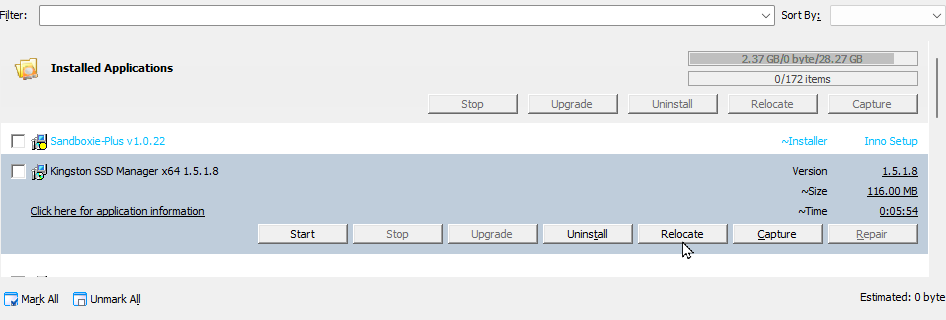
Package Font Color
PickMeApp uses different icons and font colors to distinguish different types of packages.
- Green font - MSI Package
- Turquoise - exe package
- Blue - pad and tad files
- Black – tap files
Filtering Installation Packages
You can instantly search for installation packages and captured applications by using the Filter located on the top of the Installation Packages panel. To use the Filter, simply type the name of the application, or part of its name on the box. The list of installation packages is then filtered to display only the installation packages that meet your search criteria for each PickMeApp Profile.
As an example, filtering the list by Microsoft displays all packages with the word Microsoft In the application or package name. You can see this in the screenshot below.
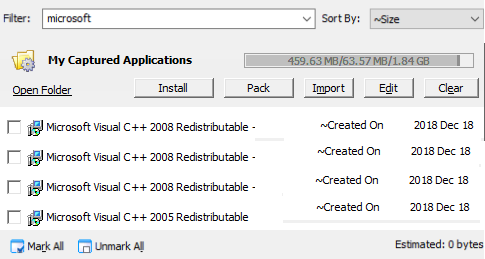
At this point, we can already click Mark All to select all the filtered application packages. However, if we only want to install a single application package, we can narrow down our search further. Let us illustrate this with an example.
Say we are looking for Microsoft Visual C++ 2010 redistributables only, we can filter the list of application packages by 2010. As seen in the screenshot below, this narrows down the list to two packages. We can then select whichever of these packages we want to install, pack, or import.

You can also click on the Filter box and select from the following pre-defined options:
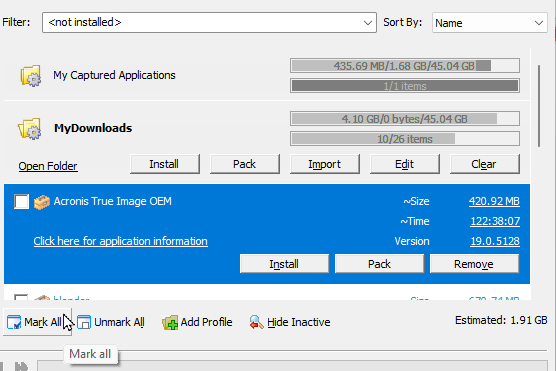
- <installed> – Lists all the installation packages that have already been installed on the PC.
- <not installed> – Lists all the installation packages that are not yet installed on the PC.
- <selected> – Lists all installation packages that have been marked/selected.
- <clear> – Cancels the previous filter and lists all installation packages.
Going back to our sample filter where we look for Microsoft Visual C++ 2010 redistributables, we can reset the filter by selecting the <clear> predefined option from the Filter box.
The screenshot below shows the predefined filter options. 
Marking an Installation Package Prior to an Operation
After filtering the list of installation packages by name or according to the predefined options (see Filtering Installation Packages), manually mark the box to the left of a package to be installed, packed, or imported.
To select all the filtered installation packages, click the Mark All button at the bottom of the Installation Packages panel. You can then install, pack, and import all the marked application packages using the Install and Pack respectively, under the Expanded View of the PickMeApp profile.
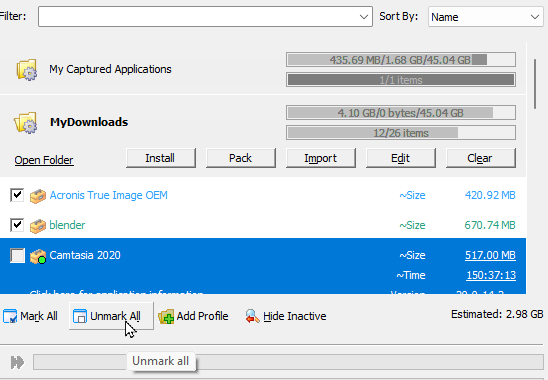
Unmarking Selected Installation Packages
After marking all installation packages (see Marking an Installation Package Prior to an Operation), you can click the Unmark All button to deselect the marked packages. You can also do this manually, by unmarking each box to the left of the marked installation packages.
Sorting Installation Packages
To help you better organize your installation packages, you can sort the list by Name, Size, Age, Used On, Cache Size, and Version. 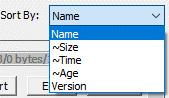
Selecting Installation Software Packages
You can select an installation package from the Installation Software Packages panel by checking the box before its name. You can select one or more packages using this method. In the same manner, uncheck the box to deselect the package.
To select all the installation packages found by a filter or listed under a profile (see Filtering Installation Packages), click the Mark All button at the bottom of the Installation Software Packages panel. In case you change your mind after selecting all packages, click the Unmark All button to deselect them again.
Expanded Package Entry View
To display the expanded installation package entry view, or the Expanded view, click a package under the Installation Software Packages panel.
Depending on the sort filter used (see Sorting Installation Packages), the Expanded view may show the following information:
- Estimated Size (~Size) – The actual size of the application when installed on the destination computer. This is normally the same as the size displayed in Windows when adding or removing programs in Control Panel.
- Estimated Time (~Time) –The estimated time for installing the package.
- Version – The version number of the installation package.
It also shows the following buttons:
- Pack – Creates a standalone installation file for a captured application.
- Install – Installs the application. It is enabled only when the application is not installed on the PC or installation settings allow installing the same or an early version of the application on the PC.
- Remove – Deletes the captured application from the active profile
To view more details about an installation package, you can also click the Click here for support information link directly below each expanded application entry.
Deselecting Installation Packages
To deselect all packages found using the filter or under an active profile, click the Unmark All button located at the bottom of the Installation Packages panel.
5.2 PickMeApp Installation Packages Profiles
5.2 PickMeApp Installation Packages ProfilesTo better organize installation packages, PickMeApp has introduced Installation Package Profiles.
These profiles are designated locations where application installers (packages) are stored and are categorized based on their storage type: local, remote (cloud), or peer-to-peer. Depending on the storage location, PickMeApp profiles are divided into three main types:
- Local Profiles: These manage installation packages on local drives and are colored grey when active and red when inactive, typically in the portable version of PickMeApp.
- Web Profiles: Managed on a remote server, these profiles are colored blue when online and grey when offline. They are currently set to read-only, prohibiting the import or capture of installed applications within the profile.
- Peer-to-peer Profiles: Designed to enable users to seamlessly synchronize installation packages across multiple PCs, these profiles are colored blue when connected and grey when offline.
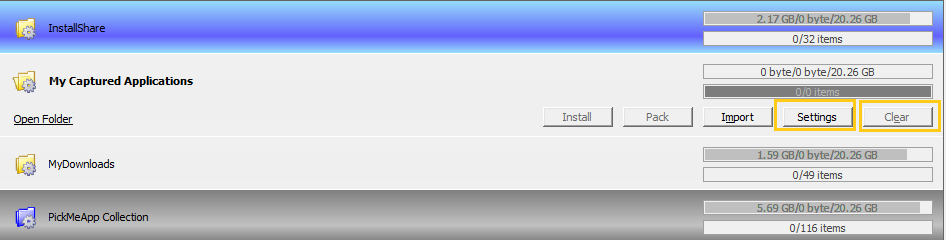
Build-In Installation Packages Profiles
PickMeApp includes several predefined profiles. By default, there are four (4) built-in profiles:
- My Captured Applications: This is the default local profile for captured applications and is always enabled. It saves captured applications to the TAPPS folder within the PickMeApp application directory. "My Captured Applications" is the active profile each time PickMeApp is started. Although you can rename this profile via the profile's "Settings" button, it will always be linked to the TAPPS folder. If the TAPPS folder is deleted, it will automatically be recreated. The contents of this profile can be cleared by pressing the "Clear" button, which deletes the installation packages located in the TAPPS folder.
- My Downloads: This local profile points to the Windows Downloads folder. You can rename it using the Profile Settings button, but it will continue to direct to the Windows
- Downloads folder. Clearing the contents of this profile, achieved by pressing the "Clear" button, results in the deletion of the installation packages found in the Downloads folder.
- PickMeApp Collection: This built-in Web Profile contains installation packages of popular applications.
- InstallShare: This is a built-in peer-to-peer profile that enables users to seamlessly synchronize their installation packages across multiple PCs.
To manage your built-in profiles, navigate to the Settings dialog in PickMeApp. Once there, click on the ‘Profiles’ tab to view all available built-in profiles.
In this dialog, you can enable or disable built-in profiles with a few exceptions. Use the toggle switch next to the profile name to enable or disable it.
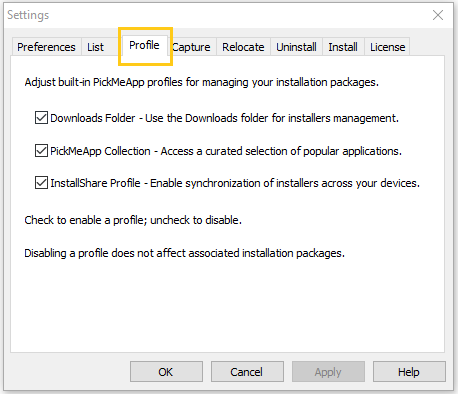
Creating a User-Defined Profile
To better organize your captured applications and other installation packages , you can create your own user-defined profiles. For example, you can create a Backup profile for packages you want to back up with their own customized settings.
To create a new local profile:
- Click the Add Profile button at the bottom of the Installation Packages panel.
- On the Add Profile window, enter the Profile Name and select the location where the applications under the profile will be saved. The location can be a folder under the PickMeApp installation directory, anywhere on your computer, on
- a removable drive, on the network or on the cloud.

- Click OK to add the new profile to the Captured Application panel.
Note: Upon adding the new profile, if there are already installation packages in the profile location, these will be added to the profile automatically.
Creating a Web Profile
Web Profiles point to a server somewhere on the Internet.
To create a remote web profile, you should indicate the location of the remote profile. For example, to create a web folder for installation packages from NirSoftTools, enter NirSoftTools as the Profile Name, then under Location, enter https://www.nirsoft.net/pad/pad-links.txt.
In this example, the text file named pad-links.txt contains the list of PAD files for installation packages in the profile. 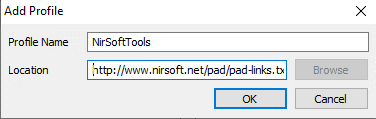
Editing a Profile Name
The names of the default My Captured Applications profile as well as user-defined profiles may be edited by clicking the Settings button under the profile’s Expanded view.
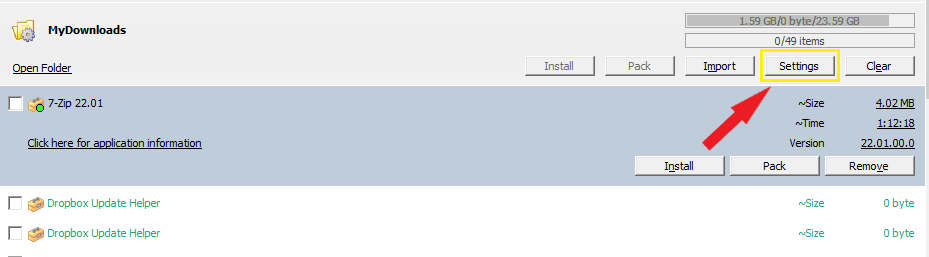
Removing a User-Defined Profile
To remove a profile and all installation packages belonging to it, click the Remove button on the profile’s Expanded view.
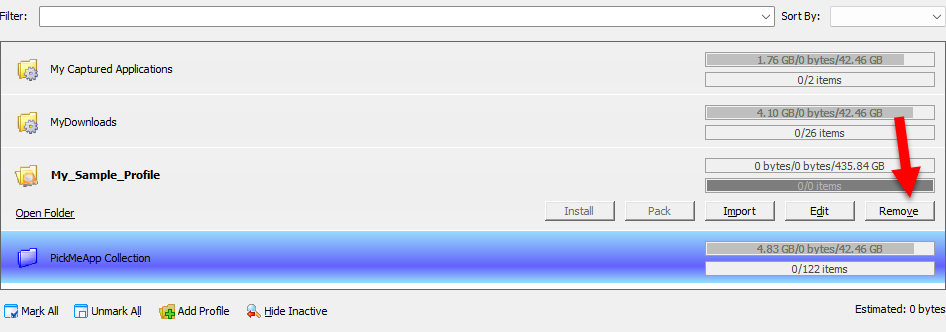
If there are installation packages in the Profile, the following message will be displayed. To go ahead and remove the packages with the Profile, click Yes. Otherwise, click No, in which case the packages will be left behind in the local folder of the deleted profile.
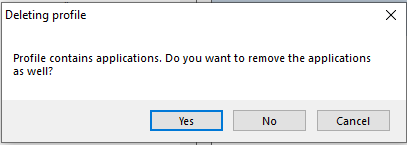
If there are no installation packages within the profile, you will be asked to confirm the Remove operation. Click Yes to go ahead and delete the Profile.
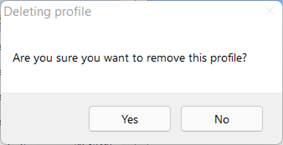
Note: Built-in profiles cannot be removed. However, you can disable them via the Profile Tab in the Settings Dialog
Clearing the Built-In Local Profiles
To remove installation packages or captured applications located in the built-in profiles like My Captured Applications and MyDownloads profiles, click the Clear button on the Profile Bar’s Expanded Entry View. When prompted, click Yes to continue, otherwise click No.
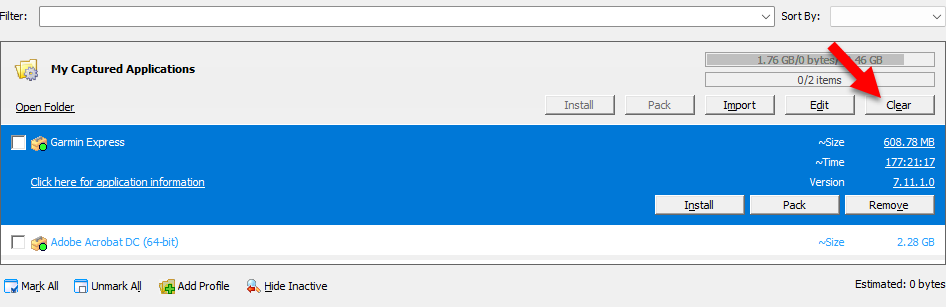
Hiding Inactive Profiles
If PickMeApp does not find the destination folder of a profile, it marks the profile with a red folder icon and shows it as inactive.
This happens when the path of the profile is located on a disconnected mobile drive, or on an inaccessible network storage.
To hide inactive profiles, click the Hide Inactive button at the bottom of the Installation Software Packages panel.
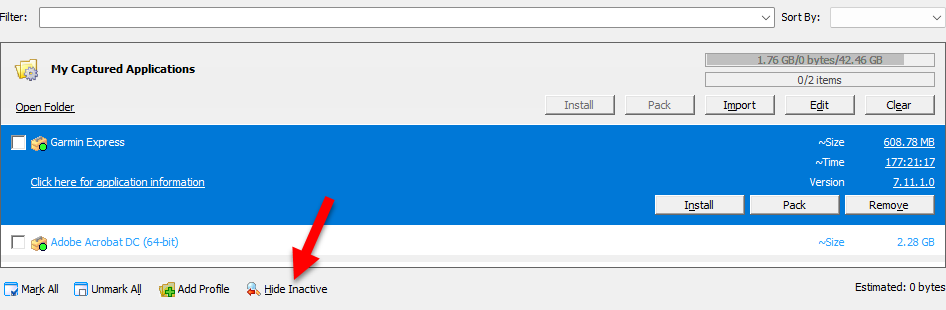
Selecting a Profile for an Application Prior to Capture
To capture an application into a profile, select the profile from the Installation Software Packages panel prior to running the Capture process. The profile’s destination folder is where PickMeApp will save the created .tap files or exe files (depending on the Capture settings) . In the screenshot below, the application that is undergoing capture is being saved to the My Captured Applications profile.
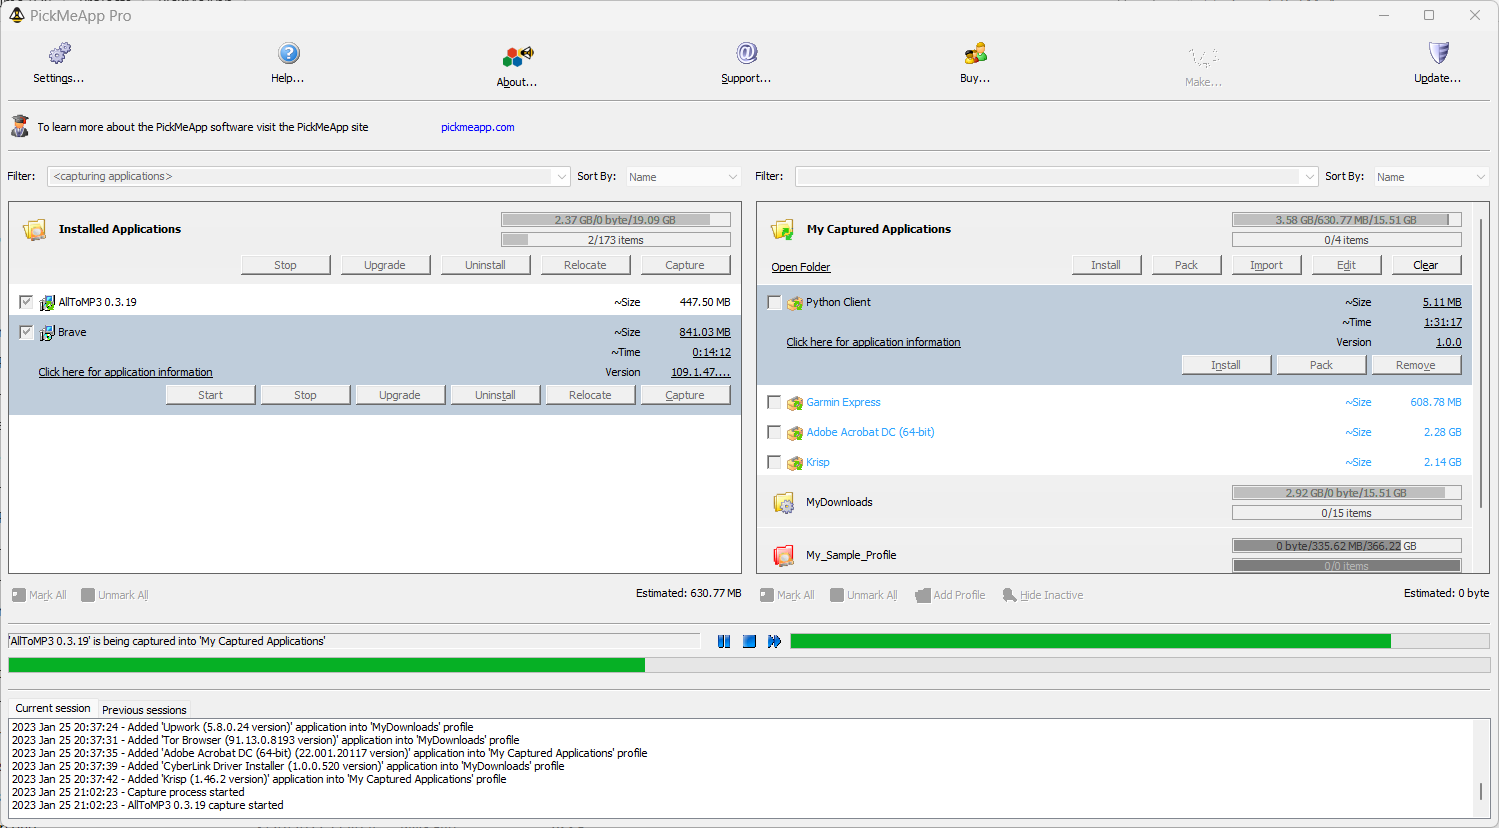
Note: You cannot capture an application to the same profile twice. If you want to capture an application again, either remove the captured application from the profile or choose another profile for the application.
Note: You cannot use Web Profiles to capture applications.
Importing Installation Packages into a PickMeApp Profile
To import an installation package into a PickMeApp Profile:
- Select the PickMeApp profile to which the installation package will be imported.
- Click Import.

- Select the installation package from your computer or the URL referencing the remote installation package. Make sure to select the appropriate installation format from the list so that you can see the installation packages located on your computer.
- Click Open to continue the import process.
- The Progress Bar shows the status of the application during importation into PickMeApp. The Log Window also displays the status of the current session.
- Once PickMeApp finishes with the Import process, the Progress Bar is refreshed or cleared and the Current session tab under the Log Window displays an Import process is finished entry. The installation package also appears in the list of applications under the designated PickMeApp folder.
5.3 Managing Installation Packages
5.3 Managing Installation PackagesThe following operations can be performed on installation packages:
- Installing an application. For more information on installing applications, see Installing Applications.
- Packaging one or more installation software into a single installation file. For more information, see Packing Installation Software.
- Remove an installation software package (from a Profile). For more information, see Removing Installation Packages.
- Importing an installation software package (to a Profile). For more information, see Importing Installation Packages into a PickMeApp Profile.
Both Install and Pack can be performed on multiple installation packages at once, while Remove from Profile can only be performed on one package at a time.
Managing an Installation Software Package
To manage a single installation package:
- Highlight the installation package you want to manage.
- Click the appropriate buttons, e.g., Installed, Pack, and Remove, on the Application Bar.
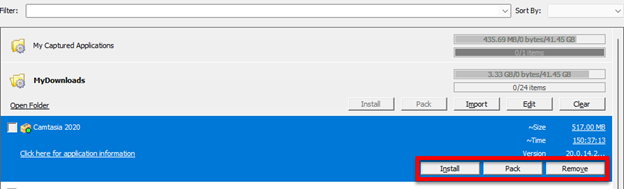
Managing Multiple Installation Packages at the Same Time
To manage several installation packages at once:
- Check the boxes to the left of the applications.
- Click the appropriate buttons, e.g., Install, Pack, and Import, on the Application Bar.

5.4 Installing Applications
5.4 Installing ApplicationsPickMeApp can keep track of all installation packages on your computer as well as remote application collections. As such, it can also be used as an application installer without going through the trouble of looking for the installation package on your computer or the web.
Install Settings
For more efficient management of your installations by PickMeApp, you need to configure your Install settings first.
- To configure your install settings:
- Click Settings on the Main Toolbar (see The PickMeApp User Interface).
- On the Settings window, click the Install tab.
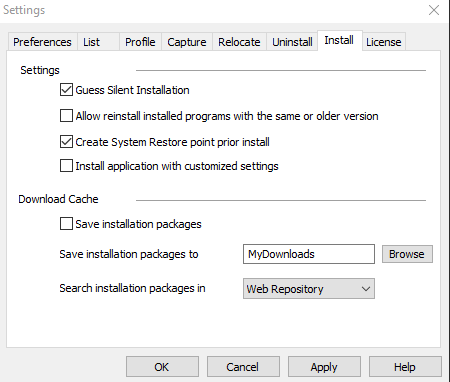
- By default, the following Install settings are enabled:
- Guess Silent Uninstallation
- Create System Restore point prior to install
- Make Downloads folder as PickMeApp Profile For more information, see Using Profiles.
- By default, the following capture settings are disabled:
- Allow reinstall installed programs with the same or older version
- Install application with customized settings
- Save installation packages
- To disable or enable a setting, click the checkbox to its left.
- By default, PickMeApp allows searching for installation packages in Web Repository. You can set this to Local Repository so PickMeApp will first look in the MyDownloads cache.
- Click Apply to save the configuration settings.
Pre-deployment Checklist
It is recommended to upgrade Windows Installer to version 4.5 and up when working with PickMeApp. Many programs require a runtime environment to be installed on the destination system. As of now, PickMeApp does not check if the required environment is installed. Therefore, it is recommended to download and install the following:
- Microsoft .NET Framework (3.5 (and up))
- Microsoft Visual C++ Redistributable Runtimes (see also VisualCppRedist AIO project)
- Microsoft Visual Basic 6.0 Common Controls
- Java Runtime Environment
You can use PickMeApp Applicaiton Collection to install these environments.
Note: Some installation packages may have other requirements aside from the above.
Installing an application
Before you can install an application, you should select the Profile where its installation package is located. If you do not know where the installation package is located, you can filter the list of installation software packages for the application. For more information, see Filtering Installed Applications.
To install a single installation package:
- Highlight the application you want to install on the Installation Software Packages panel.
- Click the Install button on the Installation Package Bar.
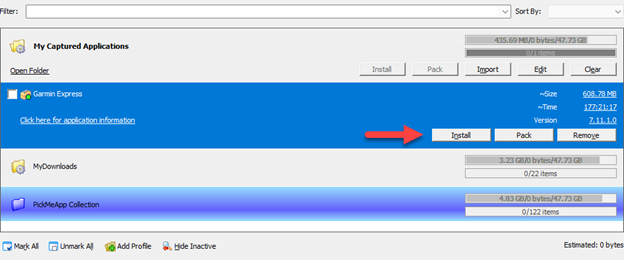
- Click Yes on the confirmation message to continue with the Install process.
- The Progress Bar shows how far you are into the Install process. The Session Log Window also displays the status of the current session.
- Once the Install process is completed, the Progress Bar is refreshed/cleared and the Current session tab under the Log Window displays an Installation process finished entry.
Installing Multiple Applications at the Same Time
It is possible to install several application packages at once only if these applications do not require user interaction during the installation process.
By default, PickMeApp tries to guess the non-interactive, unattended, and silent uninstallation sequence (see Install Settings). This allows installation of multiple applications.
While installing multiple applications, installation packages that do not allow unattended installations are identified and their install dialogs opened. Their installation is also skipped. Installation of these packages is left to the user to complete interactively.
To install multiple applications at the same time:
- On the Installation Software Packages panel, check the boxes to the left of the applications to be installed. Alternatively, you can filter the list and narrow it down to the applications you want to install (see Filtering Installation Packages).
- Click the Application Bar, then click Install, which is enabled only when you have marked/selected one or more applications listed under the active profile.
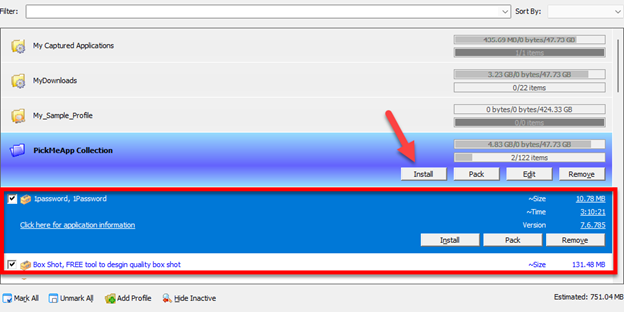
- Click Yes on the confirmation messages to continue with the installation processes.
- The Progress Bar shows how far you are into an application’s Install process. The Session Log Window also displays the status of the current session.
- Once all selected packages are installed, the Progress Bar is refreshed/cleared and the Current session tab under the Log Window displays several Install processes is finished entries corresponding to the selected number of installation packages.
Automatic Installation of Packages Within Profiles
PickMeApp Pro offers an "Automatically Install Packages" setting within each installation package profile, which can be toggled on or off according to your specific needs.
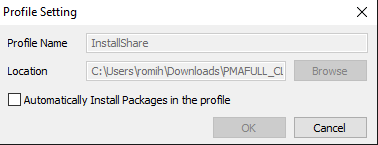
When this setting is enabled, the profile icon will display a special overlay, visually indicating its active status.

Upon activating this setting, PickMeApp continuously monitors the profile for new packages. When a new package is detected, the software:
- Checks if the application is already installed.
- Compares the installed version to determine if an update is needed.
- Verifies the "Allow reinstall installed programs with the same or older version" setting in the Install Tab of the Settings dialog.
The software will automatically install the package if it's new or updated and will reinstall it only if explicitly permitted by the install settings.
Activating the "Automatically Install Packages" setting in any profile triggers a review of all packages within that profile to ensure they are up-to-date. Additionally, restarting PickMeApp initiates a recheck of all packages in profiles where this setting is enabled.
Installations are scheduled during periods when PickMeApp is idle, putting the software in a busy state during the process. This setup allows you to pause, stop, or skip installations as needed, ensuring that ongoing installations do not interfere with your regular use of PickMeApp or your computer.
Note: If the automatic installation process is stopped, it will resume in about one minute, starting from where it was last paused. To completely halt the automatic installation process, make sure to toggle off the "Automatically Install Packages" setting for all profiles.
5.5 Removing Installation Packages
5.5 Removing Installation PackagesInstallation packages can be removed from local profiles but not from web profiles, with the behavior differing based on the profile. Thus, packages in the PickMeApp Collection profile cannot be deleted.
On the other hand, packages in local profiles such as My Downloads profile can be completely removed from your computer.
5.6 Packaging Installation Software
5.6 Packaging Installation SoftwarePickMeApp allows packing installation packages or a captured application into a standalone installation file that can be used on another PC without PickMeApp.
You can also pack several installation packages or captured applications into a single installation file. When you run this file on another computer, it will install all the applications included in the package.
You can use the Packaging feature to repackage expired self-extracted executable setups created by PickMeApp during capturing. The setup created by PickMeApp is limited by the lifespan of the original PickMeApp license. This repacking feature is also available in PickMeApp Light.
Note: TAP files do not required repackaging. They are permanently valid.
Packaging an Installation Package
To create a standalone repackaged installation file for an installation package or a captured application, click the Pack button from the Application bar.
Once done, you will see the installer file created on your destination folder. The installer is an .exe file that works just like your typical application installers in Windows. Double-click on the file to install the application on the target computer.
When packing a captured application, the Session Log window logs it as Packing %s application as self-extracting installation.
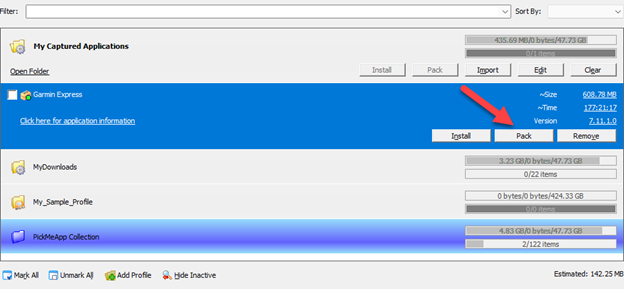
Packaging Multiple Applications into a Single Installation File
You can create a single installer file for multiple applications. To do this, select or mark the applications and click the Pack button from the Profile Bar.
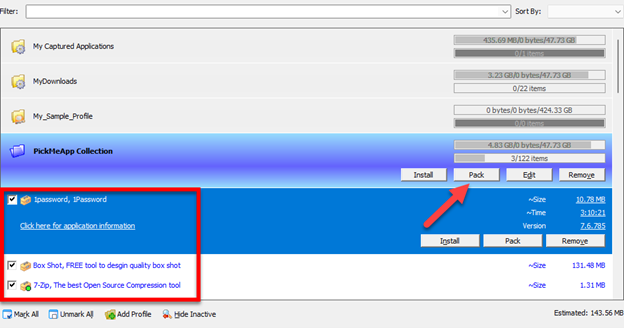
You can also click the Mark All button at the bottom to select all applications. If you change your mind, click the Unmark All button to deselect all marked applications prior to capture.
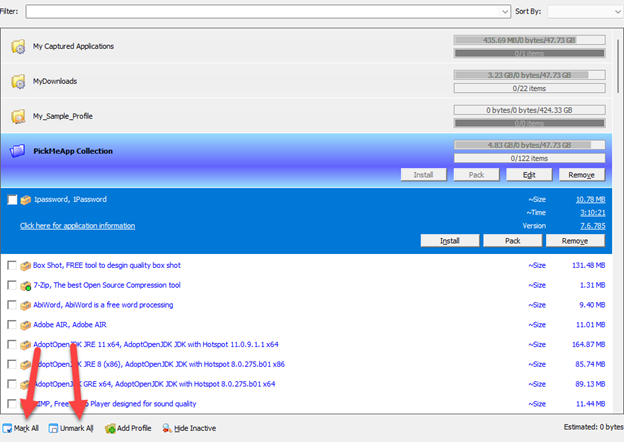
Once done, you will see an installation file with the same name as the active profile, created under the profile’s destination folder. Click on the file to install the bundled applications on the target computer.
Note: PickMeApp does not need to be present on the destination PC when installing a packaged application.
5.7 PickMeApp Collection
5.7 PickMeApp CollectionTo ease the process of using PickMeApp as your go-to Application Manager, the PickMeApp distribution includes the PickMeApp Collection Web Profile of 120 popular one-click installable programs.
- All included programs are the latest releases linked directly to their original publisher sites.
- PickMeApp can install these applications all at once.
- All installation work is done in the background.
- Applications are downloaded directly from each publisher's official site.
- The applications are installed in their default locations.
- They will not bother you with any choices or options.
- They will be installed without extra junk such as toolbars, among others.
- They will skip any reboot requests from installers, although you might need to restart your PC manually at the end of the installation process.
Each day we review, evaluate, and add programs to our PickMeApp Collection. The built-in PickMeApp Collection Web Profile enjoys automatic updates coming from our growing PickMeApp Collection.
5.8 InstallShare: The Special Built-In Peer-to-Peer Profile
5.8 InstallShare: The Special Built-In Peer-to-Peer ProfilePeer-to-Peer Profile
The Peer-to-Peer Profile is a powerful feature in PickMeApp Pro that enables seamless synchronization of installation packages across multiple PCs. This profile leverages the open-source Syncthing framework, a robust technology that ensures secure and efficient data synchronization without relying on centralized servers, thereby enhancing your control and privacy. For more details on Syncthing and its capabilities, click here.
To activate the Peer-to-Peer Profile, ensure your email and password for PickMeApp.com are correctly configured in the License Tab of the Settings Dialog, and verify that the peer-to-peer option is enabled for the profile.
Once enabled, the Peer-to-Peer Profile synchronizes and shares its content across all profiles with the same name within the PickMeApp Cluster. This cluster is defined as a group of at least two instances of PickMeApp running on different PCs, each with the same PickMeApp ID and a valid connection, where credentials are correctly authenticated with the PickMeApp.com backend.
Like other profiles, the Peer-to-Peer Profile supports various operations on the installation packages within it, including capturing applications, importing packages, and performing packing, repacking, and cleaning tasks.
However, the distinguishing feature of the Peer-to-Peer Profile is its advanced synchronization capabilities. When actions such as capturing, importing, or repacking result in a new or updated installation package within a peer-to-peer profile in the PickMeApp Cluster, that package automatically propagates to all peer-to-peer profiles with the same name across the cluster. Similarly, deleting a package from a peer-to-peer profile on one PC will cause it to be removed from all peer-to-peer profiles with the same name throughout the cluster.
By utilizing the Peer-to-Peer Profile, users can ensure that their software installation packages are available across multiple devices, enhancing productivity and reducing the complexities typically associated with managing multiple installations.
InstallShare as Peer-to-Peer Profile
Currently, PickMeApp Pro features a built-in peer-to-peer profile named InstallShare, which is enabled by default. You can manage the InstallShare profile through the Profile tab in the Settings Dialog.
Note: Ensure that the correct email and password are configured in the License Tab of the Settings Dialog before enabling InstallShare.
Once InstallShare is correctly enabled and credentials are verified, the contents of the InstallShare profiles are synchronized across all active instances of PickMeApp that share the same PickMeApp ID.
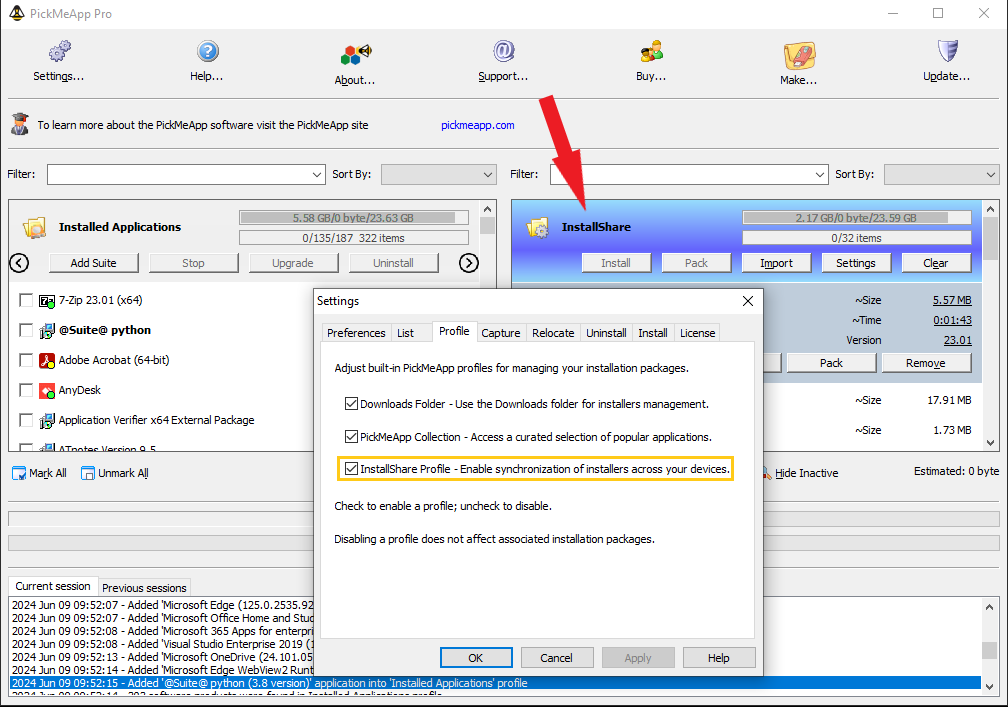
InstallShare Profile Usage
InstallShare profile allows you to effortlessly propagate applications captured on a source PC to a destination PC.
How to Propagate Captured Applications Between Source and Destination PCs Using InstallShare
- Install PickMeApp Pro on both the source and destination PCs.
- Set the same PickMeApp.com email and password on both PCs via the License Dialogs.
- Enable the InstallShare profile on both instances of PickMeApp.
- Select the InstallShare profile as the active profile on the source PC
- Capture the application within the InstallShare profile on the source PC.
- Confirm captured application appears in the InstallShare Profile on the destination PC.
Note: There is no need to manually set the PickMeApp ID in the License tab of the Settings dialog. Once the email and password are correctly entered, PickMeApp will automatically retrieve the correct PickMeApp ID from the backend.
InstallShare Profile with "Automatically Install Packages" Setting Enabled
When the "Automatically Install Packages" setting is enabled for the InstallShare profile, it not only synchronizes packages between PCs but also triggers the installation of captured applications on the destination PC. This ensures that any applications propagated through InstallShare are ready for use on the destination system without further user intervention, streamlining the process and enhancing productivity across devices.
Viewing Connected Instances in Your PickMeApp Cluster
To view all currently connected PickMeApp instances within your PickMeApp Cluster, simply log in to your account on the PickMeApp.com website. Upon logging in, you will have access to the "Online Devices" section, which displays a table of all active instances. This table includes detailed information for each device, such as:
- Code: A unique identifier for each instance.
- Name: The name of the computer on which the PickMeApp instance is running.
- License: The PickMeApp ID associated with each instance.
- Created: The date when each instance was initially registered.
- Changed: The most recent time the instance info was refreshed.
This functionality allows you to easily monitor and manage all instances of PickMeApp running within your cluster, ensuring efficient synchronization and coordination across multiple PCs.
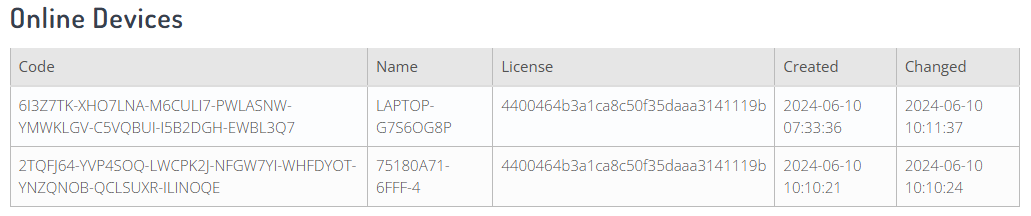
@6 MANAGING YOUR OWN INSTALLATION PACKAGES COLLECTION
@6 MANAGING YOUR OWN INSTALLATION PACKAGES COLLECTION mca.yogeshshar… Gio, 2022-05-26 04:046.1 Using PickMeApp with PAD files
6.1 Using PickMeApp with PAD filesTo help PickMeApp recognize PAD files, the files need to be uploaded to one of your PickMeApp profiles. As soon as a PAD file is uploaded to a PickMeApp profile, PickMeApp will read the PAD file’s application description, allowing it to download an application package and run an application installer upon request.
Moreover, if the PAD file includes the special TAD PickMeApp extension, PickMeApp can perform a one-click install of several chosen applications at once.
To use PickMeApp with PAD files:
- Go to software repositories and download PAD files of interesting applications.
- Import PAD files to an existing PickMeApp profile or create a new profile with the PAD files.
- PickMeApp will recognize the files and list those applications on the Right Panel, alongside with other installation packages and captured applications. Note that all standard PickMeApp features are applicable to application descriptors.
6.2 TAD Packages: PickMeApp PAD Extension for Silent Installations
6.2 TAD Packages: PickMeApp PAD Extension for Silent InstallationsTransfer Application Description (TAD) format is an extension of the PAD format. It specifies silent or unattended installation instructions. The current version supports silent installations of the following installer types.
- Installers: MSI, NSIS , WIZE, Inno Setup
- Command-line directives
- TAP files
Specifications
The following xml tags could be presented in PAD file.
<PMA>
<PMA_Extension_Version>1</PMA_Extension_Version>
<PMA_Silent_Install>
<Type>NSIS | INNO| WIZE | MSI | CMD | TAP | </Type>
<CmdLine> ---silent swithes that should be used if type is CMD, otherwise ---</CmdLine>
</PMA_Silent_Install>
</PMA>
Examples
- 7-Zip TAD extension
<PMA>
    <PMA_Extension_Version>1</PMA_Extension_Version>
    <PMA_Silent_Install>
     <Type>MSI</Type>
    </PMA_Silent_Install>
  </PMA>
- IrfanView
<PMA>
    <PMA_Extension_Version>1</PMA_Extension_Version>
    <PMA_Silent_Install>
       <Type>INNO</Type>
    </PMA_Silent_Install>
  </PMA>
- Opera 16.0.11
<PMA>
    <PMA_Extension_Version>1</PMA_Extension_Version>
    <PMA_Silent_Install>
     <Type>CMD</Type>
      <CmdLine>/silent /launchopera 0 /desktopshortcut 1 /quicklaunchshortcut 0 /setdefaultbrowser 0 /allusers</CmdLine>
    </PMA_Silent_Install>
</PMA>
PickMeApp PRO will unpacks the downloaded package in zip format . It will search recursively executable to run setup by following order
a) the first TAP file it finds
b) the first setup.exe file it finds
c) the first exe file it finds
d) the first MSI files it finds
if PickMeApp PRO cannot resolve the correct name <EXENAME> tag should be added with the exact name of the executable to run .
Examples
- Paint.net.4.1.6.install.zip
<PMA>
    <PMA_Extension_Version>1</PMA_Extension_Version>
    <PMA_Silent_Install>
     <Type>CMD</Type>
     <CmdLine>/quite </CmdLine>
     <EXENAME>paint.net.4.1.6.install.exe</EXENAME>
    </PMA_Silent_Install>
</PMA>
6.3 WEB Profiles as Application Collections
6.3 WEB Profiles as Application CollectionsThe PickMeApp Collection of software programs that comes with PickMeApp is an example of a WEB Profile managed on our PickMeApp Server.
To manage your own collection of applications with PickMeApp, you should first create a PAD map file listing all the URLs of PAD/TAD installation packages in your collection.
PAD map is an extension of the PAD specification that specifies the format for publishing application collections. PAD map is a plain text file that lists all PAD URLs for application collection (one URL per row). The PAD map file should be published on a remote server. Server should allow access to this PAD map file through any of three (3) supported network protocols, namely, http(s)://, ftp://, and file://.
The PAD files can be located on the same server or another server. For example, you may create your own application collection from a set of PAD files published on The Official PAD Repository (appvisor.com).
To add your Application collection to PickMeApp, create a PickMeApp Web Profile with the location pointing to the PAD map file of the collection. PickMeApp will periodically check for updates in the PAD map and update the contents of the Web Profile accordingly. For more information, see Creating a Web Profile.
To add more applications to your collection, just add the PAD file URLs to the PAD map. These new applications will be automatically by PickMeApp and added to the corresponding Web Profile.
Note: Due to its support for the file URI schema, file://, PickMeApp allows you to manage your own collection on a local PC without need for a remote server. The collection will be always monitored and updated by PickMeApp. For example:
- Create an Application Collection on your computer.
- Create a text file named padmap.txt with the following PAD URLs from The Official PAD Repository at at https://www.appvisor.com/:
- http://repository.appvisor.com/info/app-420064784ec9/FreeFileSync_pad.xml
- http://repository.appvisor.com/info/app-b000ff93001d/PeaZip_pad.xml
- http://repository.appvisor.com/info/app-b30004c94aa8/DriverFinder_pad.xml
- Save it to the C:\MyAPPS directory on your computer.
- Create a Web Profile named MyApps pointing to the file:// //C:/MyAPPS/padmap.txt URL.
Note: For more information on the URI schema, see Uniform Resource Identifier.
@7 PICKMEAPP PRO COMMAND LINE INTERFACE
@7 PICKMEAPP PRO COMMAND LINE INTERFACEYou can work with PickMeApp Pro using the command line. It supports the following convention:
- PickMeAppPro.exe <command> <argument>
7.1 Commands
7.1 CommandsList
PickMeAppPro.bat /a <PMA Id>.<Email> /l[d][e][p][a] /c([n][q][a][s][f]) [/suite <external suite path> ] [/appname <Name>] [/apppublisher <publisher>] [/thresholdname <threshold value>] [/thresholdpublisher <threshold value>] [/profile <profile folder>] [/log <path to the log file>]
- [d] - Lists product folders of all products
- [e] - Lists exe files of all products
- [p] - Lists all packages that indicate in /profile
- [a] - Export analyses files. such as Inno log, correlation, all installation NQA. They are in the PickMeApp folder
- /c - specifies customization flag for List
- [a] - all installed Applications
- [s] - Suites
- [f] - Filter/Search installed apps
- appname - Indicate the name of installed application will be filtered (Distance is over threshold ). Just apply for 'f' switch
- thresholdname - Threshold to apply appname
- apppublisher - Indicate the Publisher of installed application will be filtered (Distance is over threshold ). Just apply for 'f' switch
- thresholdpublisher - Threshold to apply apppublisher
- /suite - Indicate external suite ini file
- /log - Indicate log file output
- /profile - Indicate profile folder need to list. Just apply for [p]
Example: List all installed apps
PickMeAppPro.bat -a fdb5d194e14182fe832ad5bafbdd380d.tricuongle@gmail.com /l /ca /suite c:\suite.ini /log c:\log.txt
Capture
PickMeAppPro.bat /a <PMA Id>.<Email> /g[p] [/c([f][r][h])] <Product ID> /out <Output Folder> [/log <path to the log file>] [/suite <external suite path> ]
- [p] - Packing the grabbed image to installer file
- /c - specifies customization flag for grab
- f - processes file settings
- r - processes registry settings
- h - Indicate that the capturing will be not included MSI Caches
- /out - Indicate output folder
- /suite - Indicate external suite ini file
- /log - Indicate log file output
Example:
PickMeAppPro.bat -a fdb5d194e14182fe832ad5bafbdd380d.tricuongle@gmail.com fdb5444494e182fe832ad5bafbdd380d.myemail@gmail.com /gp /ch {23170F69-40C1-2702-1900-000001000000} /out c:\test /log c:\test\log.log
Uninstall
PickMeAppPro.bat /a <PMA Id>.<Email> /u [/c([b][m])] <Product ID> [/suite <external suite path> ] [/log <path to the log file>]
- /c - specifies customization flag for uninstall
- b - indicate to turn-on creating system restore
- m - indicate to turn-on Guess mode
- /suite - Indicate external suite ini file
- /log - Indicate log file output
PickMeAppPro.bat -a fdb5444494e182fe832ad5bafbdd380d.myemail@gmail.com /u {23170F69-40C1-2702-1900-000001000000} /log c:\test\log.log
Install
PickMeAppPro.bat /a <PMA Id>.<Email> /i[d] [/c([f][r][k][l][b][m])] <Package> [/downloadpath <path to download folder>] [/log <path to the log file>]
- [d] - Indicate downloading only. Do not perform installing.
- /c - specifies customization flag for grab
- f - processes file settings
- r - processes registry settings
- k - Indicate that the downloaded package will be stored in local machine
- l - Indicate that the downloading package from local machine (If not parameter, downloading order is WEB)
- b - indicate to turn-on creating system restore
- m - indicate to turn-on Guess mode
- /out - Indicate output folder
- /suite - Indicate external suite ini file
- /log - Indicate log file output
- /downloadpath -Indicate folder to be used to store any downloaded file. (default is current working folder)
PickMeAppPro.bat -a fdb5444494e182fe832ad5bafbdd380d.myemail@gmail.com /id /ck C:\Pad_Test\KeePass_pad.tad /downloadpath C:\Pad_Test /log c:\test\log.log
Extract
PickMeAppPro.bat /a <PMA Id>.<email> /e <Destination> <Package 1> [ <Package 2> <Package 3> ]
- <Destination>: output folder and the Extract log will be stored in here.
- <Package 1>: tap file 1
- <Package 2>: tap file 2
- <Package 3>: tap file 3
Example: extract 7-Zip.tap and auto.tap into c:\output folder
PickMeAppPro.bat -a fdb5444494e182fe832ad5bafbdd380d.myemail@gmail.com /e c:\output c:\7-Zip.tap c:\auto.tap
Relocate
PickMeAppPro.bat /a <PMA Id>.<Email> /r [/c([b])] <Product ID> <Relocated drive> [/suite <external suite path> ] [/log <path to the log file>]
- /c - specifies customization flag for grab
- b - indicate to turn-on creating system restore
- <Product ID>: Indicate a moving product
- <Relocated drive>: Location
- /suite - Indicate external suite ini file
- /log - Indicate log file output
Example: Relocate "Orca" to drive E
PickMeAppPro.bat -a fdb5444494e182fe832ad5bafbdd380d.myemail@gmail.com /r {85F4CBCB-9BBC-4B50-A7D8-E1106771498D} e:
Restore
PickMeAppPro.bat /a <PMA Id>.<Email> /m [/c([b])] <Product ID> [/suite <external suite path> ] [/log <path to the log file>]
- /c - specifies customization flag for grab
- b - indicate to turn-on creating system restore
- <Product ID>: Indicate a moving product
- <Relocated drive>: Location
- /suite - Indicate external suite ini file
- /log - Indicate log file output
Example: Restore "Orca"
PickMeAppPro.bat -a fdb5444494e182fe832ad5bafbdd380d.myemail@gmail.com /m {85F4CBCB-9BBC-4B50-A7D8-E1106771498D}
Pack
PickMeAppPro.bat /a <PMA Id>.<email> /p <Destination> [/n <outputName>] <Package 1> [ <Package 2> <Package 3> ... ]
- <Destination>: output folder and the Packing log will be stored in here.
- <outputName>: output file name (if not input output name, The name of first package will be used)
- <Package 1>: tap/pad file 1
- <Package 2>: tap/pad file 2
Example: Packing 7-Zip tap and KeepPass pad file
PickMeAppPro.bat -a fdb5444494e182fe832ad5bafbdd380d.myemail@gmail.com /p c:\test /n testApp c:\test\7-Zip.tap c:\test\KeePass_pad.xml
Start the exe of a product
PickMeAppPro.bat /a <PMA Id>.<email> /s <Product ID> [/exename <StarterExe>] [/log <path to the log file>]
- <Product ID>: Indicate a product
- <StarterExe>: indicate exe file name need to be started. (Accept Friendly Name)
Example: start Orca
PickMeAppPro.bat -a fdb5444494e182fe832ad5bafbdd380d.myemail@gmail.com /s {85F4CBCB-9BBC-4B50-A7D8-E1106771498D} /exename orca
Terminate the exe of a product
PickMeAppPro.bat /a <PMA Id>.<email> /t <Product ID> [/exename <ExeFile>] [/log <path to the log file>]
- <Product ID>: Indicate a product
- <ExeFile>: indicate exe file name that needs to be terminated (Accept Friendly Name)
Example: Terminate Orca
PickMeAppPro.bat -a fdb5444494e182fe832ad5bafbdd380d.myemail@gmail.com m /t {85F4CBCB-9BBC-4B50-A7D8-E1106771498D} /exename orca
7.2 Unattended/Silent Installation of Repackaged Packages and Captured Applications
7.2 Unattended/Silent Installation of Repackaged Packages and Captured ApplicationsThis applies to installation packages created with PickMeApp Pro’s Pack feature, captured applications using PickMeApp Light, and applications captured by either PickMeApp Light or PickMeApp Pro that have their settings enabled with self-extracted executable packages.
These applications can be run in interactive mode, as well as in unattended/silent mode using the /S switch.
For example, running "KeePass 2.39.1.exe /S" in a command line to install captured KeePass silently.
The following InstallSilent.bat script, which is found under the Tools directory on the PickMeApp Light program folder, can automate installation of captured software programs.
:: To call installing in silent mode, we can call like
:: InstallSilent.bat "7-Zip 9.38.exe"
@ECHO OFF
start "" /WAIT %1 /SD
Echo.
:: To call installing in silent mode, we can call like
:: InstallSilent.bat "7-Zip 9.38.exe"
@ECHO OFF
start "" /WAIT %1 /SD
Echo.
:: To call installing in silent mode, we can call like
:: InstallSilent.bat "7-Zip 9.38.exe"
@ECHO OFF
start "" /WAIT %1 /SD
Echo.
IF %ERRORLEVEL% == 0 ( Echo The application was installed successfully.
) Else If %ERRORLEVEL% == 1 ( Echo Installation ended with error.
) Else If %ERRORLEVEL% == 2 ( Echo Installation failed.
) Else If %ERRORLEVEL% == 3 ( Echo Permission Denied.
) Else If %ERRORLEVEL% == 4 ( Echo License is Invalid.
) Else If %ERRORLEVEL% == 5 ( Echo Installation canceled. The program is already installed on the computer.
) Else Echo Failed without reason
Echo.
@8 PICKMEAPP LIGHT
@8 PICKMEAPP LIGHTPickMeApp Light main functionality is to allow captures and saves installed programs as single executable installation.
You may use this installation package to re-install your program on another PC without PickMeApp being installed on the destination computer. To redeploy captured application copy and run this executable on a destination PC. The setup will guide you through reinstallation process.
8.1 PickMeApp Light Overview
8.1 PickMeApp Light OverviewTBD
8.2 PickMeApp Light vs PickMeApp Pro
8.2 PickMeApp Light vs PickMeApp ProPickMeApp Light allows you to:
- Select and capture one program at a time as executable
- Select and uninstall one program at a time
- Select and install one program at a time using an executable
PickMeApp Pro allows you to:
- Select and capture many programs at once
- Select and uninstall many programs at once
- Select and reinstall many captured programs at once
- Create a single executable installation for several programs at once
- Select and install many programs at once
- Manage separate profiles for different captured programs and new installations
Note: PickMeApp Light and PickMeApp Pro support the same set of applications.
@9 PICKMEAPP INSTALLER
@9 PICKMEAPP INSTALLER mca.yogeshshar… Gio, 2022-05-26 05:479.1 PickMeApp Installer Overview
9.1 PickMeApp Installer OverviewTBD
9.2 PickMeApp Installer vs PickMeApp Pro
9.2 PickMeApp Installer vs PickMeApp ProTBD
9.3 Analyzing Installed Applications with PickMeApp Installer
9.3 Analyzing Installed Applications with PickMeApp InstallerUnique to PickMeApp Installer is its ability to analyze if PickMeApp can support an installed software program. Using this feature, it is possible to verify if PickMeApp Pro or Light can capture and transfer your applications without having to purchase a corresponding license.
PickMeApp Installer sends information about the installed software program to PickMeApp servers for analysis. These software programs are compared with all known software programs successfully transferred by PickMeApp.
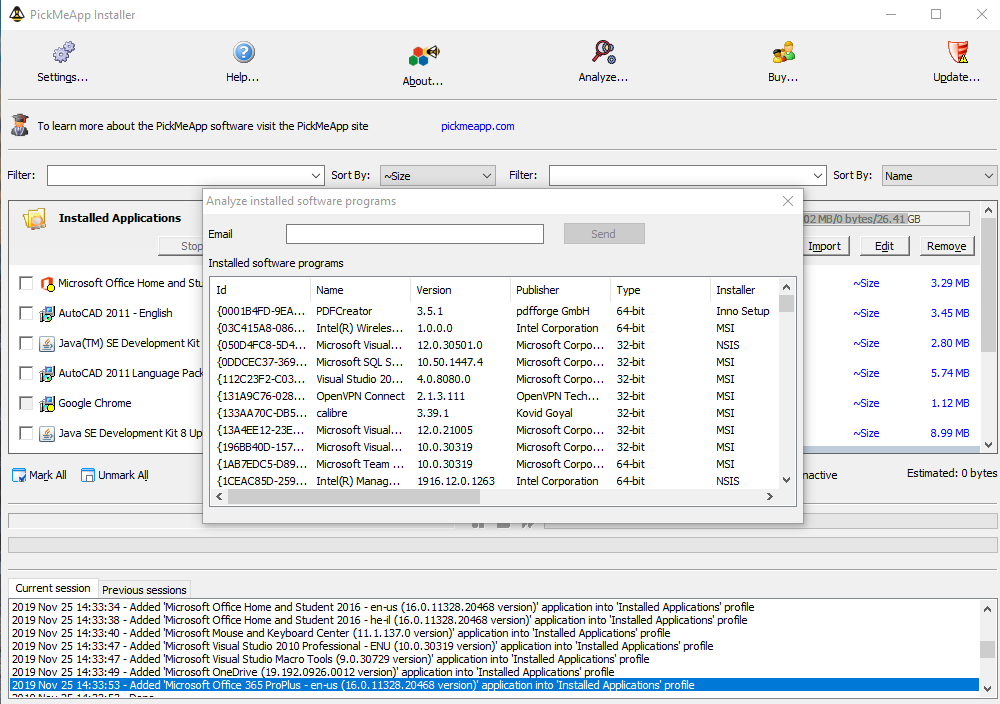
To send a request for support analysis, complete the following:
- Click the Analyze button located on the upper bar of the PickMeApp Installer.
- Provide an email address to where the final report can be sent.
- Click the Send button.
Once the PickMeApp servers finish their supportability analysis, it sends a detailed report via email.
Note: Only one (1) analysis request can be sent every 15 minutes.
@10 TROUBLESHOOTING ISSUES IN PICKMEAPP
@10 TROUBLESHOOTING ISSUES IN PICKMEAPP mca.yogeshshar… Gio, 2022-05-26 05:5110.1 PickMeApp fails to capture an application
10.1 PickMeApp fails to capture an application- Check that there is no other install/uninstall operation in progress.
- Check that the application to be captured is not running. While PickMeApp supports installation of a running application, the success of this operation depends on the application.
- Check that you have administrator rights on the computer.
- Check that the application is not listed as Currently not Supported.
- Restart PickMeApp and try again. If the problem persists, report it to PickMeApp customer support.
Note: Some applications cannot be captured / installed due to their dependency on specific hardware configurations.
10.2 PickMeApp fails to deploy an application
10.2 PickMeApp fails to deploy an application- Check that the application is not listed as Currently not supported.
- Ensure that there is no other version of the same application on the computer.
- Check that you have administrator rights on the computer.
For better compatibility, we recommend switching off UAC before running PickMeApp. You may re-enable UAC after the deployment
10.3 Applications installed on the computer are not present in the left panel
10.3 Applications installed on the computer are not present in the left panel
- Check that the application is not hidden by a current filter.
- Check that you are using the latest version of PickMeApp.
10.4 PickMeApp hangs during or after capture/installation
10.4 PickMeApp hangs during or after capture/installation- Check that there is no other install/uninstall operation in progress.
- Ensure that the application to be captured/installed is not running. While PickMeApp supports installation of a running application, the success of this operation depends on the application.
- Restart PickMeApp and try again. If the problem persists, contact PickMeApp customer support.
10.5 Deleting an application does not remove it from the Installed Applications list
10.5 Deleting an application does not remove it from the Installed Applications listRestart PickMeApp and try again.
10.6 PickMeApp does not allow you to choose an application to create a personalized package
10.6 PickMeApp does not allow you to choose an application to create a personalized packageThis means that the application has already been captured within the currently active profile. Either remove the application from the active profile or select another profile to where the application will be captured.
10.7 PickMeApp does not remove an application installed on your computer
10.7 PickMeApp does not remove an application installed on your computerIt is possible that the application registration entries are corrupted. Try to remove the application using its own uninstall option, or via the Add/Remove Programs option in Windows Control Panel.
10.8 PickMeApp does not show the Profile Name, or the personalized packages are not present
10.8 PickMeApp does not show the Profile Name, or the personalized packages are not present- Check that the profile location is accessible, and the profile folder is there. Check that all package files are in the profile location.
- Add the profile again using the Create New Profile button, then supply a path to the profile location.
@11 OPTIMIZING PICKMEAPP
@11 OPTIMIZING PICKMEAPPTBD
OLD MANUAL
OLD MANUAL admin Dom, 2022-05-29 06:221. INIZIARE CON PICKMEAPP
1. INIZIARE CON PICKMEAPP1.1. Introduzione
1.1. IntroduzionePickMeApp è uno strumento portatile per catturare e trasferire i programmi installati da un computer con Windows ad un altro.
1.2. Cosa si intende per cattura e trasferimento di programmi software?
1.2. Cosa si intende per cattura e trasferimento di programmi software?La cattura delle applicazioni consente di creare un pacchetto software personalizzato da programmi installati sul tuo PC. Questo pacchetto software è un'istantanea dell'applicazione stessa e delle sue impostazioni personalizzate.
Il software può essere utilizzato per recuperare l'applicazione sul PC, o per trasferire l'applicazione su qualsiasi sistema operativo Windows compatibile.
1.3. Quando utilizzare PickMeApp?
1.3. Quando utilizzare PickMeApp?- Se desideri avere un backup dei programmi installati e delle relative impostazioni;
- Se hai acquistato un nuovo computer e desideri trasferire i programmi abituali e le relative impostazioni su un nuovo computer.
- Se vuoi installare un'applicazione con le stesse impostazioni predefinite su più computer.
- Se reinstalli spesso Windows e desideri risparmiare tempo nell'installazione delle applicazioni
2. IMPOSTAZIONI PICKMEAPP
2. IMPOSTAZIONI PICKMEAPP2.1. Scarica il client PickMeApp
2.1. Scarica il client PickMeApp-
Clicca sull'icona “download” a sinistra di quasi tutte le pagine del sito a href="/">www.pickmeapp.com.
- Per i nuovi utenti viene aperta una finestra di dialogo di registrazione.
- Per gli utenti che effettuano il login, verrà aperta una nuova finestra di dialogo per il download successivo. - Dopo aver compilato un modulo di registrazione o un modulo per un nuovo download, sarete in grado di ottenere l'ultima versione di PickMeApp.
- Scarica una distribuzione PickMeApp sul tuo computer, solitamente denominata PickMeApp_[numero di versione exe].
-
La distribuzione è un archivio autoestraente che ti guida attraverso una semplice distribuzione del client PickMeApp.
Le versioni più recenti di PickMeApp possono avere caratteristiche aggiuntive e possono trasferire più applicazioni; pertanto, si consiglia di aggiornarlo frequentemente.
MOLTO IMPORTANTE!!! Ogni versione di PickMeApp scaricata direttamente dal sito PickMeApp riceve un ID PickMeApp univoco. Solo quelle installazioni PickMeApp che hanno il loro PickMeApp unico generato dal sito PickMeApp sono applicazioni valide. Solo queste installazioni possono richiedere supporto, ricevere aggiornamenti e godere di molte altre funzionalità disponibili per gli utenti registrati.
2.2. Apertura
2.2. Apertura- Avviare l'archivio autoestraente:
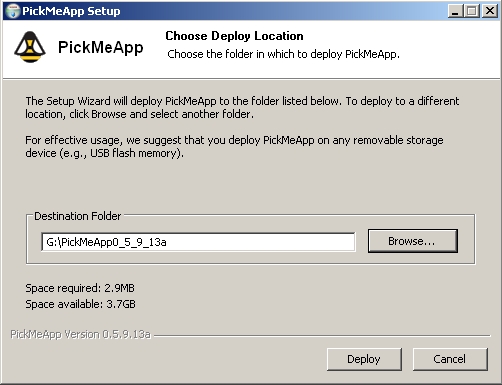
- Estrarre i file PickMeApp in una cartella di destinazione sul computer.
PickMeApp è stato progettato come strumento portatile. Pertanto, per un utilizzo efficace, si consiglia di distribuire PickMeApp su qualsiasi dispositivo di memorizzazione rimovibile (ad esempio una memoria flash USB).
Nota: il nome del percorso di una cartella di destinazione deve essere inferiore a 255 caratteri. (ad esempio G:\PickMeApp)

- Per impostazione predefinita, PickMeApp viene eseguito al termine dell’installazione.
3. UTILIZZARE PICKMEAPP
3. UTILIZZARE PICKMEAPP3.1. Avvio di PickMeApp
3.1. Avvio di PickMeApp- A seguito dell’apertura di PickMeApp, era stata creata una cartella di programma denominata PickMeApp [numero di versione] nella posizione scelta.
- Una cartella PickMeApp contiene i file di configurazione, i file eseguibili PickMeApp e una cartella TAPPS per la memorizzazione predefinita delle applicazioni catturate.
- Per lanciare PickMeApp, avviare il file eseguibile PickMeApp.exe dalla cartella PickMeApp.
Nota: Prima di avviare PickMeApp, assicurarsi di disporre dei diritti amministrativi sul tuo computer.
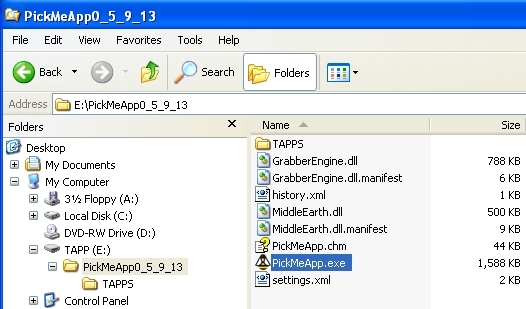
3.2. Esecuzione di PickMeApp
3.2. Esecuzione di PickMeAppPickMeApp rende l'acquisizione e il trasferimento delle applicazioni il più semplice possibile. L'interfaccia del programma è molto semplice. Di solito, sono necessari solo tre clic per effettuare operazioni di acquisizione o trasferimento: Esegui, Seleziona, Cattura o Esegui, Seleziona, Installa.
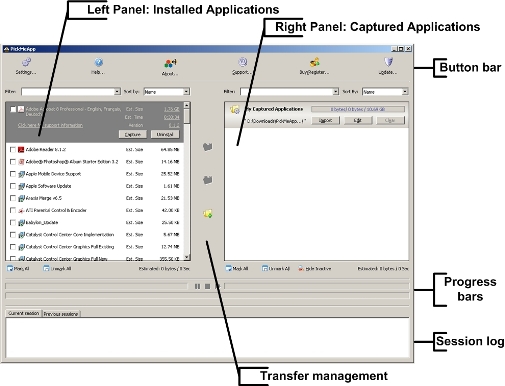
Pannello di sinistra: pannello applicazioni installate
Il pannello Applicazioni installate elenca le applicazioni installate sul computer di origine che PickMeApp è in grado di catturare.
Pannello di destra: pannello delle applicazioni catturate
Il pannello “applicazioni catturate” elenca le applicazioni catturate e la loro posizione.
Barra di gestione dei trasferimenti
La barra di gestione dei trasferimenti (a metà) contiene i seguenti pulsanti:
- Cattura applicazione(i) contrassegnate.
- Installa le applicazione(i) contrassegnate.
- Crea un nuovo profilo.
Barre di processo
Le barre di processo mostrano lo stato dei processi di cattura/installazione e consentono all'utente di interromperli.
Registro di sessione
Il registro di sessione fornisce rapporti dettagliati sui processi di PickMeApp.
Barra superiore con pulsanti
La barra dei pulsanti include quanto segue:
- Impostazioni: apre una finestra di impostazione
- Aiuto: apre una guida online nel browser
- Informazioni: apre una finestra di dialogo in cui viene visualizzato il numero di versione di PickMeApp
- Supporto: apre una pagina di supporto nel browser
- Dona: apre una pagina di donazione nel browser
- Aggiornamento: controlla gli aggiornamenti di PickMeApp
3.3. Uscire da PickMeApp
3.3. Uscire da PickMeAppDopo l'uscita da PickMeApp, non rimarrà nessuna traccia del suo utilizzo nel sistema operativo, al di fuori della cartella PickMeApp.
Tutte le impostazioni PickMeApp e le applicazioni catturate vengono posizionate nella cartella PickMeApp, pronte per essere utilizzate di nuovo all’avvio successivo di PickMeApp.
Dopo aver catturato un'applicazione, tutti i dati dell'applicazione vengono salvati nel pacchetto di installazione personalizzato di PickMeApp.
Il pacchetto di installazione è contenuto in un singolo file con estensione. tap, e comprende tutti i dati necessari per il trasferimento dell'applicazione.
3.4. Aggiornamento di PickMeApp
3.4. Aggiornamento di PickMeAppPeriodicamente, PickMeApp verifica la presenza di nuovi aggiornamenti.
Non appena sarà disponibile un nuovo aggiornamento, il pulsante "Aggiornamento" di PickMeApp diventerà rosso.
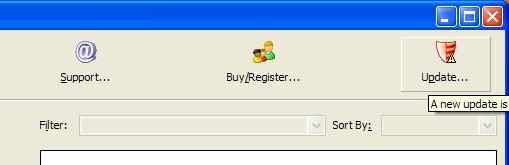
Premendo il pulsante Aggiorna verrà visualizzata la finestra di dialogo "Aggiornamento".
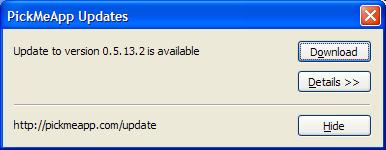
È possibile controllare il contenuto dell’aggiornamento premendo "Dettagli".
Per scaricare l'aggiornamento premere il pulsante "Download". Verrà visualizzata una finestra di dialogo con l’avanzamento del download.
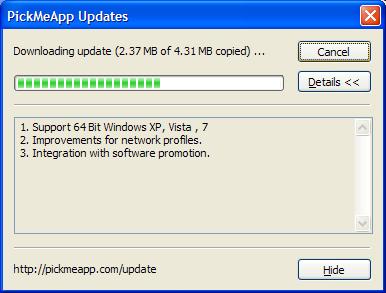
Dopo il download dell'aggiornamento vedrete il pulsante "Installa".
Dopo l'installazione di una nuova versione di PickMeApp verrà chiesto di riavviare PickMeApp.
È possibile verificare quale versione di PickMeApp è in esecuzione preimpostando il pulsante "Informazioni".
3.5. Make Portable PickMeApp
3.5. Make Portable PickMeAppPress "Make..." button to make portable version of PickMeApp.

User "Export" dialog to select PickMeApp Profiles you want to have on your portable version of PickMeApp. Once selected press "Export" button to start exporting .
All selected PickMeApp profiles, system files and folders , settings and the license will be exported to the personal portable version of PickMeApp.
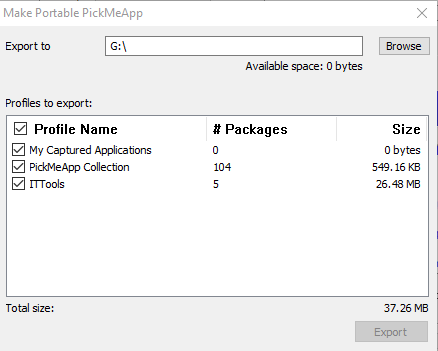
4. CATTURARE UN'APPLICAZIONE
4. CATTURARE UN'APPLICAZIONE4.1. Come funziona?
4.1. Come funziona?- Avvia pickMeApp
- Scegli le applicazioni desiderate dall'elenco e spunta la casella accanto ad esse.
- Fai clic sul pulsante Cattura nella barra centrale:
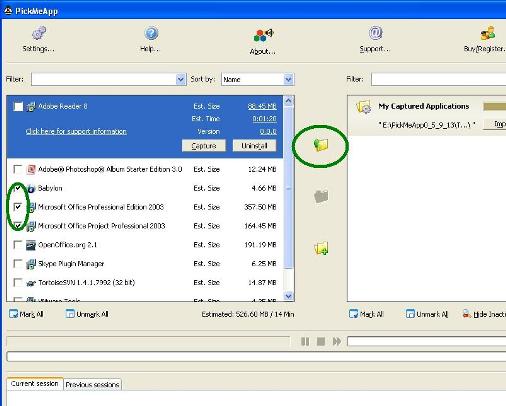
- Attendere mentre le applicazioni vengono catturate (come indicato nella barra di avanzamento).
- Quando la barra di avanzamento diventerà grigia, le applicazioni trasferite saranno state salvate nel profilo predefinito riferito alla cartella TAPPS, situata all'interno della cartella principale PickMeApp.
4.2. Utilizzo dell'elenco Applicazioni installate (Pannello di sinistra)
4.2. Utilizzo dell'elenco Applicazioni installate (Pannello di sinistra)Il pannello di sinistra presenta tutti i programmi installati che PickMeApp potrebbe scoprire sul computer.
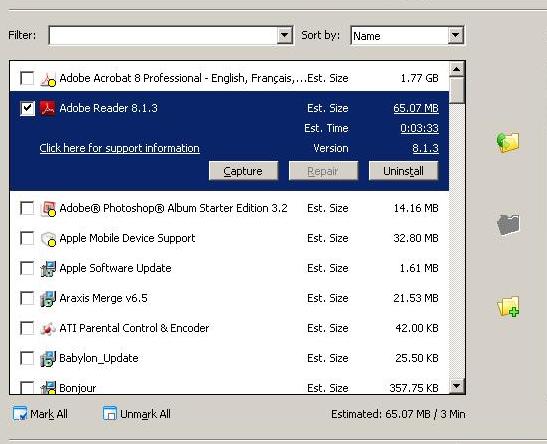
Uso del filtro
Il filtro è uno strumento pratico che consente di cercare rapidamente l'applicazione che si desidera catturare. Per attivare il filtro è sufficiente digitare il nome dell'applicazione, o parte del suo nome, nella riga corrispondente. È possibile digitare solo caratteri alfanumerici e tutti i caratteri di punteggiatura.
Per utilizzare il filtro:
- Avviare pickMeApp
- Digitare alcuni caratteri del nome dell'applicazione nello spazio corrispondente al filtro o scegliere una delle opzioni di filtraggio predefinite*.
- Controllare le applicazioni desiderate o selezionare l'opzione "Seleziona tutto".
- Fare clic su "Cattura" e trasferire l'applicazione al profilo predefinito.
- Durante l'acquisizione, è possibile saltare/mettere in pausa il trasferimento di un'applicazione utilizzando i pulsanti nella barra di avanzamento.
- Attendere finché la barra di avanzamento diventerà grigia e verrà visualizzato il messaggio "Processo di cattura completato".
Nota: durante l'acquisizione, la distribuzione o l'eliminazione di un'applicazione, il filtro è disabilitato.
Opzioni filtro predefinite
Sono disponibili quattro opzioni filtro predefinite:
- <catturato> Mostra solo le applicazioni già catturate nel profilo selezionato.
- <non catturato> Mostra solo applicazioni non catturate nel profilo selezionato.
- <selezionato> Mostra solo le applicazioni selezionate in precedenza.
- <pulito> Cancella il filtro precedente e fa sì che l'elenco delle applicazioni ritorni allo stato predefinito
Alcuni modi per utilizzare le opzioni del filtro:
- <catturato> Per visualizzare le applicazioni catturate nel profilo corrente.
- <non catturato> Per selezionare una nuova applicazione da catturare.
- <selezionato> Per visualizzare un elenco di applicazioni che si è scelto di catturare.
Il pulsante Seleziona tutto
Questo pulsante seleziona tutte le applicazioni disponibili per una cattura sotto un filtro scelto.
Il pulsante Deseleziona tutto
Questo pulsante cancella la selezione di tutte le applicazioni sotto un filtro scelto.
Cattura di più applicazioni
Con PickMeApp è possibile trasferire più applicazioni contemporaneamente. A tal fine, è necessario trovare tutte le applicazioni desiderate nell'elenco e controllare ciascuna di esse a turno.
Per acquisire più applicazioni:
- Avviare PickMeApp.
- Controllare ogni applicazione da catturare tramite filtri o selezione manuale.
- Fare clic sul pulsante Cattura e trasferire le applicazioni al profilo predefinito.
- Durante l'acquisizione, è possibile saltare o mettere in pausa un trasferimento dell'applicazione utilizzando i pulsanti nella barra di avanzamento.
- L'acquisizione sarà completa quando la barra di avanzamento diventerà grigia e verrà visualizzato il messaggio "Processo di cattura finito".
Utilizzo di un profilo di destinazione
Dopo l'acquisizione di un'applicazione, tutti i dati dell'applicazione vengono memorizzati nel pacchetto applicativo personalizzato PickMeApp. Il pacchetto applicativo è costituito da un singolo file con estensione. tap che contiene tutti i dati necessari per l’apertura dell'applicazione. Questo file viene salvato in un "profilo di destinazione" selezionato dall'utente.
Per impostazione predefinita, tutte le applicazioni catturate vengono salvate nel profilo "Le mie applicazioni catturate", che si trova nella cartella TAPPS all'interno della cartella PickMeApp.
Per creare un nuovo profilo di destinazione, procedere come segue:
- Avviare PickMeApp.
- Fare clic sul pulsante "Crea nuovo profilo".
- Inserisci un nome di profilo univoco
- Digitare il nome di un percorso di destinazione o cercare un percorso di destinazione univoco.
- Cliccare sul pulsante "OK
Verrà creato un nuovo profilo nella destinazione scelta.
Modifica del profilo di destinazione
Per attivare un profilo di destinazione per la cattura delle applicazioni:
- Avviare PickMeApp.
- Scegliere uno dei profili disponibili nel pannello a destra e fare clic sul nome del profilo.
- Il profilo scelto diventa la destinazione per le applicazioni catturate.
Nota: Durante l'acquisizione, la distribuzione o l'eliminazione di un'applicazione, il profilo è disabilitato.
Evidenziazione delle applicazioni installate
Le applicazioni installate nell'elenco possono essere evidenziate da un cerchio colorato:
- Giallo: l'applicazione è attualmente in esecuzione
- Verde: l'applicazione è già catturata nel profilo corrente sul pannello di destra
- Blu: l'applicazione è già catturata in uno dei profili non attivi sul pannello destro
Informazioni sull’applicazione
Per saperne di più su un'applicazione, fare clic sul suo nome nell'elenco delle applicazioni.
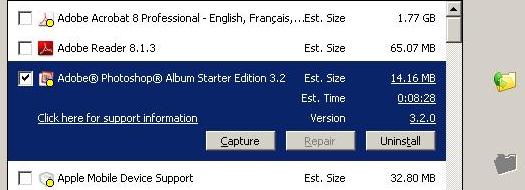
L’espansione dell’applicazione include:
- Est. Dimensione: dimensioni stimate del pacchetto applicazione quando viene catturato.
- Est. Tempo: tempo stimato impiegato per catturare l' applicazione.
- Versione: versione dell'applicazione, fornita dal distributore dell'applicazione.
- Info di supporto: fornisce un link con informazioni dettagliate sull'applicazione.
- Pulsante Cattura: inizia immediatamente a catturare l'applicazione
- Pulsante di riparazione: riparazione dell'applicazione. Attivo solo se la funzione di riparazione è disponibile.
- Pulsante di disinstallazione: disinstalla l'applicazione dal sistema*
*Attenzione: La disinstallazione di un'applicazione tramite PickMeApp non ne causerà la cattura.
Riparazione di un'applicazione
La voce dell'applicazione estesa contiene il pulsante "Riparazione". Premendo il pulsante, PickMeApp lancerà uno strumento di riparazione per l'applicazione. Il pulsante si attiva solo se la funzione di riparazione è disponibile per l'applicazione.
4.3 Software Suites
4.3 Software SuitesA software suite is a collection of software programs bundled and installed together. The software programs share a similar domain and may have correlative features and functionality, or they may be completely different from one another. After the software suite setup is finished, it can be difficult to determine how those software programs are related and whether they are part of a suite.
Microsoft Office is a popular example. Microsoft bundles multiple software programs like Word (Word Processor), Excel (Spreadsheet), PowerPoint (Presentation Program) and Outlook (email client) into a software suite. Although each of these programs function differently, they are all considered productivity software.
Prior to this PickMeApp version, a software suite user had to manually locate all related software programs, capture them one by one and then recover them onto the target PC. Some of our app workarounds advised users on how to deal with their software suites.
With this Version 1.2. release, PickMeApp is able to identify related software programs as part of a software suite. It lists the software suite under “Installed Application List” alongside the other applications. The user can easily distinguish software suites by their names which starts with “@Suite@” and the bold title fonts. Users can also use the <suites>
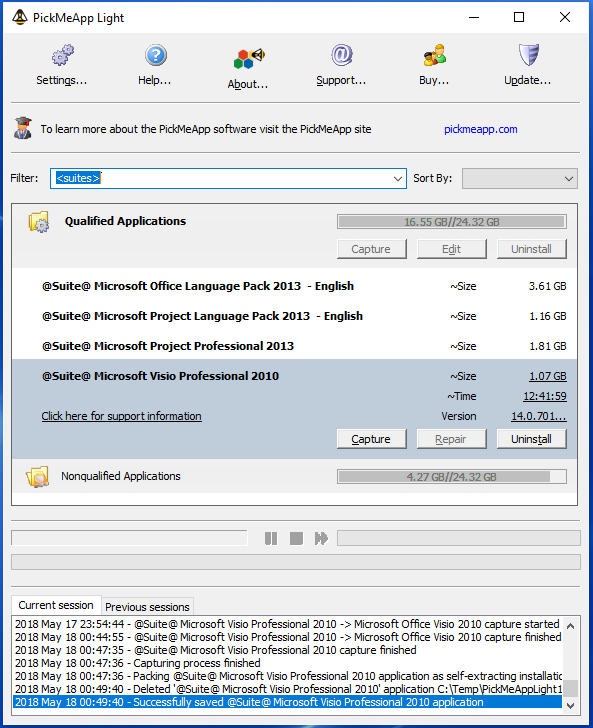
Software suites are capturable if all related applications are capturable ( Qualified Applications) . When a software suite is captured, PickMeApp takes all related applications and packages them as a single TAP file or as a single self-extracting executable setup (PickMeApp Light). Software suites are repairable if at least one of its applications is repairable. When a software suite gets repaired, PickMeApp repairs all repairable applications of the software suite. When you uninstall a software suite, PickMeApp uninstalls all related applications.
PickMeApp may fail to find all related applications for a particular software suite, thus losing some its features when transferred by PickMeApp. We constantly improve the PickMeApp abilities to recognize related applications. PickMeApp will only recognize Microsoft software suites as well as predefined custom suites. This limitation will be reduced in the following releases!
4.4 Capture Setup Cache
4.4 Capture Setup CacheTo allow smooth repair and install additional components and features, many software programs cache some installation files on the user’s PC during their first installation.
Since version 1.2, PickMeApp has been able to capture and transfer applications’ installation caches while capturing the applications. Along with the “Check integrity of installed applications” feature, this new function significantly improves application re-installation.
One drawback of the capturing setup cache feature is that the captured package has a larger size. Sometimes it may be twice the initial package size. Also, the capture may take longer time. Disable this feature if you need quicker capturing or a smaller installation package!
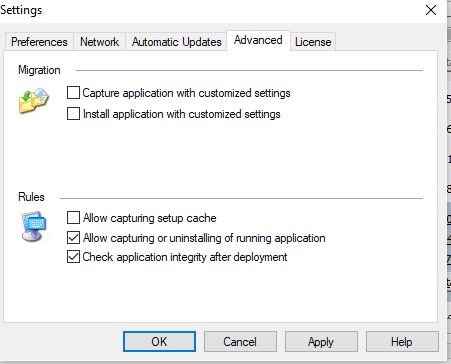
5. APERTURA DI UN'APPLICAZIONE CATTURATA
5. APERTURA DI UN'APPLICAZIONE CATTURATA5.0. Lista di controllo pre-apertura.
5.0. Lista di controllo pre-apertura.Se lavori con PickMeApp è consigliabile aggiornare Windows Installer alla versione 3.1.
Molti programmi richiedono l'installazione di un ambiente di esecuzione sul sistema di destinazione. Per il momento PickMeApp Beta non controlla se l'ambiente richiesto è installato. Si consiglia pertanto di scaricare e installare quanto segue:
5.1. Come funziona?
5.1. Come funziona?Per aprire un'applicazione:
- Avviare PickMeApp.
- Trovare il pacchetto univoco richiesto nel profilo di destinazione e spuntare la casella accanto.
- Fare clic sul pulsante "Avvia installazione" per aprire l'applicazione.
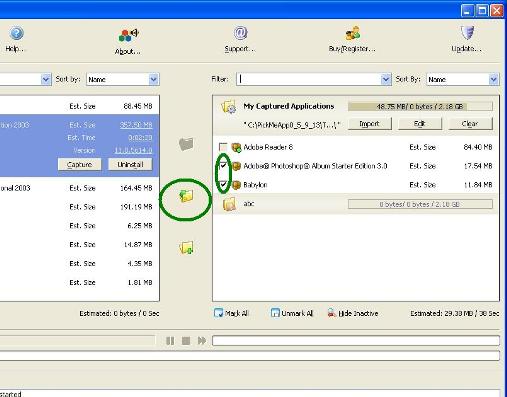
Attendere finché la barra di avanzamento diventerà grigia e verrà visualizzato il messaggio "processo completato".
Nota: Un'applicazione non può essere aperta due volte.
5.2. Uso dell'elenco delle applicazioni catturate (pannello di destra)
5.2. Uso dell'elenco delle applicazioni catturate (pannello di destra)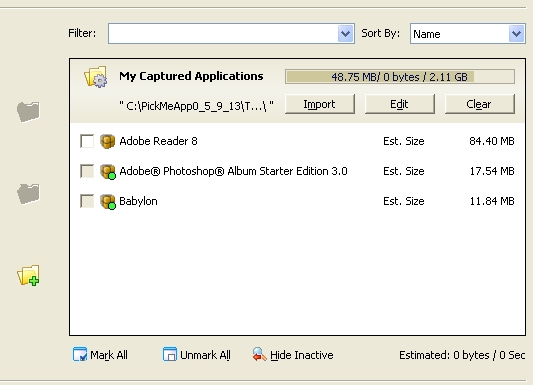
Un piccolo cerchio verde indica che un'applicazione è già installata nel sistema.
Il filtro è uno strumento pratico che consente di cercare rapidamente l'applicazione che si desidera trasferire. Per attivare il filtro è sufficiente digitare il nome dell'applicazione, o parte del suo nome, nella linea di ingresso filtro. È possibile digitare solo caratteri alfanumerici e tutti i caratteri di punteggiatura.
Per utilizzare il filtro:
- Avviare pickMeApp
- Digitare alcuni caratteri dal nome dell’applicazione nella riga corrispondente al filtro o scegliere una delle opzioni di filtraggio predefinite.
- Controllare le applicazioni desiderate o selezionare l'opzione "Seleziona tutte".
- Fare clic sul pulsante "Avvia installazione" per aprire l'applicazione.
- Attendere fino a quando la barra di avanzamento diventa grigia e viene visualizzato il messaggio "Installazione completata".
Nota: Durante l'acquisizione, l’apertura o l'eliminazione di un'applicazione, il filtro è disabilitato.
Sono disponibili quattro opzioni filtro predefinite:
<installato> Mostra solo le applicazioni già installate nel computer di destinazione
<non installato> Mostra solo le applicazioni non installate nel computer di destinazione
<selezionato> Mostra solo le applicazioni precedentemente selezionate
<pulito> Cancella il filtro precedente e fa sì che l'elenco delle applicazioni venga ripristinato.
allo stato di default
Alcuni modi per utilizzare le opzioni del filtro:
<installato> Per verificare se l'applicazione scelta è già installata
<non installato> Per verificare se ci sono altre applicazioni che si desidera installare
<selezionato> Per visualizzare un elenco di applicazioni che si è scelto di distribuire
Alcuni modi per utilizzare le opzioni del filtro:
- < installato > Per visualizzare le applicazioni installata nel profilo corrente.
- < non installato > Per selezionare una nuova applicazione da installare.
- <selezionato> Per visualizzare un elenco di applicazioni che si è scelto di installare.
Questo pulsante seleziona tutte le applicazioni disponibili per un’installazione sotto un filtro scelto.
Il pulsante Deseleziona tutto
Questo pulsante cancella la selezione di tutte le applicazioni sotto un filtro scelto.
Installazione di più applicazioni
Per installare diverse applicazioni dal pacchetto personalizzato contemporaneamente, è sufficiente controllare le applicazioni necessarie nell’elenco e fare clic sul pulsante Avvia installazione.
5.3. Utilizzo dei profili
5.3. Utilizzo dei profiliI profili sono luoghi specifici in cui vengono memorizzate le applicazioni catturate.
In genere, vengono creati diversi profili per scopi diversi (ad esempio per il backup, la mobilitazione per diverse piattaforme e simili).

Aggiunta di un profilo
Questa opzione consente di creare un profilo vuoto con un nome e una posizione scelti.
Quando esiste già un profilo esiste nel percorso fornito, le applicazioni catturate vengono automaticamente incluse all'interno di esso.
Importazione
L'opzione Importa consente di importare le applicazioni catturate e i descrittori delle applicazioni. (.tap,. tad,. pad files) nel profilo selezionato. I file verranno copiati nella cartella del profilo dalla posizione originale.
Nota: è possibile importare questi file uno per uno o come set di file. In alternativa è possibile importare un archivio zip di tali file. (il mix è ok).
Modifica
L'opzione Modifica consente di modificare il nome del profilo o la sua posizione.
Se si modifica la posizione del profilo, tutti i pacchetti dell’applicazione attualmente presenti nel profilo verranno importati nella nuova posizione dal precedente. Il profilo precedente verrà quindi cancellato.
Rimuovere
L'opzione Rimuovi elimina tutte le applicazioni nel profilo selezionato e il profilo stesso.
Il profilo predefinito non può essere rimosso.
Nascondi / Mostra profili inattivi
Se all'inizio PickMeApp non rileva la cartella del profilo nel percorso specificato, contrassegna il profilo come inattivo (icona rossa della cartella). Ciò potrebbe verificarsi perché il profilo si trova su un'unità mobile o su un'archiviazione di rete scollegata.
È possibile nascondere o eliminare i profili inattivi; non è possibile modificarli.
5.4. Funzione Crea file exe
5.4. Funzione Crea file exeLa funzione "Crea file exe" di PickMeApp viene utilizzata per riconfezionare l'applicazione catturata come un unico pacchetto di installazione. Questo pacchetto di installazione può essere utilizzato per installare le applicazioni catturate su qualsiasi PC contemporaneamente, senza bisogno dello strumento PickMeApp.
Possibile utilizzo della funzione "Crea file exe".
- Compatibilità della versione. PickMeApp cambia rapidamente. Stiamo cercando di fornire una compatibilità per le versioni precedenti, ma può accadere che i vecchi pacchetti di applicazioni catturati non siano supportati da una nuova versione di PickMeApp.
- Distribuzione Software. Questa funzione è particolarmente utile per gli amministratori di sistema. Ora PickMeApp può essere usato per riconfezionare diverse applicazioni utili come un unico pacchetto di installazione e per distribuirlo ad altri PC.
- Semplicità. Stiamo cercando di rendere PickMeapp il più semplice possibile, ma alcuni utenti sono confusi durante l'utilizzo di PickMeApp. Questa funzione semplifica il trasferimento di programmi e impostazioni. Rende una reinstallazione simile a un'esperienza Windows standard.
Per ottenere il massimo dal punto di vista funzionale durante la reinstallazione delle applicazioni su un nuovo PC, considerare l’utilizzo di PickMeApp insieme ai pacchetti di applicazioni originali (file TAP).
Limitazioni della funzione " Crea file exe ".
Riconfezionare
- È possibile riconfezionare fino a 40 applicazioni in un unico pacchetto exe.
- Le dimensioni del pacchetto exe finale devono essere inferiori a ~1 GB.
- Il processo di riconfezionamento aggiunge circa 2 MB oltre al pacchetto originale.
Installazione
- Non è possibile scegliere quale applicazione installare.
- Le informazioni sulle applicazioni installate sono limitate.
- Durante l'installazione non è presente alcuna notifica di progresso.
- Non è possibile annullare l'installazione a metà del processo.
6. PICKMEAPP COME APPLICATION MANAGER
6. PICKMEAPP COME APPLICATION MANAGER6.1. Panoramica
6.1. PanoramicaPickMeApp è l’Application Manager definitivo.
Adesso, oltre al trasferimento di programmi e impostazioni, PickMeApp ti aiuta a scoprire, scaricare e installare qualsiasi applicazione Windows esistente con pochi clic.
PickMeApp riesce a farlo supportando il formato Portable Application Description (PAD) e la nostra estensione proprietaria, supportando le installazioni di applicazioni Windows silenziose e non presidiate.
Come esempio dell'utilizzo di PickMeApp come Application Manager, la distribuzione PickMeApp include la PickMeApp Collection di 120 programmi installabili con un solo clic.
Tutti i programmi inclusi sono le ultime release collegate direttamente ai siti dei produttori originali.
-Queste applicazioni possono essere installate contemporaneamente da PickMeApp.
-Tutti i lavori di installazione vengono eseguiti in background.
-Le applicazioni sono scaricate dal sito ufficiale di ogni editore.
-Le applicazioni verranno installate nella loro posizione predefinita.
-Non vi infastidiranno con alcuna scelta o opzione.
-Verranno installati senza l'uso di ulteriori elementi come barre degli strumenti o altro.
-Eviteranno le richieste di riavvio da parte degli installatori. Quindi riavvia manualmente il PC alla fine
Ogni giorno rivediamo, testiamo e aggiungiamo nuovi programmi alla nostra Collezione PickMeApp.
Tutti gli utenti registrati che installano spesso programmi utilizzando PickMeApp potranno usufruire di aggiornamenti automatici della nostra Collezione PickMeApp in costante espansione.
6.2. Formato Portable Application Description (PAD).
6.2. Formato Portable Application Description (PAD).Il Portable Application Description (PAD) è un formato di documento a lettura ottica progettato dall’Association of Shareware Professionals. Consente agli autori del software di fornire descrizioni e specifiche dei prodotti alle fonti online in modo standard, utilizzando un semplice schema XML che permette a webmaster e curatori di programmi di automatizzare gli elenchi dei programmi. I file PAD più comunemente hanno un’estensione. XML o. PAD...
I file PAD regolarmente aggiornati vengono pubblicati da migliaia di servizi informativi e cataloghi software.
L'organizzazione ASP gestisce il PAD repository con più di 200.000 descrittori software costantemente aggiornati.
Inoltre i file PAD possono essere trovati nei seguenti archivi.
- http://repository.appvisor.com/
Un file PAD standard può includere le seguenti informazioni su un'applicazione
- Nome e versione dell'applicazione
- Piattaforme supportate
- Nome Editore
- Scaricare i link
- Tipo di licenza e EULA
6.3. Introduzione rapida per utilizzare PickMeAp con file PAD
6.3. Introduzione rapida per utilizzare PickMeAp con file PADPer far si che PickMeApp riconosca i file PAD, i file devono essere caricati in uno dei profili PickMeApp.
Non appena un file PAD viene caricato in un profilo PickMeApp, PickMeApp è in grado di leggere una descrizione dell'applicazione, scaricare un pacchetto applicativo ed eseguire un programma di installazione dell'applicazione su richiesta.
Inoltre, se un file PAD include una speciale estensione PickMeApp (TAD), PickMeApp è in grado di fornire un’installazione di diverse applicazioni selezionate con un solo clic.
Per utilizzare PickMeAp con i file PAD è necessario eseguire le seguenti operazioni:
1.Vai ai depositi software e scarica i file PAD di applicazioni interessanti.
2. Importa i file PAD in un profilo PickMeApp esistente o crea un nuovo profilo con quei file PAD.
3.PickMeApp riconoscerà tali file ed elencherà le applicazioni nel pannello di destra, insieme alle applicazioni catturate.
4. Ora tutte le funzionalità standard di PickMeApp sono applicate anche ai descrittori delle applicazioni.
Collegamenti per archivi software, dove trovare i file PAD
- http://repository.appvisor.com/
6.4. Formato T-APP Application Description (TAD)
6.4. Formato T-APP Application Description (TAD)Il formato T-APP Application Description (TAD) è un'estensione del formato PAD.
Consente di specificare le istruzioni di installazione silenziose o non presidiate.
La versione corrente supporta
1.MSI
2.direttive sulla linea di comando
3.File TAP.
Specificazione
I seguenti tag xml dovrebbero essere presentati nel file PAD.
<PMA>
<PMA_Extension_Version>1</PMA_Extension_Version>
<PMA_Silent_Install>
<Type>MSI | CMD | TAP | ZIP</Type>
<CmdLine>app.exe </CmdLine>
</PMA_Silent_Install>
</PMA>
Esempi
- estenzione 7-Zip TAD
<PMA>
    <PMA_Extension_Version>1</PMA_Extension_Version>
    <PMA_Silent_Install>
     <Type>MSI</Type>
      <CmdLine>app.msi</CmdLine>
    </PMA_Silent_Install>
  </PMA>
- IrfanView
<PMA>
    <PMA_Extension_Version>1</PMA_Extension_Version>
    <PMA_Silent_Install>
     <Type>CMD</Type>
      <CmdLine>app.exe /silent</CmdLine>
    </PMA_Silent_Install>
  </PMA>
- Opera 16.0.11
<PMA>
    <PMA_Extension_Version>1</PMA_Extension_Version>
    <PMA_Silent_Install>
     <Type>CMD</Type>
      <CmdLine>app.exe /silent /launchopera 0 /desktopshortcut 1 /quicklaunchshortcut 0 /setdefaultbrowser 0 /allusers</CmdLine>
    </PMA_Silent_Install>
</PMA>Nota: Il tipo ZIP è lo stesso del tipo CMD, ma prima PickMeApp apre il pacchetto scaricato. <CmdLine> dovrebbe indicare il nome esatto dell'eseguibile.
6.5. WEB Profiles as Applications Collections
6.5. WEB Profiles as Applications CollectionsTo list a custom remote collection of applications define Web Profile and set remote link that list all urls on PAD files of the applications.
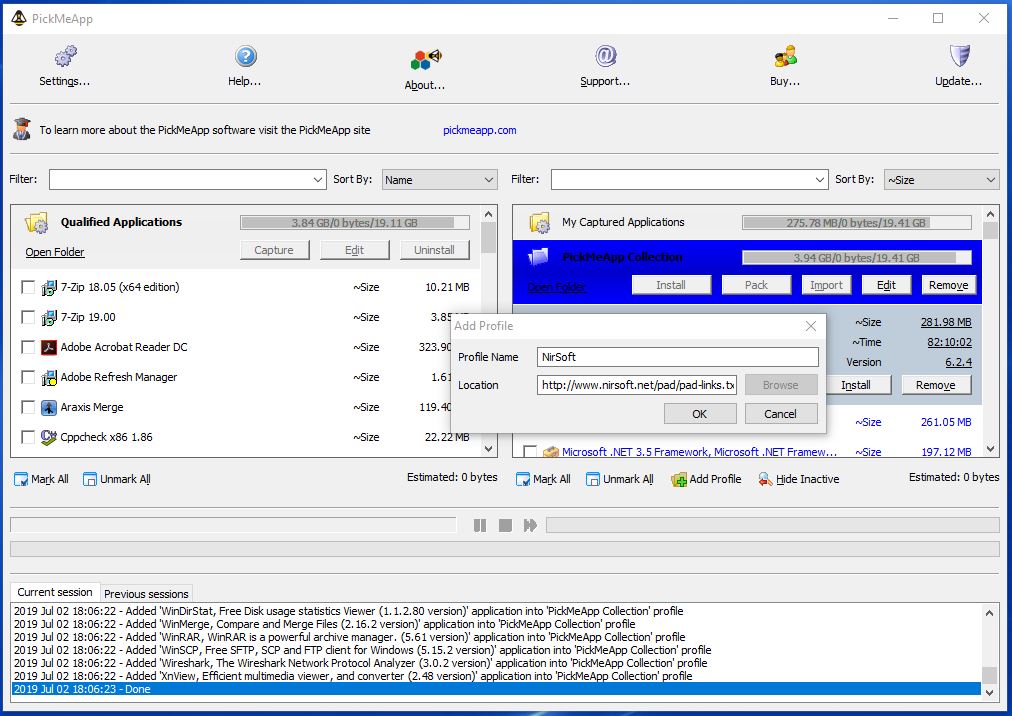
PickMeApp Collection of Essentials Programs
https://pickmeapp.com/pmapads/pmafc.txt
Existing Application Collections
- http://www.masterslabs.com/padmap.txt
- http://download.seiz.ch/padmap.txt
- http://www.ab-tools.com/pad.txt
- https://xfx.net/padmap.txt
- http://www.abhisoft.net/pad/padmap.txt
- http://www.amigaforever.com/pad.txt
- http://www.artistscope.com/pad/pad_map.txt
- http://www.batchwork.com/pad/padmap.txt
- http://www.bigasoft.com/pad/padmap.txt
- http://www.binaryboy.com/pads/padmap.txt
- http://www.bksoft.de/padmap.txt
- http://www.cayoren.com/padmap.txt
- http://www.cyber-wit.com/padfiles/
- http://www.cybermatrix.com/pad/pads.txt
- http://www.diafaan.com/padfiles/
- http://www.digitalliquid.com/pad/padmap.txt
- https://www.digitalvolcano.co.uk/download/padmap.txt
- https://www.e-systems.ro/padmap.txt
- http://www.easy2sync.com/padmap.txt
- https://www.grsoftware.net/PADmap.txt
- http://www.gsa-online.de/files/pad.php
- http://www.gssezisoft.com/padmap.txt
- http://www.hotbounce.com/pads/hotbounce-padlist.txt
- http://www.info2000.biz/pad/allPads.txt
- https://www.infordesk.com/products/pad_list.txt
- https://www.m2osw.com/padfile/
- http://www.marshallsoft.com/padfiles.txt
- http://www.masterslabs.com/padmap.txt
- http://www.nirsoft.net/pad/pad-links.txt
- http://www.nuonsoft.com/pad/master_pad.txt
- http://www.peterssoftware.com/padinfo/padmap.txt
- http://www.phdcc.com/download/padmap.txt
- http://www.rttsoftware.com/padfiles.txt
- http://www.servolutions.com/pad/allpadfiles.txt
- http://www.sharktime.com/pad/padmap.txt
- http://www.sprintbit.com/other/pad/pads.txt
- http://www.stoik.com/pad/padmap.txt
- http://www.top-password.com/PAD/padmap.txt
- http://www.turnwatcher.com/padfile
- http://www.wernerr.de/software-free/padmap.txt
- https://wonderwebware.com/padmap.txt
- http://www.treepad.com/pad/padmap.txt
- https://wammu.eu/api/pad/padmap.txt
- https://bluefive.pairsite.com/pad.txt
- http://www.nuonsoft.com/pad/master_pad.txt
How to create you own list?
- Create simple plain text file containing all PAD URLs from application collections.
- Put it on some storage, remote or local
- Add Web Profile with link pointing to that file
PickMeApp Pro supports http://, https://, ftp://, file:// protocols
6.6 Guessing silent Installation or Removal of Applications
6.6 Guessing silent Installation or Removal of ApplicationsPickMeApp PRO can try to guess the type of installers used to install or package the application to apply known silent installation or uninstallation switches to the application.
Guess mode is enabled or disabled using Advanced Settings dialog .
If Guess mode is enabled PickMeApp PRO will allow
- to unistall silently those applications which installer type was identified.
- to install silently those applications that are described by PAD format
When Guess mode is disabled all installations or uninstallations of applications are interactive, except for applications which type is explicitly known. ( qualified applications, captured applications or applications described using TAD format).
Note Disable guess mode to install or to remove programs interactively.
While installing and uninstalling silently applications PickMeApp PRO will try to identify if applications do not behave silently by monitoring opening dialogs of application. if application setup does not behave silently PickMeApp PRO will skip installing or uninstalling that application. It will move to the next application, leaving open dialogs intact to allow user to complete the actions manually.
6.7. Analyze installed software programs
6.7. Analyze installed software programsNote: The following feature is only relevant for the PickMeApp Installer.
PickMeApp Installer offers a unique feature that analyzes if installed software programs are supported by PickMeApp.
The information about installed software programs is sent to PickMeApp servers for analysis on whether they are supported by PickMeApp. Those software programs are compared with all known software programs successfully transferred by PickMeApp.
The final report is sent to the email provided in the "Analyze installed software programs" dialog.
To send a request for supportability analysis, complete the following:
- Press the “Analyze” button located on the upper bar of the PickMeApp Installer.
- Provide an email address where the final report should be sent.
- Press the “Send” button.
Once the PickMeApp server finishes its supportability analysis, the detail report is sent by email.
Note: Only one analysis request per 15 minutes can be sent.
Using this feature, it is possible to verify if PickMeApp Pro or Light can capture and transfer your applications without having to purchase the license.
7. PICKMEAPP LIGHT
7. PICKMEAPP LIGHT7.1 Il punto su PickMeApp Light
7.1 Il punto su PickMeApp LightPickMeApp Light ha una funzionalità del 50% rispetto alla versione completa.
PickMeApp Light cattura e salva i programmi installati come installazione eseguibile singola. È possibile utilizzare questo pacchetto di installazione per reinstallare il programma su un altro PC senza utilizzare PickMeApp eseguendo il file eseguibile su un PC di destinazione. Il setup vi guiderà attraverso il processo di reinstallazione.
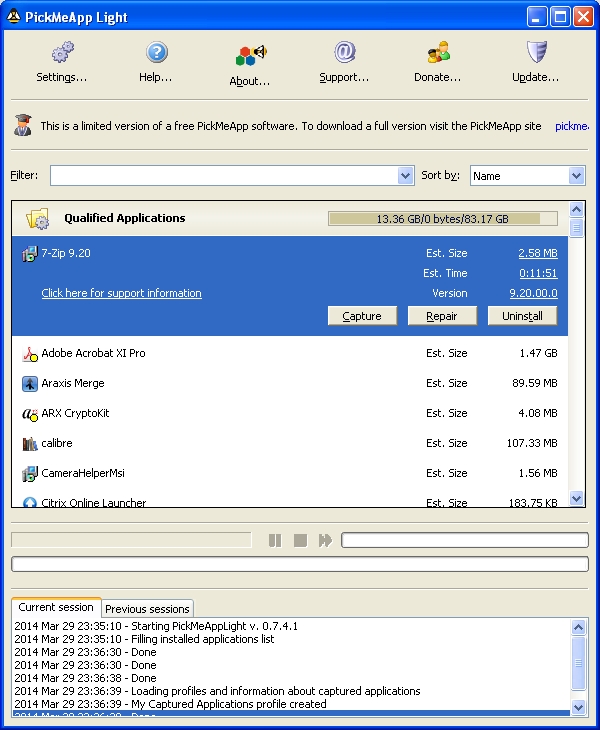
7.2 Unattended/Silent Installation of captured application.
7.2 Unattended/Silent Installation of captured application.PickMeApp Light captures and packages installed programs as single executable setup.
This setup can be run in interactive mode as well unattended/silent mode using /S switch.
For example running "KeePass 2.39.1.exe /S" in a command line to install captured KeePass silently.
The following InstallSilent.bat script can be used to automate installation of captures software programs.
(The script can be located in the "Tools" directory of PickMeApp Light setup).
:: To call installing in silent mode, we can call like
:: InstallSilent.bat "7-Zip 9.38.exe"

@ECHO OFF
start "" /WAIT %1 /SD

Echo.

IF %ERRORLEVEL% == 0 ( Echo The application was installed succufuly.
   ) Else If %ERRORLEVEL% == 1 ( Echo Installation ended with error.
        ) Else If %ERRORLEVEL% == 2 ( Echo Installation failed.
          ) Else If %ERRORLEVEL% == 3 ( Echo Permission Denied.
             ) Else If %ERRORLEVEL% == 4 ( Echo License is Invalid.
               ) Else If %ERRORLEVEL% == 5 ( Echo Installation canceled. The program is already installed on the computer.
                 ) Else Echo Failed without reason

Echo.
7.3 PickMeApp Light vs PickMeApp
7.3 PickMeApp Light vs PickMeAppUna versione completa di PickMeApp Application Manager consente di:
- Selezionare e catturare molti programmi contemporaneamente
- Selezionare e reinstallare contemporaneamente molti programmi catturati
- Creare una singola installazione eseguibile per più programmi contemporaneamente
- Selezionare e installare nuovi programmi contemporaneamente.
- Gestire profili separati per i diversi programmi acquisiti e per le nuove installazioni.
- Ricevere aggiornamenti automatici.
- Invia la richiesta e ricevi supporto online.
Nota: Attualmente non vi è alcuna differenza tra PickMeApp e PickMeApp Light nelle applicazioni supportate.
8. CONFIGURAZIONE
8. CONFIGURAZIONE8.1. Preferenze interfaccia utente
8.1. Preferenze interfaccia utente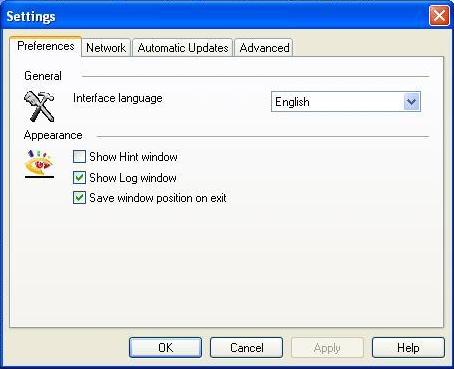
Lingua interfaccia: elenco delle lingue disponibili da cui gli utenti possono selezionare la lingua di visualizzazione dell'interfaccia utente PickMeApp.
PickMeApp è disponibile nelle seguenti lingue: inglese, italiano, vietnamita, tedesco, sloveno, polacco e francese.
Le barre di registro e di suggerimento possono essere disattivate. I registri verranno creati in background e salvati in file di registro.
8.2. Preferenze di rete
8.2. Preferenze di rete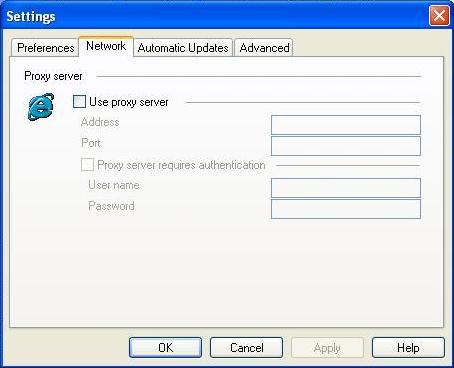
Nella finestra Impostazioni è possibile configurare il server proxy, se necessario per passare attraverso il firewall aziendale.
8.3. Configurazione aggiornamenti automatici
8.3. Configurazione aggiornamenti automatici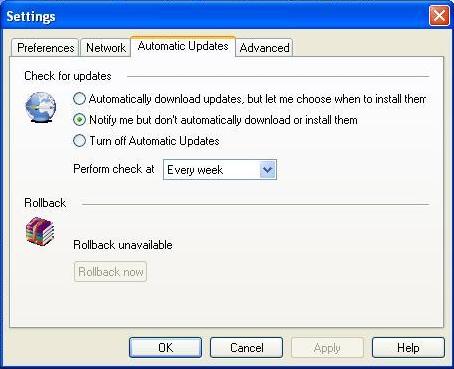
È possibile attivare un controllo automatico per gli aggiornamenti di PickMeApp e specificare il modo in cui il controllo procederà.
C' è anche un'opzione per il ritorno a una versione precedente di PickMeApp.
8.4. Opzioni avanzate
8.4. Opzioni avanzate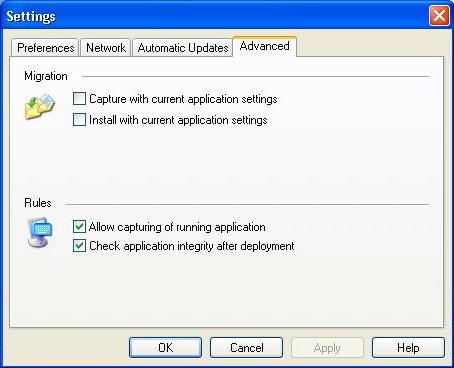
È possibile abilitare l'acquisizione e l'installazione di un'applicazione con le impostazioni utente personalizzate correnti. Questa è una caratteristica sperimentale.
Per rendere più sicura la cattura delle applicazioni, è possibile disabilitare l'acquisizione delle applicazioni attualmente in esecuzione.
Per velocizzare il processo di installazione, è possibile disabilitare un PickMeapp che controlla l'integrità delle applicazioni installate.
Nota: alcune applicazioni vengono fissate automaticamente da PickMeApp durante il test.
8.5. Interfaccia a riga di comando PickMeApp
8.5. Interfaccia a riga di comando PickMeAppPuoi lavorare con PickMeApp usando l’interfaccia a riga di comando. PickMeApp supporta le seguenti norme
pickmeapp.exe <command> <argument>
Comandi
/l recevi una lista di software installati
/g cattura l’applicazione
/i installa l’applicazione
/u disinstalla l’applicazione
Esempi:
pickmeapp.exe /l
L’esempio qui sopra crea il file PMAOutput.txt nella cartella PickMeApp.
Questo file contiene l’ID delle applicazioni installate e i nomi dei software corrispondenti.
Esempio di PMAOutput.txt:
{90140000-0011-0000-0000-0000000FF1CE} Microsoft Office Professional Plus 2010
{90140000-00A1-0409-0000-0000000FF1CE} Microsoft Office OneNote MUI (English) 2010
…
PickMeApp utilizza l'ID software invece dei nomi del software, quindi è necessario utilizzare questo file per selezionare il software con cui lavorare.
pickmeapp.exe /g {90140000-001A-0409-0000-0000000FF1CE} Outlook.tap capture.log
L' esempio sopra
-cattura l'applicazione Microsoft Outlook (utilizzando il numero {90140000-001A-0409-0000-0000-000000000FF1CE}
-crea il file Outlook. tap con l'applicazione catturata.
-crea il file capture.log
pickmeapp.exe /u {90140000-001A-0409-0000-0000000FF1CE} uninstall.log
L' esempio sopra disinstalla l'applicazione Microsoft Outlook (dal suo numero {90140000-001A-0409-0000-0000-0000000FF1CE} dal PC.
Nota: Eseguire il backup o cattura di nuovo questa applicazione per essere in grado di ripristinarla insieme ai suoi dati in qualsiasi momento.
pickmeapp.exe /i Outlook.tap install.log
L'esempio sopra
-installa l'applicazione catturata prima all'interno del file TAP
-crea il file log install. log.
9. RISOLUZIONE DEI PROBLEMI
9. RISOLUZIONE DEI PROBLEMI9.1. PickMeApp non riesce a catturare un'applicazione
9.1. PickMeApp non riesce a catturare un'applicazioneVerificare che non siano in corso altre operazioni di installazione/disinstallazione.
Verificare che l'applicazione da catturare non sia in esecuzione.
Verificare di disporre dei diritti di amministratore sul computer.
Verificare che l'applicazione non sia elencata come attualmente non supportata
Riavviare PickMeApp e riprovare. Se il problema persiste, segnalarlo al servizio di assistenza PickMeApp.
Nota: Alcune applicazioni non possono essere catturate/installate a causa della loro dipendenza da specifiche configurazioni hardware.
9.2. PickMeApp non riesce ad aprire un'applicazione
9.2. PickMeApp non riesce ad aprire un'applicazioneVerificare che l'applicazione non sia elencata come attualmente non supportata
Assicurarsi che non vi siano altre versioni della stessa applicazione sul computer.
Verificare di disporre dei diritti di amministratore sul computer.
Per una migliore comparabilità si consiglia di spegnere l'UAC prima di avviare PickMeApp.
È possibile abilitare l'UAC dopo aver terminato l’apertura.
9.3. Le applicazioni installate sul computer non sono presenti nel pannello di sinistra
9.3. Le applicazioni installate sul computer non sono presenti nel pannello di sinistraPickMeApp mostra tutte le applicazioni suddividendole in
- Applicazioni qualificate - le applicazioni che possono essere catturate.
-
Applicazioni non qualificate - le applicazioni che non possono essere catturate.
Verificare che l'applicazione si trovi nel profilo Applicazioni qualificate.
Verificare che l'applicazione si trovi nel profilo Applicazioni non Qualificate.
Controllare che l'applicazione non sia nascosta da un filtro corrente.
Verificare che si stia utilizzando l'ultima versione di PickMeApp.
9.4. PickMeApp si blocca durante o dopo la cattura/installazione
9.4. PickMeApp si blocca durante o dopo la cattura/installazioneControllare che a non sono in corso altre operazioni di installazione/disinstallazione.
Assicurarsi che l'applicazione da catturare/installare non sia in esecuzione.
Riavviare PickMeApp e riprovare. Se il problema persiste, segnalarlo al servizio di assistenza PickMeApp.
9.5. Dopo aver cancellato un'applicazione dall'elenco delle applicazioni installate (pannello di sinistra), viene ancora elencata in tale elenco
9.5. Dopo aver cancellato un'applicazione dall'elenco delle applicazioni installate (pannello di sinistra), viene ancora elencata in tale elencoRiavviare PickMeApp e riprovare.
9.6. PickMeApp non consente di scegliere un'applicazione per creare un pacchetto personalizzato
9.6. PickMeApp non consente di scegliere un'applicazione per creare un pacchetto personalizzatoQuesta applicazione è già stata catturata all'interno del profilo attualmente attivo. Rimuovere l'applicazione dal profilo attivo oppure selezionare un altro profilo.
9.8. PickMeApp non rimuove un'applicazione installata sul computer
9.8. PickMeApp non rimuove un'applicazione installata sul computerÈ possibile che le voci di registrazione dell’applicazione siano danneggiate. Provare a rimuovere l'applicazione utilizzando la propria opzione di disinstallazione o tramite l'opzione Aggiungi/Rimuovi programmi nel pannello di controllo.
9.9. PickMeApp non mostra il nome del profilo, o i pacchetti personalizzati non sono presenti.
9.9. PickMeApp non mostra il nome del profilo, o i pacchetti personalizzati non sono presenti.Verificare che la posizione del profilo sia accessibile e che la cartella del profilo sia presente. Verificare che tutti i file dei pacchetti si trovino nella posizione del profilo.
Aggiungere nuovamente il profilo utilizzando il pulsante "Crea nuovo profilo" e fornire un percorso alla posizione del profilo.
10. PICKMEAPP AS SOFTWARE UPDATER
10. PICKMEAPP AS SOFTWARE UPDATER admin Mer, 2020-04-01 09:3310.1 PickMeApp software updater Overview
10.1 PickMeApp software updater OverviewPickMeApp keeps your installed applications up-to-date.
PickMeApp’s full range of software management functionality makes PickMeApp the most advanced and the best software updater tool in the market. Here’s why:
- Scan and lists your outdated software
- Upgrades are downloaded and installed with just one click
- Upgrades are downloaded from the program's original source
- Create a system restore point that rolls back to previous updates whenever required (available on-demand in the Pro version only)
- Portable and non-portable modes (Pro version only)
- Built-in advanced Uninstaller
- Supports thousands of software programs via built-in and/or custom App Stores
- Works smoothly with all Windows versions, including Windows 10/8/8.1/7/XP/Vista
The outdated programs will be marked by red exclamation mark "!".
Alternatively the upgradeable filter can be used to find programs that can be upgraded.
It is possible to upgrade one or several applications in a raw by pressing "Upgrade" button.
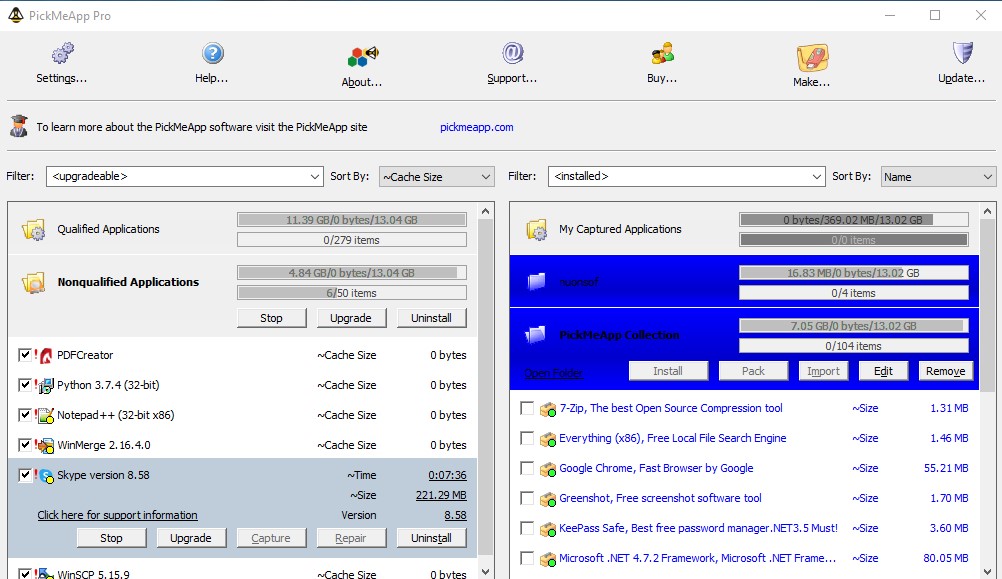
Upgrades will be available for any software programs installed from PAD packages located in one of PickMeApp Profiles ( see more explanation in the following paragraph)
For example
Any application from PickMeApp Collection once installed on the computer will be monitored for upgrades.
To make sure that installed software will be monitored for upgrades, import its PAD package to one of PickMeApp profile . As reminder the official PAD repository (http://repository.appvisor.com/) contains more than 15,000 software titles.
It is ok to import corresponding PAD package even after application was already installed.
11. RELOCATE INSTALLED SOFTWARE TO ANOTHER DRIVE
11. RELOCATE INSTALLED SOFTWARE TO ANOTHER DRIVEMany Windows computer users with small SSD system disks (128 – 256 GB) are falling into the same trap: Although the initial hardware requirements for the operating system installation seemed sufficient with these disks (about 20 GB for Windows 7/8 and 40 GB for Windows 10), the continued usage of Windows OS gradually uses up any free space left on the disk.
At first, Windows users feel safe installing software on their default drive, even when it only has 128GB of storage space. In addition, Windows updates, drivers, settings, application and system caches, logs and user files are all saved on the system disk as well. After 1-2 years of running Window OS with a small SSD, most Windows users run out of free space on the system disk.
While it is possible to free space by moving personal files onto an additional larger disk, about 80% of space on the system disk would be still occupied by installed software and system files.
Uninstalling and reinstalling software on a new disk seems like a tedious and error prone solution in this situation. The better solution would be to relocate installed software to a new disk as-is. Eventually, Windows provided a built-in technology that makes such relocation possible. The technology, called junction points, allows a Windows user to anchor the paths of some source folders on one disk to the target folder on another disk. Users can free up space on their system disk by moving application folders’ content to another drive and anchoring their original locations to the new folders. This allows them to keep the rest of their application components like shortcuts, registries, and configurations.
PickMeApp provides an intuitive and user-friendly solution to move installed programs to another disk. Once a user chooses to relocate one or several installed applications, PickMeApp takes on all necessary operations necessary to perform the relocation of an installed software.
PickMeApp calculates required disk space, identifies application folders that are safe to relocate, moves applications folders to a new destination, cleans up leftover data and confirms application integrity after relocation. PickMeApp may undo any unsuccessful relocation and keeps the computer save state throughout the relocation process. In some cases, restarting the computer and running PickMeApp again is required to complete a relocation.
Relocated software works seamlessly with management operations such as running, terminating, capturing, uninstalling, and upgrading installed software. After uninstalling an application, PickMeApp will cleanup any leftover application data and will preserve relocated applications after the upgrade in most cases. Users can always revert the relocation by installing software back to its original installation location.
PickMeApp supports relocating applications on all Windows operating systems with NTFS drivers, starting from Windows XP SP3 and up. By using PickMeApp to move applications on another disk, users will effectively free up 95-99% of system disk space that was previously occupied by installed applications. In future releases, PickMeApp will provide a solution for freeing even more space, which will further prolong the life span of Windows computers with small SSD disks.
11.1 Relocation settings
11.1 Relocation settingsTo enable the relocation feature, select a destination drive in the Relocation Tab of the Settings menu. The destination drive is used as the destination for relocated application files and folders.
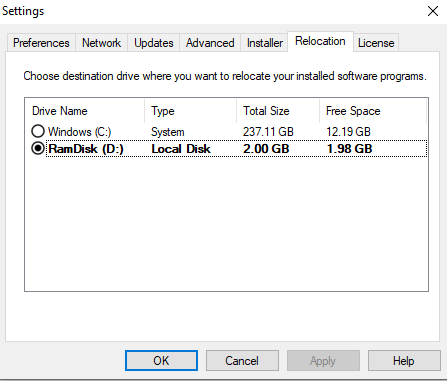
The Relocation settings tab shows a sorted list of compatible drives available on the computer. The first drive on the list is the drive with the most available storage space. The drive that is currently chosen as the destination drive is show in bold.
The list does not include non-NTFS and removable drivers. No drive can be chosen if there is only one compatible drive available on the computer, and the relocation feature is disabled. A driver without free space cannot be chosen as a destination drive.
Note: The relocation feature is enabled on computers with two or more non-removable NTFS drivers.
Select the destination drive in the drive list and press the “Apply” or “OK” buttons to save your choice. From that point on, any new relocations are done on that destination drive. The PickMeApp Session log will then show the following message:
“Drive <name of drive><Disk Label:> was chosen as relocation destination.”
Note: If a destination driver was deleted, select a new destination drive to enable the relocation feature.
11.2 Relocate installed Application
11.2 Relocate installed ApplicationRelocate Single Application
Once a destination drive is chosen, you may start the relocation of a single application by pressing the “Relocate” button available on the Application Bar of any installed application (Qualified and Non-Qualified).
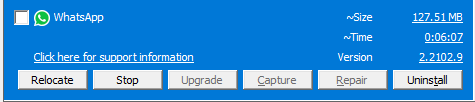
Note: You cannot relocate an application that is originally installed on the destination drive (e.g., disk C:).
PickMeApp starts the relocation of an installed application by ending all running application processes. Please make sure you have saved all application documents prior to starting the relocation process.
The relocation may last from a few seconds to several minutes, depending on the size of the application and speed of the source and destination drivers. In some cases, you may experience a short period of desktop flickering. This happens when PickMeApp is trying to release some locked files prior to the relocation.
Note: It is important that during relocation, the computer is not accidentally switched off (e.g., pressing the power button), otherwise the application may end up in a non-operational state.
Software suites (e.g., Microsoft Office) are handled as a single application. All applications in a software suite are relocated at once.
In some cases, you may be prompted to restart your computer and to run PickMeApp again to finalize the relocation of applications. You may restart computer once per several relocations.
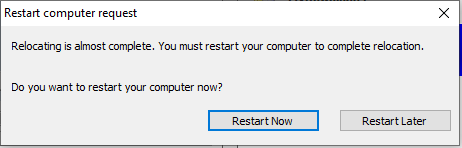
Make sure to run PickMeApp again after the computer restarts. PickMeApp Light and portable PickMeApp Pro users must manually run PickMeApp again. PickMeApp Pro users that enabled starting PickMeApp during computer startup will have the PickMeApp automatically restart.
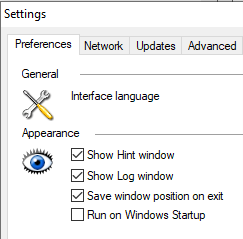
Relocate Several Applications
PickMeApp Pro can relocate several selected installed applications at once.
Select the applications that you want to relocate and press the “Relocate” button available on Qualified and Non-Qualified applications profiles. The selected applications are now relocated one by one. You can stop or skip the relocation of applications during the process.
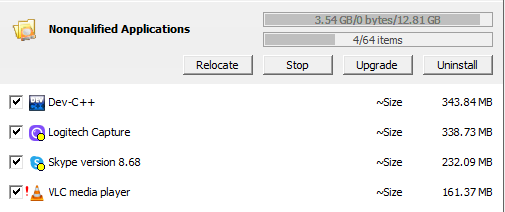
Make sure to restart the computer and run PickMeApp again if at least one application relocation requires a computer restart.
Relocated Applications Filter
You may find relocated applications by applying the <relocated> filter in the Filter Bar.
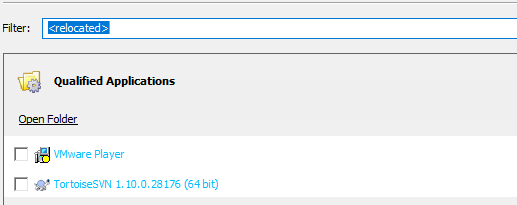
The <relocatable> filter helps find applications that can be relocated to the destination drive. The filter excludes applications that are installed on the current destination drive (e.g., disk C:).
Relocated Applications Info
To see detailed information about a relocated application, click the “Support information” link at the Application Bar, along with other detailed info about the application the dialog provides:
- The size of the relocated folders (the freed-up space from the original disk)
- The destination drives.
- The relocated folders and their status
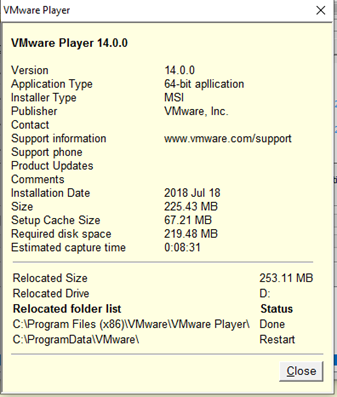
11.3 Remain Relocated Application
11.3 Remain Relocated ApplicationRemaining applications means to return application folders to their original location after relocation.
After an application is successfully relocated, the font color of each relocated application is changed to blue font and the Relocate button is changed to the Remain button.
Note: The Remain button is disabled for relocated applications waiting for a computer and PickMeApp restart.
The Remaining action is very similar to the relocation of application. The remaining process may last from a few seconds to several minutes, depending on the size of the application and speed of the source and destination drivers. In some cases, you may experience a short period of desktop flickering. This happens when PickMeApp is trying to release some locked files prior to remaining the application.
Remaining applications may require restarting the computer to clean up the remaining data from the relocation. In such cases, PickMeApp prints information message inside the Session Log. The “Restart” pop-up is not shown.
Note: The remaining application fails with an error message if there is not enough space left on the original drive.
Note: You can only remain applications one at a time. There is no batch mode available for remaining applications.
11.4 Creating System Restore Points
11.4 Creating System Restore PointsWe strongly recommend creating Windows Restore Points prior to relocating an application. PickMeApp Pro users have access to the “Create Restore Points per PickMeApp Action” feature described here: (link).
To learn more about how to create Windows Restore Points, follow this link: (link).
11.5 Command Line Interface for Relocate
11.5 Command Line Interface for RelocatePickMeApp Pro users can run relocate and remain actions using command line. Two new CLI switches "/r" and "/m" are available to relocate and remain applications (see the PickMeApp CLI for more info).
It is possible to relocate a previously relocated application to another drive by using CLI. This option is not available via PickMeApp UI.
11.6 Managing relocated applications
11.6 Managing relocated applicationsRunning and Closing relocated applications
There should be no difference in running or closing a relocated application. You can create shortcuts and add them to the start menu the same way as you would with a non-relocated application.
Uninstalling relocated application
The best way to uninstall a relocated application is to use the PickMeApp Uninstall Feature described here: (see link)
To allow a proper clean up after uninstalling a relocated application, make sure that PickMeApp is running during the uninstall process.
In a case when a relocated application was uninstalled while PickMeApp was not running, the application’s relocated files and folders might be left on the destination folder. A manual cleanup will be required in this scenario.
Upgrading relocated application
There are two scenarios for application upgrades:
- The upgrade setup overwrites application files by using new files without altering folder locations. The PickMeApp Relocate feature is designed to support the process in this case. The upgraded application is still relocated after the upgrade, although some new application folders might not be relocated.
- The upgrade setup uninstalls the old application and then installs the new application version. Currently, PickMeApp cannot distinguish that scenario from a regular uninstall. The newly installed version of the application is not relocated. To keep the application relocated, repeat the relocation process.
11.7 Relocation Feature Troubleshooting
11.7 Relocation Feature TroubleshootingIf you need to contact PickMeApp support about relocation or remain installed applications , please provide PickMeApp Support with the following files:
- Log files located at %appdata%\PickMeApp
- GDPR records located at the hidden folder $PmaData at %systemdrive%
12. PickMeApp as Application Launcher
12. PickMeApp as Application LauncherPickMeApp as Application Launcher
In line with our goal to make PickMeApp the ultimate Windows Application Manager for everyone, PickMeApp is adding a new capability of launching and terminating installed applications with just one click.
PickMeApp’s detailed knowledge of application components allows PickMeApp to locate and start any executable of the installed software on your PC. PickMeApp can also identify and terminate any running process of the selected application on demand. PickMeApp even handles hidden application services running in the background that are consuming computer resources.
You can manage an application’s start and stop by using the “Start” and “Stop” buttons on the PickMeApp application bar. Also, you can terminate several applications at once by using the “Stop” button on the System profile bar.
If an application has a single executable, PickMeApp shows those buttons with normal text. If an application has several executables or services, the “Start” and “Stop” buttons are shown in bold text.
If several executables belong to the same application, PickMeApp allows users to choose which executable to start or to stop. PickMeApp groups these executables by type to simplify their management. The essential application executables can easily be reached by one click. Rarely used executables are grouped together by default.
Alongside with starting executables, PickMeApp starts any essential application services needed to run those executables. On the other hand, it is possible to completely terminate all of an application’s processes and services to save computer resources.
PickMeApp provides detailed application info about application executables, services, running statuses and whether they are setup to run after computer startup. PickMeApp allows you to filter and select several running applications for batch management .
PickMeApp CLI interface is extended to support starting and stopping of applications from the command line.