PickMeApp can relocate an installed application or several installed applications at once from one storage device to another on the same computer.
Note: To know which of the applications installed on your computer can be moved or relocated to another location, use the <relocatable> filter.
During relocation, PickMeApp calculates required disk space, identifies application folders that are safe to relocate, moves applications folders to the new destination, cleans up leftover data and confirms application integrity after relocation. PickMeApp may undo any unsuccessful relocation and keep the computer save state throughout the relocation process. In some cases, restarting the computer and running PickMeApp again is required to complete a relocation.
Relocated software works seamlessly with management operations such as running, terminating, capturing, uninstalling, and upgrading installed software. After uninstalling an application, PickMeApp will cleanup any leftover application data and preserve relocated applications. Users can always reverse the relocation by recovering the software and putting it back in its original location.
PickMeApp supports relocating applications on all Windows operating systems with NTFS storage systems, starting from Windows XP SP3 and up. By using PickMeApp to move applications on another disk, users will effectively free up to 99% of system disk space that was previously occupied by installed applications. In future releases, PickMeApp will provide a solution for freeing even more space, which will further prolong the life span of Windows computers with insufficiently sized SSD disks.
PickMeApp starts the relocation of an installed application by ending all running application processes. Make sure you have saved all application documents prior to starting the relocation process.
The relocation may last from a few seconds to several minutes, depending on the size of the application and speed of the source and destination drivers. In some cases, you may experience a brief period of desktop flickering. This happens when PickMeApp is trying to release some locked files prior to the relocation.
WARRNING! During relocation, take care that you do not accidentally switch off the computer e.g., pressing the power button, otherwise the application may end up in a non-operational state.
Software suites, e.g., Microsoft Office, are managed as a single application. All applications in a software suite are relocated at once.
In some cases, you may be prompted to restart your computer and run PickMeApp again to finalize the relocation of applications. You may restart the computer once per several relocations.
Note: PickMeApp will attempt to stop the application before relocating it. However, if you encounter any issues during the process, you may want to stop the application first before attempting to relocate it again.
Setting a Destination Drive
You need to set a destination drive for applications to be relocated prior to using PickMeApp’s Application Relocation feature.
To set a destination drive for applications to be relocated:
- Click Settings on the Main Toolbar (see The PickMeApp Pro User Interface)
- On the Settings window, click the Relocate tab.
- Select the destination drive.
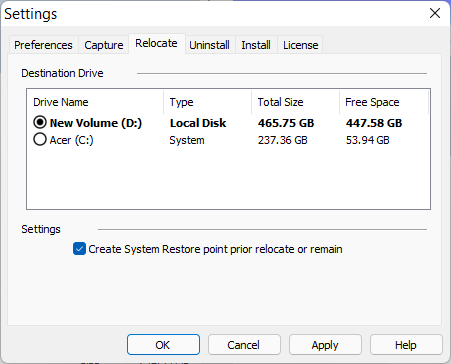
- Click Apply. A message saying that the drive has been chosen as the relocation destination appears on the Session Log.
Note: Only non-removable NTFS disks will be listed as destination storage suitable for relocation.
- To let PickMeApp create a system restore point prior to relocating an application, check the Create a System Restore Point box.
Note: For the Create System Restore point setting in PickMeApp to work, system protection must be turned on for the source disk, or the drive from where the application is being relocated.
Relocating a Single Application
After setting the destination drive, you can start relocating applications.
PickMeApp starts the relocation of an installed application by ending all running application processes. Make sure you have saved all application-related documents prior to the relocation.
The relocation may last from a few seconds to several minutes, depending on the size of the application and speed of the source and destination drivers. In some cases, you may experience a brief period of desktop flickering. This happens when PickMeApp is trying to release some locked files prior to the relocation.
Warning!
During relocation, take care not to accidentally switch off the computer. Otherwise, the application may end up in a non-operational state. To ensure that you can reinstall the application in case of issues, you may want to back up the application first by packaging it with PickMeApp.
Software suites, e.g., Microsoft Office, are managed as a single application. All applications in a software suite are relocated at once.
In some cases, you may be prompted to restart your computer and to run PickMeApp again to finalize the relocation of applications. You may restart the computer once per several relocations.
Note: You cannot relocate an application that is already installed on the destination drive.
To relocate a single application:
- Search for the application to relocate from Installed Applications panel.
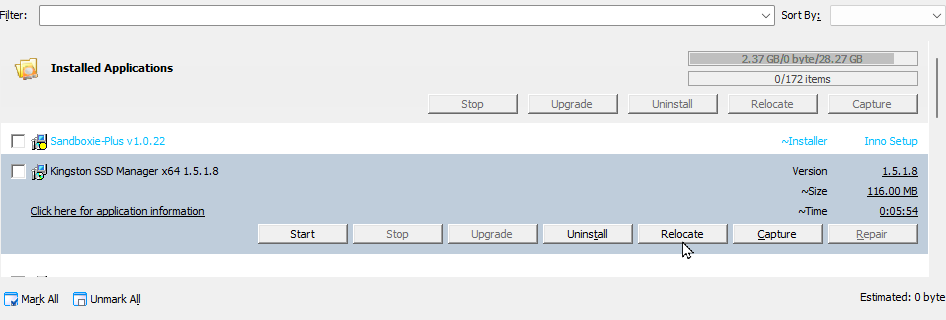
- When you find the application, click it to open its Expanded view.
- Click Relocate to start relocating the selected applications to the designated destination drive (see Setting a Destination Drive). The Progress Bar shows how far you are into the Relocate process. The Log Window also displays the status of the current session.
- Once the relocation process is done, the Progress Bar is refreshed/cleared and the Current session tab under the Log Window displays a Relocating Product process finished entry. When you run the application the next time, it should start from its new location on the designated destination drive.
Relocating Multiple Applications at the Same Time
PickMeApp can relocate several applications at the same time.
To relocate several applications at once:
- Search for the applications to relocate from Installed Applications panel.
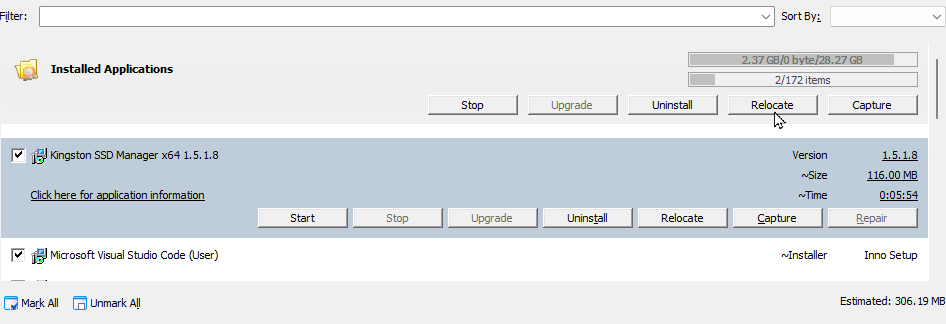
- When you find the applications, check the boxes to the left of the applications to be relocated. Alternatively, you can filter the list and narrow it down to the applications you want to relocate (see Filtering Installed Applications).
- On the Installed Application panel, click Relocate to start relocating the selected applications to the designated destination drive (see Setting a Destination Drive). The Relocate button is enabled when you mark/select one or more applications in the source panel.
- During the Relocate process, the Progress Bar shows how far you are into the process. The Log Window also displays the status of the current session.
- Once the Relocate process is done, the Progress Bar is refreshed/cleared and the Current session tab under the Log Window displays a Relocating Product Process finished entry. When you run any of the relocated applications the next time, they should start from their new locations on the designated destination drive.
Note: Restart the computer and run PickMeApp again if at least one application relocation requires a computer restart.
Relocated Applications Filter
You may find relocated applications by applying the <relocated> filter in the Filter Bar.
Relocated Applications Info
To see detailed information about a relocated application, select the Click here for application information link on the Application Bar. The detailed application info available via this link includes:
- The size of the relocated folders (the freed-up space from the original disk)
- The original and destination drives.
- The relocated folders and their status
Restoring a Relocated Application
To restore a relocated application means to return the relocated application’s folders back to their original location. This transfers the application back to its original location.
After an application is successfully relocated, the font color of each relocated application is changed to blue and the Relocate button on the Application Bar is changed to the Restore button.
Note: The Restore button remains disabled for relocated applications waiting for a computer and PickMeApp restart.
The Restore action is like relocating an application. The Restore process may last from a few seconds to several minutes, depending on the size of the application and speed of the source and destination drivers. In some cases, you may experience a brief period of desktop flickering. This happens when PickMeApp is trying to release some locked files prior to restoring the application.
Note: The application being restored fails with an error message if there is not enough space left on the original drive.
Restoring applications may require restarting the computer to clean up restored data coming from the relocation. When this happens, PickMeApp prints the information on the Session Log. Since there is no Restart computer message that appears on your screen, make sure to check the Session Log every time you try restoring an application.
Note: You can only restore applications one at a time. Batch mode is not available for restoring applications.